
 Lessons: 23Length: 2.5 hours
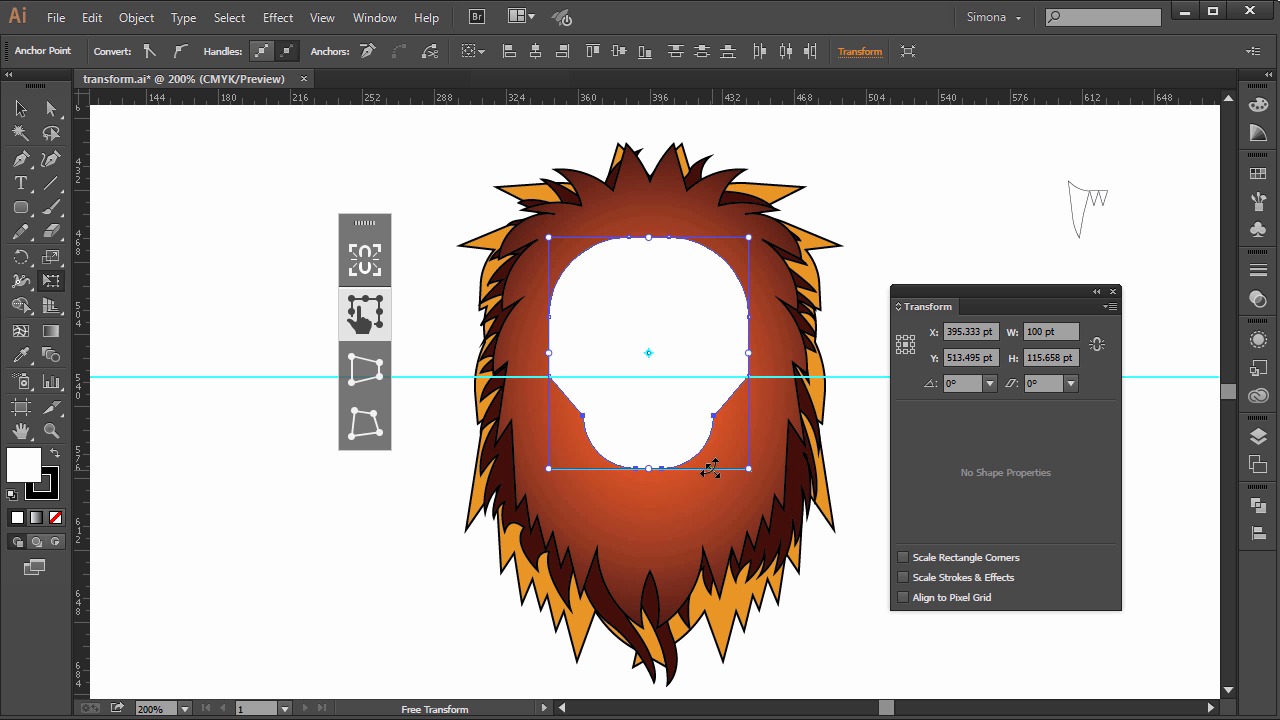
- Overview
- Transcript
4.2 The Transform Tools
Let's learn how we can transform a shape, introducing the new dynamic corner features and what kind of tools Illustrator has to offer for reshaping objects.
1.Introduction
1.1Introduction01:24
2.Program Overview
2.1Workspace and Document Setup07:21
2.2Adobe Illustrator Tools07:34
2.3Art Boards09:04
2.4Pixels vs. Vector, and the Vector Path Explained10:41
3.Drawing Shapes and Lines
3.1Creating Shapes07:38
3.2Making Lines06:03
3.3Drawing Tools07:42
3.4The Pen Tool08:34
4.Manipulating Shapes and Lines
4.1Select, Align, and Group05:30
4.2The Transform Tools10:24
4.3The Cutting Tools05:37
4.4Special Transform Tools09:27
5.Colors and Effects
5.1The Color Panel09:25
5.2Patterns08:31
5.3The Live Paint Tool06:41
6.The Type Tool
6.1The Type Tool05:23
6.2Formatting Text04:36
6.3Special Text Techniques04:53
7.Save, Export and Print
7.1Saving Your File03:04
7.2Exporting Your File03:00
7.3Printing Your File03:49
8.Conclusion
8.1Conclusion01:35
4.2 The Transform Tools
Hi my name is Simona and welcome to tuts+. You are watching the course, The Fundamentals of Adobe Illustrator and this is lesson, The Transform Tools. In this lesson we learn how we can transform a shape, introducing the new dynamic corner features and what kind of tools illustrator has to offer for reshaping objects. So let's open the exercise file called Transform from your search file folder. I created a layer with the shapes from the previous lesson. Then the layer with the eye we created earlier. And two teeth I created with the Pen Tool. Those shapes are fairly easy and I am sure after the Pen Tool exercise you are very good with the Pen Tool now and you can recreate them. So let's get right on it. Let's create a new layer by clicking on the icon here in the layer panel and then we double click it so we can rename it. So let's call it face. As you can see, we have no face yet for the lion, and you might wonder why. Well you learned a lot about the basic shapes, the drawing tools, and the Pen Tool. Now what we want to do is put those tools to use and learn how we can transform and reshape them. So let's create a rounded rectangle shape. So we will select the tool for the rounded rectangle, and then we click once on the art board, and we set 100 points for the width, and 140 points for the height, and the radius to 40 points. The default colors are white fill and black stroke. We can leave this for now. Now let's open the Transform Tool panel. If you don't have it open, you can find it under window > transform. In Adobe Illustrator CC, we have a new tool called dynamic corners. And what that means is that we can easily change the properties of the corners. We can change them how they look and the size of them. As you can see when we select the shape, we can change the corners all together. Or if you untick the link here, we can set them individually. Then we can rotate the shape here or even change the width and height proportionally. And then we can skew the shape as well. But it gets even better. We can free transform the corners, too. When we select the shape with the selection tool, we will see four small circles, and when we click on them and drag them, we can change the size of the corners on all four simultaneously. But if we use the direct selection tool and then click on one of the anchor points and then drag on one of the circles, there we can change the corner on just one side. Of course, we can call up the free transform tool as well over here in the toolbar and resize the shape. Or resize it when we click the Shift key proportionally. And if you click the Shift key and the Alt or Option key on the Mac, we can resize it from the center out proportionally. You can also use the scale tool and when we double-click it, in the pop up window, we can set our dimensions. But let's reshape the rectangle so it will become the face of the lion. We need to turn on the smart guides > ruler by clicking Ctrl or Cmd+R on a mac. Or we can go to view > show ruler. Quick tip here, if you ever need to switch your ruler to another unit of measure, just right-click on the ruler here and you can choose a different measure system. Now lets drag out a guide from the ruler, horizontally. Just click and drag a guide down to the middle. Then we select the Pen Tool and we add two more anchor points to our rounded rectangle on each side. We replace the guide. The smart guides will help us to place them correctly. Now we select the Lasso Tool, and then we will select the bottom anchor points just like this. Then we select the Free Transform Tool, and then we will get this new window here on the side. Its like a flyout. It shows us that we are using the Free Transform Tool. Then we want to scale the bottom part of the rectangle and since we selected only the anchor points on the bottom we can just transform those. Now let's hold down the Shift key and the Alt key, or Option key on the Mac. And then we move over the bottom right corner of the Transform toolbar. And you see will a double arrow and a curved arrow. That means we could rotate the shape and if you were on the corner point, see when I move away, I can just see the curved double arrow. But when I'm directly on the corner point of the transform bounding box, I can scale the shape. Now let's scale it smaller by moving the mouse upward and remember the Shift+Alt, or Option key on the Mac, are still pressed. See what happened? Only the selected anchor points and the path segments connected are getting scaled. Now let's scale it to about here, and then we let go of the Shift+Alt, or Option key and move the center point here, and we will see two double arrows. One for up, and one for down, and one for left, and one for the right, as you can see. We can either shear it, or stretch, or shrink it. So let's stretch it to about here, and then we'll let go. Now we created a base for the lion's face, and we only used a rounded rectangle and the Free Transform Tool and the Pen Tool to add two anchor points. We talked earlier about the dynamic round corners. I would like to show you another neat trick we can use. When we zoom in onto the face here, and look at the corner point here, we see that it's quite a sharp corner. Now when we select with the Direct Selection tool, the anchor point. And then we click once on the anchor point so we see the circle. We can then drag the circle and then we will see the little quarter circle icon, knowing that when we are about to move the mouse we will start adding a corner to this anchor point. We can also double click it and set an exact radius in the pop-up window or change the corner and the type of rounding. So let's put 40 points for the radius and click OK. Let's do this on the other side too. So we will select the anchor point again. And then we click and drag. And then watch the number in the grey area increasing, the more I pull away. If we then select the anchor point again, we can see that we now have control handles as well. But just in case, we can still select the circle and pull back again to remove the corner. Now I'd like to show you how to easily reflect the shape. I already have placed one eye that we earlier created with the Paintbrush and the Blob tool. Let me select it and move it onto the face on the right side. Now there is no need to redraw it. We can just make a copy of it. So let's drag out a vertical guide from the ruler and place it into the middle of the lion's face. Then we select the eye and then we will go and select the Reflect Tool over in the toolbar. The Reflect Tool is hidden underneath the Rotate Tool. So we press on the Rotate Tool and then in the flyout, we select the Reflect Tool. The shortcut for the reflect tool is O. We click then once in the middle of the lion's face and then we see a black arrow. Now if we start to click and hold the mouse key and then move the cursor, you can see that we are reflecting the original eye shape. But when we press the Alt or Option key as well, you will see a double arrow, which means we are making a copy of the original shape. And then if we hold the Alt or Option+Shift key, and move the mouse, we will reflect it in 45 degree increments. And that way, we can make a perfect reflected copy of the eye. So let's do this now. Now one more thing about transforming shapes. You can, of course, also rotate shapes with the Rotate Tool. I have already created a set of teeth here, and these were created with the Pen Tool and I used the Reflect Tool to duplicate the bigger tooth here. Now we need, of course, another set of teeth for the bottom of the lion. Let's select the teeth group, and then we go back and select the Rotate Tool here in the toolbar. Now we click once below the teeth in the middle, and just like we did with the Reflect Tool. Then we hold the Shift key and the Alt or Option key and then drag the cursor. We will make a copy of it. And now we have made a copy and rotated it by 180 degrees. All we have to do now is scale the second group of teeth with the Scale Tool. So, the Scale Tool is over here and looks like this. So, we double-click on the Scale Tool in the toolbar and then in the dialogue box that pops up, we type 75% for the uniform scale, and then we check the Preview tick here. We can see that 75% of the original size is good enough for now, so let's click OK and then move the second group of teeth a little bit up, and that's it. We are at the end of this lesson. We covered quite a bit of tools that help us transform shapes and objects from scaling up or down to rotating, shearing, or reflecting. And we learned about the dynamic corners and how we can make use of them. So let's move on to the next lesson and learn about the cutting tools and illustrator.


