
 Lessons: 23Length: 2.5 hours
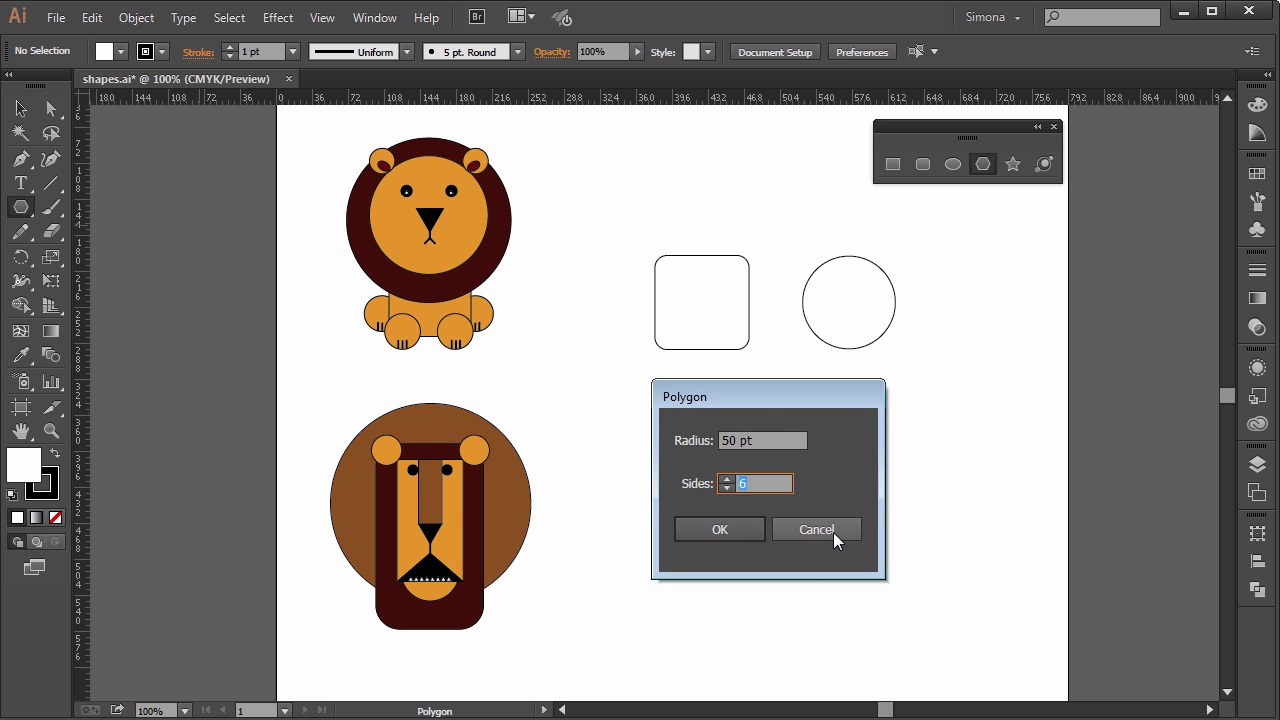
- Overview
- Transcript
3.1 Creating Shapes
Now we will explore the shape tools Adobe Illustrator has to offer, and how to apply them to create a simple lion illustration.
1.Introduction
1.1Introduction01:24
2.Program Overview
2.1Workspace and Document Setup07:21
2.2Adobe Illustrator Tools07:34
2.3Art Boards09:04
2.4Pixels vs. Vector, and the Vector Path Explained10:41
3.Drawing Shapes and Lines
3.1Creating Shapes07:38
3.2Making Lines06:03
3.3Drawing Tools07:42
3.4The Pen Tool08:34
4.Manipulating Shapes and Lines
4.1Select, Align, and Group05:30
4.2The Transform Tools10:24
4.3The Cutting Tools05:37
4.4Special Transform Tools09:27
5.Colors and Effects
5.1The Color Panel09:25
5.2Patterns08:31
5.3The Live Paint Tool06:41
6.The Type Tool
6.1The Type Tool05:23
6.2Formatting Text04:36
6.3Special Text Techniques04:53
7.Save, Export and Print
7.1Saving Your File03:04
7.2Exporting Your File03:00
7.3Printing Your File03:49
8.Conclusion
8.1Conclusion01:35
3.1 Creating Shapes
Hi, my name is Simona, and welcome to tuts+. You are watching the course, the Fundamentals of Adobe Illustrator, and this is lesson, Creating Shapes. In this lesson, we will explore the shape tools Adobe Illustrator has to offer, and how to apply them for a simple line illustration. So, let's get started. Open up Adobe Illustrator CC. And open the work file, Shapes, in your source file folder. As you can see, I created two basic simplified lion illustrations for you. So we can easily understand how we can, with a few shape tools, create a simple illustration. This way, you will get a good understanding of the shape tools. Shapes are really the basic tools that we can use to draw a vector object. So, let's look at the tools here in the toolbar over on the left. In this section here, we can find the drawing tools. And then you click on the Rectangle tool here, and hold down the mouse key. We can see how all those other tools are within this group. So let's separate the panel and explore most of those tools. First is the Rectangle tool, and the shortcut is M. So when we select it, and then click on the Artboard, we can start drawing a rectangle just like that. The default colors are white for the fill and black for the stroke. So if we create another one, but hold down the Shift key, we will constrain the rectangle and the result will be a square. Neat, isn't it? The point of the origin when drawing the square, or any other rectangle, is more or less the point where you will click. See in this case, from the top left, out down, if I pull it towards, downwards with the mouse. Now, if you hold the Shift and the Alt key, or Option key on the Mac, we will draw a square from the middle or center outward. Just like that. Now, here's another small trick. So, we are creating a square from the center out by holding down the Shift key and the Alt key, or the Option key on the Mac. And if you clicked already, and now you want the square to be in another location on the Artboard, we'll just hold down the Space bar, too. And then move the square to the position you want it to be. Then when you're happy with the position, release the Space bar, and boom. Now you can resize it again. Of course, you still have to hold the Shift key and the Alt, or Option key. Now we know how to create rectangles and squares, but you can also create an exact size of a rectangle or square. If we select the Rectangle tool again, and then click once on the Artboard, a dialogue box pops up where we can put exact dimensions. For example, let's create a square 50 points by 50 points. So, we select the Rectangle tool, click once, then we type 50 points by 50 points, and click OK. Of course, the same will work for a rectangle, just set the dimensions you would like to have. The other drawing tools in your group here work pretty much the same, like the Rounded Rectangle tool. We can just draw one like this, or we can click once and set the dimensions of the corner radius. Then we have the Ellipse tool. We can create ellipses, or if you hold down the Shift key, a circle, either from the click point on, or from the center point, if you hold down the Alt key or Option key as well. The Polygon tool will have a default of six sides, which is called a hexagon, and always draws out from the center. When we click once, we can change the number of the sides and the radius, but all sides will always have an equal length. We can make a triangle or octagon, for example. The same way works the Star tool. We can set the radius 1, and radius 2, and the number of points. The Flare tool is an odd one, and I won't go into detail here. But as you can see, it makes flares. So, let's look at the two basic illustrations. The first lion is mostly made with the Ellipse tool, and the Rectangle tool, and the Polygon tool. First, we take the ellipse and we create a circle. Remember, hold down the Shift key and the Alt, or Option key, and start drawing a circle. Then, we need another one. Same way, but do you remember when we hold down the Space bar, we can position it, and if it's too small after letting go of the Space bar, we can just resize it. After that, we create two more circles for the eyes, one for the left, and one for the right, and maybe a pupil here, and then another one over there. Then we use the Rectangle tool and make the body. Illustrator works in objects, as you remember, so now the rectangle is in front of the circles here. We can easily rearrange it by right-clicking on it and then choosing sending either to the back or to the front. But we will explore this feature more in detail in another lesson. But just so you know that you can arrange objects around, not just from the left to the right, or the top to the bottom, but also in front, or to the back. Then we make two more circles for the paws, just like that. Next, we can add a nose with the Polygon Tool. Let's select it and then click once, and we change the sides to 3, the radius about 15 points. Then I can rotate it with the Transform tool. A few more circles for the ears and some tiny rectangles for the mouth with the help of the Rotate tool. Don't worry about the transforming and rotating. Just play around with the shapes so you can get a good hang of them. The next basic lion object is pretty simple too. First, we need a big circle, then a rounded rectangle. So select the Rounded Rectangle tool, and draw a shape just like this. Then we need another long rectangle, then some eyes. So let's create two circles, and then two for the ears. Then another rectangle for the nose, and another triangle with the Polygon tool. And just because we are added another one for the mouth, just a much bigger one. We can connect the nose and mouth with a long rectangle, and let's create another small circle for the chin and arrange it to the back. Now we are almost finished. We only need some teeth. So, one more time, the Polygon tool. Let's set the radius to five points and then we repeat this four times. Then we place them onto the mouth, one by one, with the Selection tool, and this is it. Don't worry about color for now. We will discuss colors and color themes later on. We just want to get a good understanding of the shape tools Illustrator has to offer. And this is it for this lesson. I think we have a pretty good understanding of the shape tools, and how we can create basic simple shapes with Illustrator. So let's move on to the next lesson, and explore the line tools, and how to make use of them.


