
 Lessons: 23Length: 2.5 hours
- Overview
- Transcript
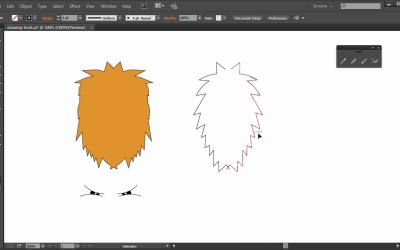
3.3 Drawing Tools
Let's now explore the Pencil Tool, the Blob Tool, and the Paint Brush Tool.
1.Introduction
1.1Introduction01:24
2.Program Overview
2.1Workspace and Document Setup07:21
2.2Adobe Illustrator Tools07:34
2.3Art Boards09:04
2.4Pixels vs. Vector, and the Vector Path Explained10:41
3.Drawing Shapes and Lines
3.1Creating Shapes07:38
3.2Making Lines06:03
3.3Drawing Tools07:42
3.4The Pen Tool08:34
4.Manipulating Shapes and Lines
4.1Select, Align, and Group05:30
4.2The Transform Tools10:24
4.3The Cutting Tools05:37
4.4Special Transform Tools09:27
5.Colors and Effects
5.1The Color Panel09:25
5.2Patterns08:31
5.3The Live Paint Tool06:41
6.The Type Tool
6.1The Type Tool05:23
6.2Formatting Text04:36
6.3Special Text Techniques04:53
7.Save, Export and Print
7.1Saving Your File03:04
7.2Exporting Your File03:00
7.3Printing Your File03:49
8.Conclusion
8.1Conclusion01:35
3.3 Drawing Tools
Hi, my name is Simona, and welcome to tuts+. You are watching the course, The Fundamentals of Adobe Illustrator CC, and this is lesson Drawing Tools. In this lesson, we will explore the pencil tool, the blob tool, and the paintbrush tool. So, let's get started. In Illustrator, please open your exercise file called drawing tools in your source file folder. Here we can see the mane of the lion and the eyes. I placed them on a separate layer called template and locked it. You might be already familiar with the layers if you know Photoshop. And with Illustrator, you can of course, create new layers and lock them as well. Above the template layer is another layer called exercise. I will demonstrate the tools on this layer and you can use the layer for your exercises as well. Both objects, the mane and the eye, were created by using the pencil tool, and the paintbrush tool, and the blob tool. So let's start talking about the pencil tool. We can find it here on the left, and a shortcut for it is N. The pencil tool has several hidden tools within its group. So let's separate the tool panel. In older Illustrator versions, the pencil tool was kind of annoying. Whatever you drew looked unrefined, and it was frustrating at times to connect or draw a new path with it. Since Illustrator CC, the pencil tool is much more fun. Let me show you how, so with pencil tool selected, let's draw a mane-like shape. Just like this, just click and start dragging, and once you like go the path will be selected. Now if you wanted to continue drawing, all we have to do is pay attention to the little sign next to the pencil tool. When you see a forward slash, then we can continue drawing, and the path will continue as one. It kind of reconnects it. But when we see the asterisk next to it, we will create a new pencil path and it will not be connected to the previous one. As you can see, the path looks quite jaggy. We have lots of angle points. We could use the smooth tool to smooth it out. So with the just drawn path still active, and with the smooth tool selected, we can go over extra anchor points like this, and the path will be smoothed out. But there's even a better way to create a nice, smooth path with the pencil tool now. Let's double click on the pencil tool here. In the dialog box, we can set now the fidelity of the pencil tool. Currently it is set to be accurate, but watch what will happen when we set it to smooth. So let's move the slider all the way to the right, and click okay. Now when we redraw the mane-like path, just like this, look what happened. It's not jaggy, but smooth, and it looks a bit more sophisticated. So let's continue to create the mane. See the forward dash again? We will continue with this path. Since I am a fan of less work, I only drew half of the mane here. Let me tell you a really good shortcut for duplicating shapes. We select the just drawn shape, and then we go to object, transform, reflect. In the pop-out window we choose vertical, click preview, and then we click copy. This will make a reflected copy of the shape. Now we just move it over with the selection tool, and if you have the smart guides on, you can snap it right next to it. And here we have the mane of the lion. Both shapes are not connected though, but in our pencil group we have a tool called the join tool. So all we need to do is select both paths with the selection tool that we want to join, and then we select the join tool, and we click on the area where the paths are not joined together. And boom. The shape is now a closed path. We can erase a path as well with the path eraser tool. When we select the path and click over an area that we want to delete, it will delete this part. It's a bit tricky, but it will do. Next, we have the paint brush tool. Let's separate the tool panel as well. If I select it, and I draw a path like this, it looks a little bit thick. But we can adjust the stroke thickness up here in the control panel. As well as we can set the variable width, profile, and the different brush definitions. I'm just changing the stroke thickness for now to 0.25 points. With the paintbrush tool selected, we can start drawing lines just like this. Now we can create all sorts of lines. The paint brush tool is just like the pencil tool, and it deals with strokes instead of fills. Now let's put the paintbrush tool to use. Let's start with drawing an eye of the lion. So with the paintbrush tool selected, and the stroke set to 0.25, we can start drawing a line just like this, and then another one just below. Doesn't look like much for now, but just wait a minute and we will use a really cool tool for the rest of the eye. Of course you can use the paint brush tool for the mane of the lion as well. Maybe you even like it better than the pencil tool. But remember, once you let go of the mouse, you will create another path that is not connected to the first. Now let's quickly talk about the blob brush. The blob brush is kind of special. Let me show you why. When I stop drawing anything, any shape or form, and then select a shape with the selection tool, I can see that it is a fill, and not stroke. With the blob tool, I can paint. When I paint over a blob shape, I will add that paint to that blob shape. So let's add the rest of the eye with the blob brush. I can increase the size of the blob brush by hitting the left and right bracket keys on the keyboard. So now, I am drawing the eye to the two paintbrush lines just like this. I can add a smaller shape by decreasing the blob brush, and then adding more detail to the eye. Just like this. And all we are missing is a pupil. Now let's add one with the pencil tool. Let's create a shape, one line, two lines, three lines. And the path is closed. Then we flip the stroke to become a fill just by clicking on the arrow here, and then we select a white color for the fill. And this is it, we are now at the end of this lesson. We learned about the pencil tool and it's new features, used the paintbrush tools, and explored the blob brush. Now, these are pretty good drawing tools, and once you are comfortable with them, you will just create about anything you can sketch, or come up with. Now, let's move on to the next lesson and get to know one of the most important tools, in my opinion, the pen tool.


