
 Lessons: 23Length: 2.5 hours
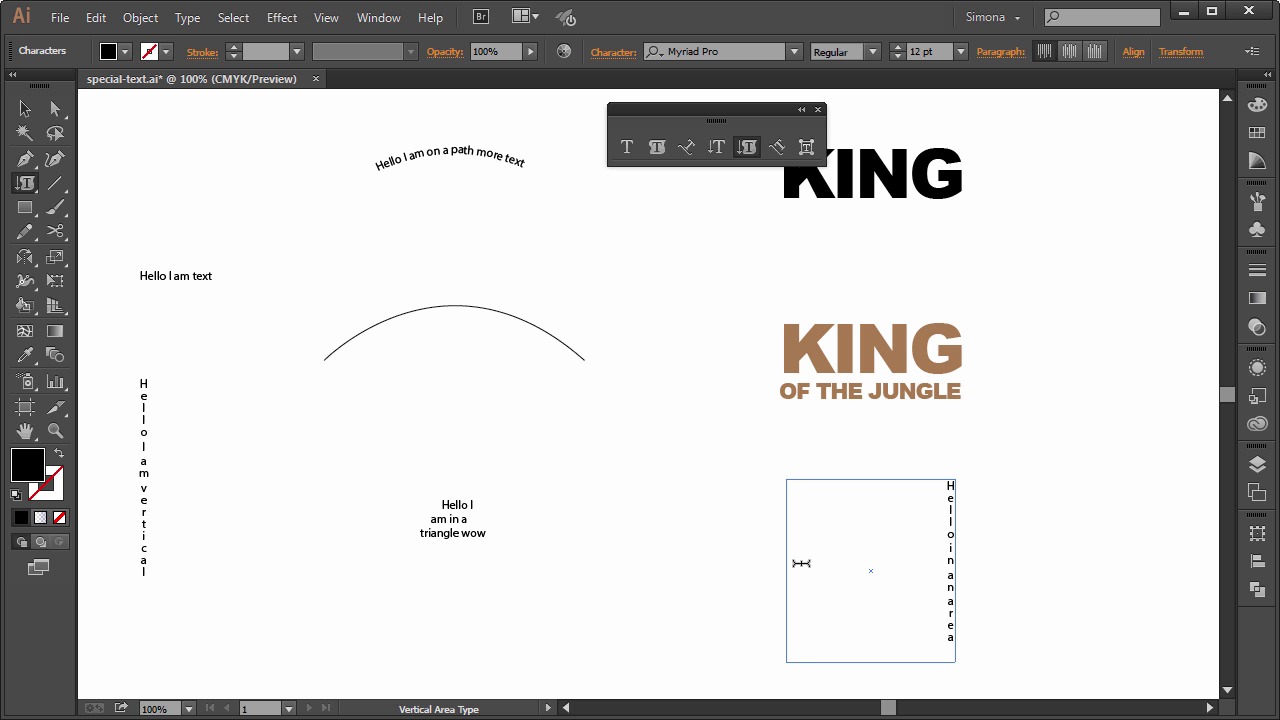
- Overview
- Transcript
6.3 Special Text Techniques
Taking things a bit further with the Type Tool, let's now learn how to use the Type Tool on a path and inside an object, and how to use a new feature, the Touch Type Tool.
1.Introduction
1.1Introduction01:24
2.Program Overview
2.1Workspace and Document Setup07:21
2.2Adobe Illustrator Tools07:34
2.3Art Boards09:04
2.4Pixels vs. Vector, and the Vector Path Explained10:41
3.Drawing Shapes and Lines
3.1Creating Shapes07:38
3.2Making Lines06:03
3.3Drawing Tools07:42
3.4The Pen Tool08:34
4.Manipulating Shapes and Lines
4.1Select, Align, and Group05:30
4.2The Transform Tools10:24
4.3The Cutting Tools05:37
4.4Special Transform Tools09:27
5.Colors and Effects
5.1The Color Panel09:25
5.2Patterns08:31
5.3The Live Paint Tool06:41
6.The Type Tool
6.1The Type Tool05:23
6.2Formatting Text04:36
6.3Special Text Techniques04:53
7.Save, Export and Print
7.1Saving Your File03:04
7.2Exporting Your File03:00
7.3Printing Your File03:49
8.Conclusion
8.1Conclusion01:35
6.3 Special Text Techniques
Hi, my name is Simona, and welcome to tuts+. You are watching the course, the Fundamentals of Adobe Illustrator, and this is lesson, Special Texts Techniques. In this lesson, we will learn how to use the type tool on a path, inside an object and how to use the new feature called the touch type tool. So, let's get started. Open up Adobe Illustrator and the exercise file called Special Text in your source file folder. We played around with the type tool before, and now, I would like to show you what else we can do with it. So, let's separate the type tool panel from the tool panel over here. The first tool is the type tool, remember we selected, then we clicked once and we can start typing. Next, we have the area type tool. It is not like the one we used creating a block of text before. This tool lets us actually add text to a shape or object, and it really places the text inside the shape or object. For example, when we select the tool and then click on the triangle path here, the tool will convert the shape into an area where we can type text. And as you can see, the stroke will not be visible anymore of the triangle. And all the text will be squeezed into this shape. Another often tool that is used is the type on path tool. I created the path for us. Then, when we select Tool and then click on the path, we can start typing on this particular path we've chosen. Then, when we deselect and choose the selection tool, we can drag via these handles the text along this path. And if we choose the type tool again, we can then add more text or take text away as long as the path will hold all the text. We can also add vertical text via this tool here. So, with the vertical text tool selected, we click once and then we can start typing away in a vertical line. Same as the area type tool, we have the vertical area type tool. So, we selected, then click on the path of the shape here and then retype the text. And as you can see, we are start typing vertically and it will all be squeezed into the shape. The next tool is the vertical type on a path. And just like the type on the path tool, it works the same, just vertical. So, we will choose it, and then we click on this path here, and then we will start typing. And then, we have the touch type tool. This tool is new and it's really cool for altering characters within a word. Let me show you. Here, we have the word king. Now, if we wanted to change only one character or even several, but each in a different way, in the past, we would have to outline the text, separate the shapes, and then transform them individually. And we would lose the live text and we wouldn't be able to change the text afterwards. Now, with the new touch type tool, we can do this on the fly. So, here we go. We select the touch type tool, and then we can alter each character however we want. I can select this one, and then rotate it or move it. Then, I select another one. Make it smaller. Rotate it too. And then the next one. And move it as well, rotate a little, maybe a little bit bigger. And the last one, I just rotate and make a little smaller. Now, when I select the type tool again, I can still access the characters and I can change the text. Just like this. Now, just to let you know, why it's called touch type tool. It's because, if you have a touch screen or a Wacom tablet with a touch pad or a Cintiq, you can simply use this tool and touch the characters and transform them right on the screen. Now, isn't this cool, or what? And one more thing before we end this lesson, let me show you quickly how to outline texts and make it into a shape. So, let's select a text here and then we go to Type > Create Outlines. And, now we have shapes. The live text is taken away, so we cannot change the text anymore. But, we can transform now the shape into anything we want. And now, we are at the end of this lesson about special text techniques. So, let's move on to the next lesson and learn how to save our file in different formats.


