
 Lessons: 23Length: 2.5 hours
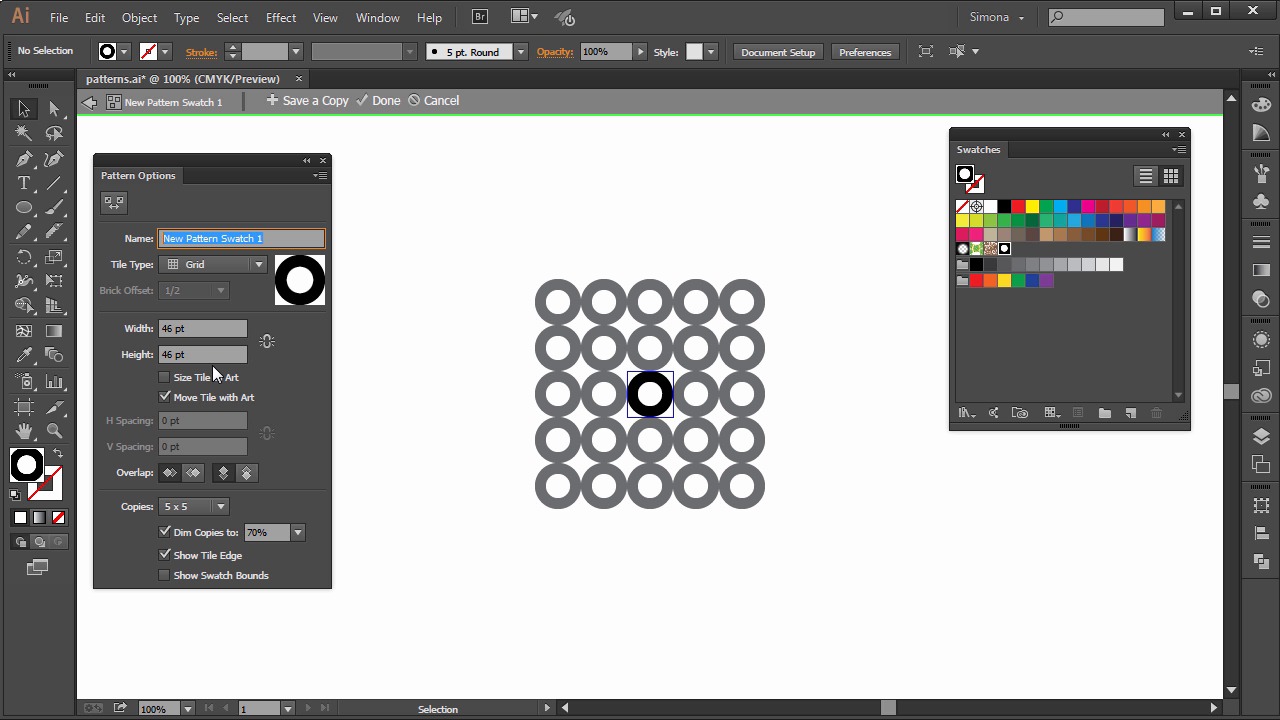
- Overview
- Transcript
5.2 Patterns
In this lesson you will learn how to apply patterns and how to create your own.
1.Introduction
1.1Introduction01:24
2.Program Overview
2.1Workspace and Document Setup07:21
2.2Adobe Illustrator Tools07:34
2.3Art Boards09:04
2.4Pixels vs. Vector, and the Vector Path Explained10:41
3.Drawing Shapes and Lines
3.1Creating Shapes07:38
3.2Making Lines06:03
3.3Drawing Tools07:42
3.4The Pen Tool08:34
4.Manipulating Shapes and Lines
4.1Select, Align, and Group05:30
4.2The Transform Tools10:24
4.3The Cutting Tools05:37
4.4Special Transform Tools09:27
5.Colors and Effects
5.1The Color Panel09:25
5.2Patterns08:31
5.3The Live Paint Tool06:41
6.The Type Tool
6.1The Type Tool05:23
6.2Formatting Text04:36
6.3Special Text Techniques04:53
7.Save, Export and Print
7.1Saving Your File03:04
7.2Exporting Your File03:00
7.3Printing Your File03:49
8.Conclusion
8.1Conclusion01:35
5.2 Patterns
Hi, my name is Simona and welcome to tuts+. You are watching the course to Fundamentals of Adobe Illustrator, and this is lesson patterns. In this lesson we will learn all about how to apply patterns and how to create our own. So, let's get started and open up Illustrator. Please open up the exercise file called patterns in your source file folder. Illustrator comes with tons of patterns that you can access via the swatch panel. You can customize existing patterns, and we can design patterns from scratch using any of the Illustrator tools. Patterns that are used for filling an object are called fill patterns. They're different in design in tiling than the patterns meant for a path drawn with the brushes. It's best to use fill patterns to fill objects. So let me show you how that looks. We can find fill patterns here in the swatch panel. When we create a rectangle and then choose a pattern here in this swatch panel, we first want to make sure that the fill is active. Remember all we have to do is click on the square in the tool panel here or hit X on the key board to make it active. Then when we go to the swatch panel and hover over this swatch here, you can see that it is called foliage. This is one of the default patterns in the swatch panel. Now let's create a rectangle and then make sure the fill is active. With the rectangle selected, you can click on the swatch here, and you can see that the object has been filled with a pattern. Then we select the free transform tool and resize the shape. We can see that the fill of the pattern will be repeated and not stretched. This is one of the key behaviors of patterns. No matter how you transform your shape, the pattern will fill accordingly. Even if you were to rotate the shape with the rotate tool, you will see that the pattern stays in place. But of course we can control that if we wanted to. Let me show you how. Remember the scale or the rotate tool? When we select the shape of the pattern, and then double click on the scale tool, we can set transform patterns next to the transform object take, so let's make the preview visible, and then we tick the transform patterns. Now when we change the uniform scale to 50%, we can see that the object in the pattern is scaled as well. Now when we uncheck the transform object, we can see that only the pattern is scaled. Remember though, if you were to click okay, the setting is permanent, and you will have to reopen the scale option dialog box again to uncheck the transform object, or uncheck the transform pattern. The same happens with the rotate tool. We can double click the rotate tool, and in the pop out window you can check the transform patterns, and then check the preview. And when we select the angle of rotation we can see that the shape and the pattern is rotated. Now, we know that you can select form patterns that come with Illustrator or we can create our own patterns. And it's really pretty easy. So let's create a circle in black with the ellipse tool, and then a smaller circle on top in white, and then we select both and then center them via the control panel up here. Now we select the two circles together, and then we drag them into the swatch panel. See the plus sign appearing close to the cursor? Now we will then go, we just added a new swatch pad to our panel. It's that simple. Make sure nothing is selected on the output for the next step. Now let's double click on the swatch and the pop up window. Which is the pattern objects dialogue box. We can give our swatch a name. So let's call it dot. Then we click done on here and then once again and the window will close. Now when you hover over the swatch, you will see that the name is called dot, just the name that we just gave it. Let's select the shape here and then we will fill it with the newly created pattern. See, your first created pattern appears. Now what if you wanted to change the color of the smaller dot without creating a new pattern? Well, what we can do is we can simply drag the swatch panel onto the outboard. Let's select the just created pattern and drag it onto the outboard just by grabbing it and placing it here. Now this is a group. So remember from the previous lessons, we can access shapes in a group by just double clicking on the shape. And then we can select the shapes within the group individually. So let's select the white circle and then fill it with red. Then we'll leave the group and since we do not want to create a new pattern, we just want to update the existing one. We can just grab the group again and then drag it back into the swatch panel. And then place it on top of the existing swatch. But we need to press the Alt or option key first. And then you will see a hand with a plus sign appearing. And then we need to make sure that the swatch that we want to update is surrounded by a black rectangle. And that means that if we let go now we will have updated the panel that we just created. So let's let go and boom. See, the panel has been updated. Cool isn't it. Now let me show you how you can change a pattern and adjust it with the pattern generator in Adobe Illustrator. I created a few spiral shapes for you. For these, I used a polar grid tool and I'm sure you will have no problem creating your own cool shapes. Or duplicating these here. Another way of creating a pattern is to select the shapes you want to make a pattern of. And then we go to object, patterns, make. Then we will have the pop up window. And then just click OK to this little window over here. Then we can give it a name. So let's call it, discs. And then you can see in the middle here, on the art board, a blue bounding box around the shapes. And then, shapes repeated around them. But they seem to be faded. We can change these here in the bottom. And if we uncheck the dim copies. You can see how the whole pattern tiles and repeats. Now the panel option dialogue box has a hidden feature. It is this button upper here. It is the pattern tile tool. Now if we click it, we see that the volume box in the middle has now 8 handles and now we can change the size of it. And if I do so, see what happens. The tiling changes and either by making it smaller, and the shapes start to overlap or wider and the gap between the shapes increases. It is really up to you how you would like your pattern to look, so let's make it overlapping. So, I decrease the size just like this. I move around a little bit and adjust it so all the shapes will over lap. Then, we click done. And, here's the pattern applied to our shape. And this is it for this lesson about patterns. You can go wild with patterns, create seamless patterns, and change them. Imagine creating your own animal skin or animal fur pattern. I'm sure you might get inspired now. So let's move on to the next lesson and learn about the live paint tool, and how to color our lion illustration with it.


