
 Lessons: 23Length: 2.5 hours
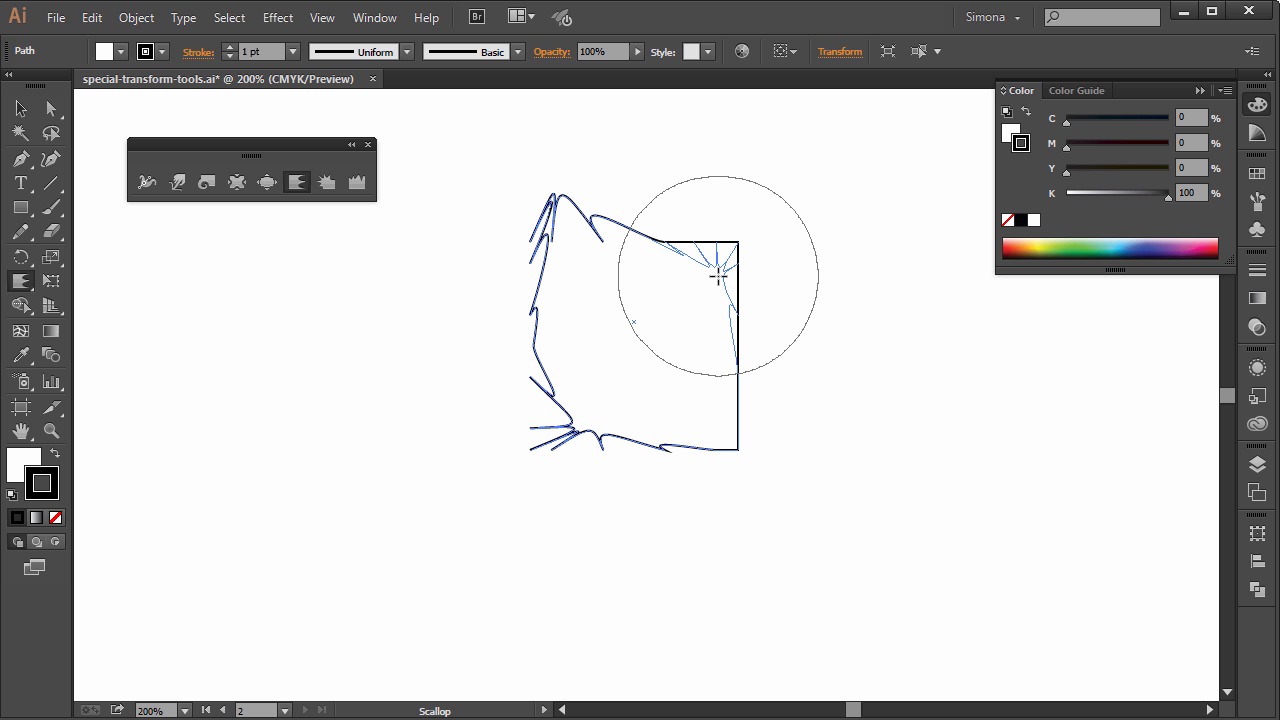
- Overview
- Transcript
4.4 Special Transform Tools
In this lesson you will explore how we can use the special transform tools that Illustrator has. You’ll also learn about life appearances and how we change them on the fly if we want to.
1.Introduction
1.1Introduction01:24
2.Program Overview
2.1Workspace and Document Setup07:21
2.2Adobe Illustrator Tools07:34
2.3Art Boards09:04
2.4Pixels vs. Vector, and the Vector Path Explained10:41
3.Drawing Shapes and Lines
3.1Creating Shapes07:38
3.2Making Lines06:03
3.3Drawing Tools07:42
3.4The Pen Tool08:34
4.Manipulating Shapes and Lines
4.1Select, Align, and Group05:30
4.2The Transform Tools10:24
4.3The Cutting Tools05:37
4.4Special Transform Tools09:27
5.Colors and Effects
5.1The Color Panel09:25
5.2Patterns08:31
5.3The Live Paint Tool06:41
6.The Type Tool
6.1The Type Tool05:23
6.2Formatting Text04:36
6.3Special Text Techniques04:53
7.Save, Export and Print
7.1Saving Your File03:04
7.2Exporting Your File03:00
7.3Printing Your File03:49
8.Conclusion
8.1Conclusion01:35
4.4 Special Transform Tools
Hi, my name is Simona and welcome to tuts+. You are watching the course The Fundamentals of Adobe Illustrator and this is lesson Special Transform Tools. In this lesson, we will explore how we can use special transform tools and how we can use them and learn about live appearances. And how we can change them on the fly, if we want to. So, let's get started and open up Illustrator. Please open your exercise file called special transform tools in your source file folder. We can find transform tools over here in the tool panel and one tool is called Width Tool. And within this group you can find following special transform tools. The Work Tool, the Troll Tool, the Pucker Tool, and below the Blow Tool. And then the Scallop Tool, the Crystallize Tool, and the Wrinkle Tool. So let me separate the panel from the toolbar. You can also find special transform effects if you go to Effect > Distort and Transform, and here we can select from the Free Distort, Pucker and Bloat, Roughen, Transform, Trick Twist, and Zig Zag. But let me talk first about the special transform tools in the Tool Panel. Now let's create a rectangle. The fill is white and the stroke is black by default and it really doesn't matter right now. I only chose those colors so I can show you the tools easier. So let's choose the width tool. And I select it over here. And then if I go over on to our rectangle and click on the path. I see a plus sign. And then if I click and drag I can change the width of that path stroke and give it a special thickness just like that. And if I click over here, then I can apply the same effect to the stroke. All I do is I click and drag, and then I change the stroke width. It's really just pulling it up or down. This is still a stroke, and if I turn off the stroke here in the tool panel, it will disappear. And if I turn the stroke back on again, it is reset like the fact it's not permanent, and by doing this, we can just delete the effect. If I try to drag without clicking on the path, nothing will happen. I also can apply this tool onto the anchor points, like the corner here just like this. And maybe I can apply one down here. I applied this effect to part of the line illustration. Let me quickly show you how we can use it. So I already have a copy in my clipboard of the paws of a lion. And when I paste it onto the art board, we can see that we have a uniform stroke around the claws and it also looks a little bit flat. Now when I select the width tool and then click here on the end point of one of the claws I can change the thickness. And in the control panel I can see that the variable width profile and the stroke has changed. I can reset it via the control panel and switch it back to the uniform. Remember the width tool is not permanent and we can change it back at anytime. Then the next tool is called the Warp Tool. If I select the warp tool, and I start clicking on one of the corners in our square, I can warp the whole shape just by dragging it around. And then I can warp it again and again. You can warp it as much as you want. This tool is permanent though and will change the shape permanently. So let's undo this. Next is the Twirl Tool. Just as the name suggests, it twirls and if I click on the corner here, it makes a little twirl effect. And it keeps twirling as long as I hold down the mouse key. This is permanent as well, and will change the original shape. The next tool is called Pucker Tool. The pucker tool deflates the shape by moving the control points. It sort of swallows everything up, just like you see right now. Then we have the Blow Tool. It inflates the shape. And just like this, it just makes it bigger and bigger, and I can blow it up. Then we have the Scallop Tool. It adds random, curved details to the shape. Next is the Crystallize Tool, which will crystallize corners. And then, one of the last tools, the Wrinkle Tool. And as you can see, when I apply it to the object, it makes wrinkles. So this is it for the special tools here in our tool panel. You can really apply it to any shape. It doesn't have to be square or rectangle. It can be any kind of shape. I just choose a square to make it easy to see what kind of effect these tools create. Now I would like to talk more about the effects we can find under Effect > Distort and Transform. And talk especially about the Pucker and Load, and Graphing Tool and so forth. I already copied to my clipboard the lion shaped face that we created earlier. So let me delete the square here and copy the face onto the art board. Now I would like to put a special effect on this face. So I select it and then go up to Effect > Distortion and Transform > Pucker and Bloat. We will get a pop up window. In there I see on one side Pucker and on the other side Bloat. When I use the arrow in the middle and slide it along, it will give me a percentage. And right now, I don't see anything. So let's take the preview here, and as you can see, if I move it either to the left, I will pucker it, or either to the right, and I will bloat the shape. I decided to give it about minus 28% of pucker, and then I click OK. Now let's try the bloat effect. I go back to the Effect > Distort and Transform > Pucker and Bloat again. But this time I move the slider to the right and use the bloat effect. What is so special about this effect is that they are live. Which means you do not change the original shape. And you can change the settings of the effect at anytime you want. And to do so, all we have to go is over here and open the Appearance Panel on the right. We can also find the Appearance Panel under Window > Appearance Panel. So if you open the appearance panel, the first thing you see here is the pucker and bloat, the stroke, and the fill. Each effect is put on a layer. So if I double click on the pucker and bloat layer, I will get the pop-up renew again and we can change the effect settings. When we click OK, the change effect will be applied to the shape. Now the reason why I showed you those effects is because I already used them for the lion illustration. So let me show you what I have done. In my layers I added three effects. So let me hide them and show them one by one. This is the original lion face shape. In the back we have the main line that we created in previous lessons. Now I created the first effect. So when I go to the appearance panel, it's the zigzag effect. Just as I showed you earlier I can double click it and then we'll bring back the pop-up window of the zigzag and then we can change the settings there. The second effect I used is this one here and then I go to the appearance panel, it is the pucker and bloat. And the third effect, again, is the pucker and bloat. But this time I used bloat instead of pucker. Now let me make the face visible again and as you can see, the shapes with their effects are behind the face of the lion. And this is all about special transform effects. Some are permanent like the tools here in the tool panel. Others are not, like the ones we can find under Effect > Distort, and Transform. And when we apply those effects, we won't change the original shape of our object. And we can easily change the effects settings in our appearance panel. Now, we are at the end of this lesson. We learned about the special transform tools and they can really be helpful to create twisted shapes on the fly. And if you use those effects that are not permanent you can easily reset or trick them and apply it to an object. And all this via the appearance panel. Now let's move on to our next lesson, and give life to our lion illustration, and learn all about the color panel. And how we can apply Gradient, Fill Color, and Distro Color.


