
 Lessons: 23Length: 2.5 hours
- Overview
- Transcript
7.2 Exporting Your File
In this lesson you will learn how to export your file for different programs such as Adobe Photoshop, or for the web.
1.Introduction
1.1Introduction01:24
2.Program Overview
2.1Workspace and Document Setup07:21
2.2Adobe Illustrator Tools07:34
2.3Art Boards09:04
2.4Pixels vs. Vector, and the Vector Path Explained10:41
3.Drawing Shapes and Lines
3.1Creating Shapes07:38
3.2Making Lines06:03
3.3Drawing Tools07:42
3.4The Pen Tool08:34
4.Manipulating Shapes and Lines
4.1Select, Align, and Group05:30
4.2The Transform Tools10:24
4.3The Cutting Tools05:37
4.4Special Transform Tools09:27
5.Colors and Effects
5.1The Color Panel09:25
5.2Patterns08:31
5.3The Live Paint Tool06:41
6.The Type Tool
6.1The Type Tool05:23
6.2Formatting Text04:36
6.3Special Text Techniques04:53
7.Save, Export and Print
7.1Saving Your File03:04
7.2Exporting Your File03:00
7.3Printing Your File03:49
8.Conclusion
8.1Conclusion01:35
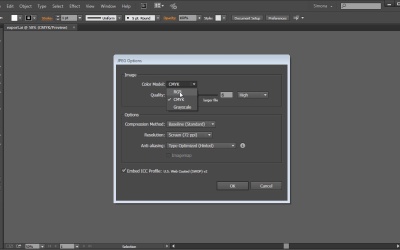
7.2 Exporting Your File
Hi, my name is Simona and welcome to tuts+. You are watching the course, The Fundamentals of Adobe illustrator, and this is lesson Exporting Your File. In this lesson we will learn how to export our file for different programs such as Photoshop or for the web. Let's open up Adobe Illustrator again, and the exercise file called export in your source file folder. So here's our artwork, and what do we need to do to save it as a jpeg, png, or even as a psd file for Photoshop? The Save As options do not offer any of these file formats. So, let me show you what we can do. Let's go to File > Export. And in the window we now have many more file type options available from the list. We can save the artwork now in many more formats. So let's start with the JPEG format first. So we will select the JPEG format from the drop down, then we click Export. Then we are represented with the JPEG option window. Here we can choose from the color model, the quality, the compression method, resolution, either screen, medium or high, and other, and the anti-aliasing. Let's assume we want an RGB, JPEG, high quality, and the screen resolution. Now we can click OK. Now let's export our artwork as a PNG. Same way. We go back to File > Export. Then we choose PNG from the drop down menu as a file format and then we click Export. In the PNG option window we leave it as is and then we will have an artwork with a transparent background. Then we click OK. And last but not least, we will export the artwork as a PSD file so we can open it up in Photoshop. So again, we go to File > Export and then we choose PSD from the drop down as a file format. Then we click Export. And we leave the default as is in the Photoshop Expert Options. Just make sure the Write Layers is checked. Then, we click OK. And now, we have successfully exported our artwork in three different formats. One, as a JPEG. Another one as a PNG with transparent background. And one file is a PSD file for Photoshop with layers. And now we are at the end of this lesson about exporting your file. So let's move on to the next lesson and learn how to save our artwork for print.


