
 Lessons: 23Length: 2.5 hours
- Overview
- Transcript
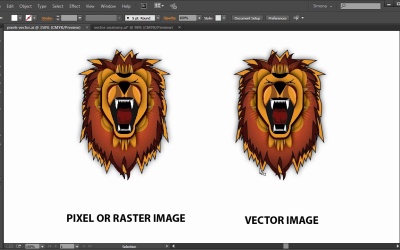
2.4 Pixels vs. Vector, and the Vector Path Explained
In this lesson I will explain the differences between pixels and vectors, and we will explore the vector path and its anatomy.
1.Introduction
1.1Introduction01:24
2.Program Overview
2.1Workspace and Document Setup07:21
2.2Adobe Illustrator Tools07:34
2.3Art Boards09:04
2.4Pixels vs. Vector, and the Vector Path Explained10:41
3.Drawing Shapes and Lines
3.1Creating Shapes07:38
3.2Making Lines06:03
3.3Drawing Tools07:42
3.4The Pen Tool08:34
4.Manipulating Shapes and Lines
4.1Select, Align, and Group05:30
4.2The Transform Tools10:24
4.3The Cutting Tools05:37
4.4Special Transform Tools09:27
5.Colors and Effects
5.1The Color Panel09:25
5.2Patterns08:31
5.3The Live Paint Tool06:41
6.The Type Tool
6.1The Type Tool05:23
6.2Formatting Text04:36
6.3Special Text Techniques04:53
7.Save, Export and Print
7.1Saving Your File03:04
7.2Exporting Your File03:00
7.3Printing Your File03:49
8.Conclusion
8.1Conclusion01:35
2.4 Pixels vs. Vector, and the Vector Path Explained
Hi, my name is Simona and welcome to tuts+. You are watching the course The Fundamentals of Adobe Illustrator. And this is lesson pixels versus vectors and the vector path explained. In this lesson I will explain the differences of pixels and vectors and we will explore the vector path and its anatomy. So let's get started. Let's open up Illustrator. And then open the exercise file pixel, vectors in your source file folder. You will see the lion illustration twice. One on the left and one on the right. They are identical in artwork. But the biggest difference is that the one on the left is a pixel based artwork, and the one on the right is vector based. So what does that mean? Pixels are blocks of an image that simulate the points on your screen, and vectors are points, lines, curves, and polygons in a mathematical grid. Those points, and lines, and curves, and so forth, are the basic building blocks of a vector art. Pixel based programs, like Photoshop, will display an image in blocks. The pixels and those are all equal in size, and have a defined position. Those images containing pixels are called raster images. The advantage is that a ton of information and detail can be captured in such a raster image. But the biggest disadvantage is that it will lose information and detail when upscaled. And to keep a great amount of pixel information, the file size can become quite big. You've probably heard the term pixel resolution, and you might be familiar with the PPI, or pixel per inch, term. And the higher the number, the larger the file and details stored. When we zoom in onto the lion image on the left, we will start seeing those pixel blocks. Now imagine we want to scale this kind of image up. So let me scale it up by 200%. You will see even better those pixels, but they are becoming really fussy and blurry. See here, the pixels are becoming really evident and if you were to print this right now, the printout would look the same. Usually a printer will ask you for a high resolution file of your image, which is generally around 300 ppi. Meaning there are 300 pixels per inch. Compared to that graphics which are usually 72 ppi. When you use for example Photoshop and you manipulate an image, you can actually change and manipulate the pixels information that the program stores. A raster or pixel image is resolution dependent. That means if you create an image in Photoshop or any other raster based software, you specify a resolution for it and the image is dependent on this resolution. Downsizing in resolution is always possible, but you will lose some information. But upscaling the resolution will start degrading the quality of the image. You can resample this image in Adobe Photoshop and the program will fill in the gaps of the missing pixels. But that doesn't mean that the increase in quality is there as well. Now let's explore the vector based line illustration. Vectors exist in a mathematical space as opposed to the pixel space with a defined position. That makes a vector independent of an image resolution. This is one of the biggest advantages of vectors. You can zoom in again and again. Let's do that right here. And, see, no pixels, no fuzziness or blurring. Now, what if I scale the vector image, like this for example? See? No loss of quality. I could make it as big as a billboard if I wish, and it would still look sharp. This is simply because the whole image is comprised of vectors or paths. Each of those paths leads to a location called control points or nodes. The points have a definite position on a grid, the x and y coordinates, and those coordinates determine the direction of the path. It all gets calculated mathematically and we can assign color or stroke, shape and thickness without increasing the size of the file. That's why we can enlarge it without creating ginormous file sizes and keeping the quality the same. So let's go again and scale a vector line to see what happens. Let me scale it up like this, and look we do not see any difference in quality. Compared to the pixel image, let me scale that one again too. We see a pixelation happening here. Adobe Illustrator is a vector based program. So an artwork created with it will not be displayed in pixels but in points, lines, curves, shapes, polygons. Again, as I said earlier, all calculated it in a mathematical algorithm. And all of this resolution independent. Of course, we can rasterize a vector image and basically create a pixel image out of it. But once that is done, it is tricky to convert it back. Now when to use pixels and when to use vectors. It really depends on the application of the art work. Photographs or highly detailed images with special effects tend to be pixel based and people usually use Adobe Photoshop or any other raster based software. You can be really precise in manipulating each pixel but size can become really big, and once it's flattened, no more edibility. When it comes to logos, clip art, line art, or text, they are most likely vector based. The ability to scale them without loss of detail or quality and software like Adobe Illustrator or any other vector based software is used to create those. The advantage is that files are usually smaller and as I said before, the scalability of them. It can be altered and edited easily, since the file is not flattened, like a pixel based image. But on the other hand, it could run into limited details and limited effects. Adobe Illustrator has raster effects though. And Photoshop does have vector shapes as well. And sometimes it is a combination of programs that is used to create an artwork. Overall, it always depends on what the artwork is used for. My favorite, of course, is Adobe Illustrator. Now since we know a bit more about pixels and vectors, let's explore the vector path and how it is constructed. This is very important. Before we can create any vector based artwork, we need to understand what the anatomy of a vector looks like. Let's have a look at the lion illustration. As you can see, the artwork is comprised of shapes, lines, polygons, and curves. Each element is really just a path, either an open path or a closed path. Each path has attributes, either a stroke or fill or both, and sometimes, effects. An illustration is composed of vector objects like the mane of the lion or the mouth and the teeth. And each object has paths, either open or closed. And those paths are composed of line segments that have anchor points at each end. So, when we zoom out, we can see here the vector objects, then the paths, and then the anchor points here. As you can see it is easy to understand what an open path is like a zigzag line or the straight line,the curved one, and what a closed path is like the square, a circle, a star or a polygon. Now let's examine the anchor points. The line or path segments and the control handles of a path a bit closer. I illustrated the anchor points with the red square. When we click on a path, the anchor points are shown as tiny squares connected with a line or path segment. Sometimes a curved path looks like it only has two anchor points, one on each end. But as you can see here, this path has three anchor points in between, and each path from one anchor point to the next is called a line or path segment. On the other hand, a circle has four anchor points, and in between we can see the line segments. Anchor points are the basis of all objects. All line segments have anchor points at each end, and those define the precision and the curve attributes. So what does that mean? Let's look at the curve path here. This curve path has five anchor points, and at those anchor points we can find control handles that tell us the curve attribute. At the moment we cannot see the control handles. But I made a small illustration showing how they look. Here's the anchor point and out of the anchor point come two control handles. One on the right and one on the left. When we select the curve path below, like this with the Selection tool, we can see the anchor points, but still the control handles are not visible. We actually have to select the anchor points itself to see them. We need to use the Direct Selection tool. Then click on the anchor points and here they are. Those control handles can be used to change the attribute of the path. And such a curve is called bezier curve. They are named after the French mathematician Pierre Bezier who developed a method for defining curves mathematically. A path that is curved has anchor points with control handles. And a path that is straight will not have any control handles. But before things get too confusing, we will stop here. We will explore the bezier curve in detail and we will learn all about the Pen tool in a later lesson. So to wrap it up in this lesson, we have learned about the differences of pixels and vector based images. We know the advantages of vector based images and learned about the anatomy of a vector path and how vector based artwork is comprised. Now, let's move on to the next lesson and start creating our first shapes and lines for our line illustration in Adobe Illustrator CC.


