- Overview
- Transcript
3.7 Focus on the Hair
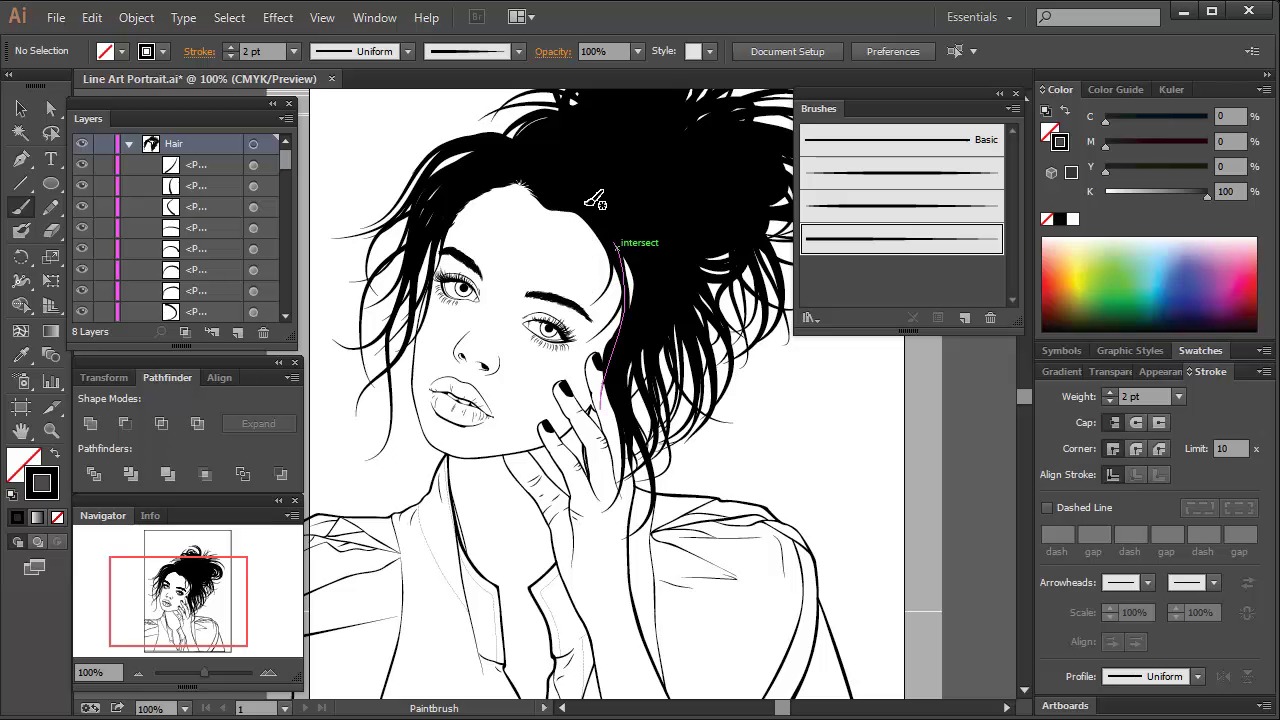
Vectoring hair can be intimidating, however if you start of simple with silhouetted hair, you can nail the basics of this skill. In this lesson we’ll create some great silhouetted hair, using our helpful tapered brushes and a creative clipping mask.
1.Introduction1 lesson, 02:32
1.1Welcome and Course Overview02:32
2.Pre Portrait Lessons4 lessons, 14:58
2.1Prerequisites to the Course03:05
2.2Choosing the Right Stock03:35
2.3Skin tones and Picking Colors03:49
2.4The Three Brushes04:29
3.Create a Basic, Cartoon/Line Art Style Portrait8 lessons, 31:07
3.1Set Up Your Document03:29
3.2Base Shapes05:07
3.3Creating the Line Art06:34
3.4Focus on the Mouth02:43
3.5Focus on the Eyes03:24
3.6Focus on the Eyelashes and Eyebrows02:15
3.7Focus on the Hair04:12
3.8Finishing Touches03:23
4.Create a Basic, Color Portrait with Simple Shading8 lessons, 32:19
4.1Introduction04:46
4.2Basic Portrait Theory06:26
4.3Skin Shading: The Shadows05:27
4.4Skin Shading: The Highlights02:00
4.5Lip Shading and Eye Shading03:49
4.6Creating Shadows and Highlights for Hair04:35
4.7Make Up02:15
4.8Final Touches03:01
5.Conclusion1 lesson, 00:59
5.1Conclusion00:59
3.7 Focus on the Hair
Hey all. Welcome back to Vector Portraits for Beginners on tuts+. My name is Sharon Millin. And in this lesson we're going to be looking at drawing the line art for the hair. The easiest way to draw the hair is to draw it in silhouette. This means you won't need to draw any internal details. To start off with, we're going to create a new layer. We're gonna focus in on the hair line. We're gonna be using the Original Tapered Brush and the Paintbrush Tool to draw the hairline. Draw strokes along the hairline, draw as many as you can, that hides the original straight line of the hair line. What you should be seeing is a nice zig zag look along the hairline. Once you're finished, group them together and lock that group. We're going to start adding volume to the hair now. Think of the hair as large branches on a tree. You start with larger strokes and you go slowly down to smaller strokes. Again we're going to be using the Paintbrush Tool. However, you could also use the Pen Tool for this. We'll be using the triangle type of brush, and we'll be starting off with our first stroke. Once you've drawn your first stroke, work out the stroke weights that you need to use. In this case, I've used four points. I then applied the Triangle Taper Brush. Once you're happy with the stroke weight, continue to draw these large strokes across the hair. The initial strokes should be curving around the hair. Especially around the bow. And remember to draw lines across the bangs and fringe that cover the hand. Once you've done, select all of these, group them together and lock them. I'm gonna repeat the exactly the same process, however with the smaller stroke weight. First off, it will be two point, then Select All > Group and Lock, then one point, Select All > Group and Lock and then 0.25. Guess what, Select All > Group and Lock. Even though the hair volume is on top of her head, there would still be some strands of hair that would be visible from either side of her neck and either side of the face. So, how are we going to go around this? Well what you need to do is employ some creative clip mask usage. First of all, draw a rectangle over the area. From the original base shapes that were previously hidden and grouped together, go into that group and get the shapes for the face, the neck, the jacket and the hand. Copy and paste them in front, then use Pathfinder Unite. Select the rectangle and the United Shapes and use Minus Front. You should get two shapes now. Select them both together and create a Compound Path. Now I'm going to set the fill to this shape to pink just so you can see whereabouts I'm actually drawing these new strands. So continue your process of drawing the hair with four point, two point, one point, and 0.25 strokes. When you're finished, group these strokes together. Put your pink shape on top of your group of strokes and then create a Clipping Mask. As you can see, now you have clean lines that don't overlap onto the face or the neck. And that's it. Your hair is done. A lot easier than you think. Next time on Vector Portraits for Beginners, we're going to finish off this portrait. A couple of subtle additions just to tie everything together. Thanks for listening.


