
 Lessons: 32Length: 4.1 hours
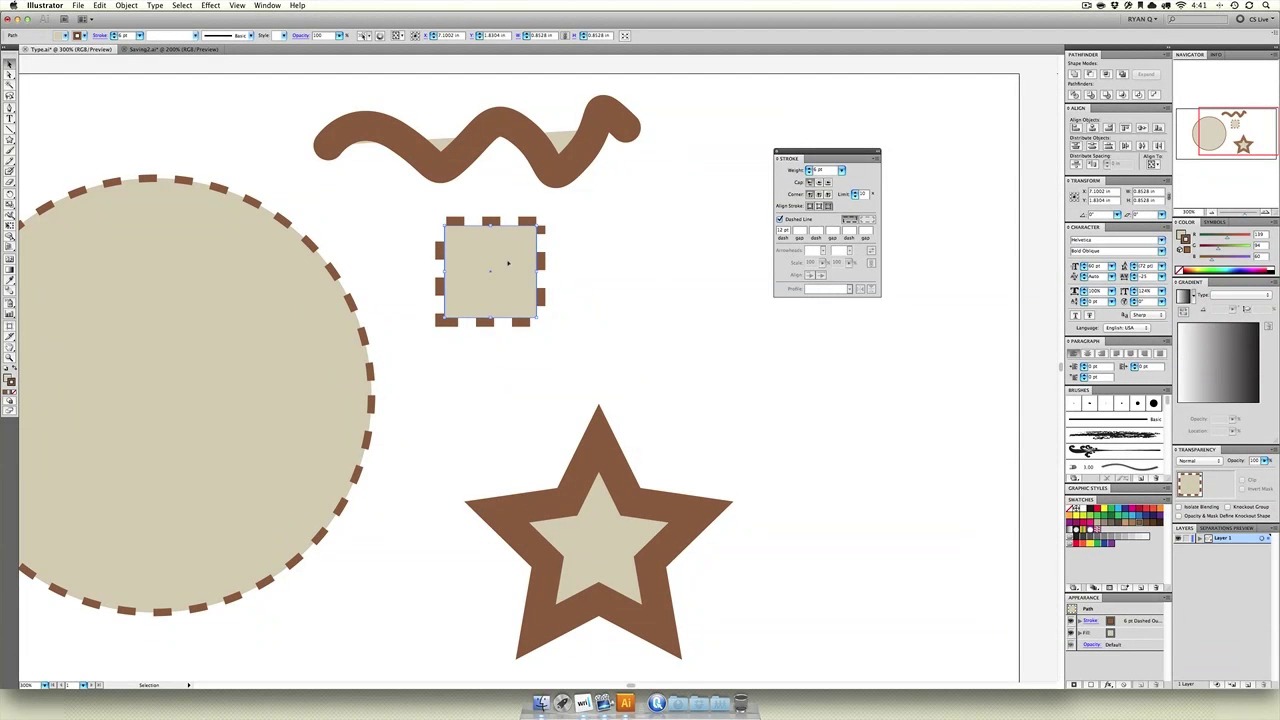
- Overview
- Transcript
4.4 The Stroke Palette
Learn how to work with complex strokes and lines.
1.Introduction
1.1Introduction01:11
1.2Getting Started06:56
2.Get to Know Illustrator
2.1Illustrator Interface04:52
2.2Your First Document05:02
2.3Basic Tools11:27
2.4Creating Objects09:26
2.5The Pen Tool11:54
2.6Selection Tools06:41
2.7Settings04:43
2.8End of Week One00:26
3.Object Oriented Design
3.1Object-Oriented Design04:02
3.2Grouping11:34
3.3Layerless Thinking11:51
3.4Locking & Hiding05:21
3.5Saving Files09:02
3.6End of Week Two00:24
4.Powerful Palettes
4.1The Align Palette11:24
4.2Pathfinder Palette11:38
4.3The Type Palette11:05
4.4The Stroke Palette16:09
4.5Symbols Palette09:35
4.6The Magic Wand04:23
4.7Art Boards06:14
5.Effects and More
5.1Gradients12:53
5.2Using Masks06:05
5.3Vector Effects13:53
5.43D Tools09:38
5.5Gradient Mesh and Shading09:59
5.6Tracing and Live Paint09:24
5.7End of Week Four00:35
6.Final Project
6.1Your Final Project05:23
7.Conclusion
7.1Conclusion00:35
4.4 The Stroke Palette
Now we're gonna talk about the stroke tool, and I know we've covered the appearance palette before, and we kind of showed that you can make stroke large or small and change its color. But there's a lot more that you can do with strokes in Illustrator that I think is pretty important to cover, and it's all with the stroke palette. Now, I kept the old document open here, just so we would have an idea of what it's like to just kind of clear everything if we're just fooling around and don't want it anymore. I just hit Cmd+A, hit Delete. You can see, remember we locked that background, and that is what? Cmd+Opt+2, and then Delete, and we have a clear document ready to take on our next challenge. Now, here's the stroke palette over here, I'm gonna take it and just pull it off. And you can see, I am showing my options, so go to see how drastically different it is, I'll hit Show Options here. And really look at everything we can do with strokes. This is going to be pretty simple. I'm just going to create a circle, and I'm going to give it a stroke. And here in the stroke palette, I'm gonna turn it up really high, say, 20. And this is so we get a good look at what our stroke palette can do. We're also gonna take a square and a star. And the reason why we're doing that is you'll be able to see a lot of different things very quickly. The first thing we're gonna tackle is the caps inside of Illustrator. So the three types of caps you have are butt caps, round caps, and projecting caps. Kinda weird, but really the best way to show you is to have a path, That is incomplete, because that's what caps affect the most, the end of incomplete paths. The default is a butt cap, feel free to laugh to yourself if you're feeling extra mature today. [LAUGH] And it's basically just your square end, right? It just cuts off wherever the path ends. Now if we look at projecting cap, you can see the cap will extend past the end point of the path. It's projecting itself forward. Finally if we see a round cap, it gives us a lot more almost like a marker or crayon type feel. Where it rounds off the end. But if you look here, you see it's going, again, way past what the endpoint is. Next is our corners. The corners can be really shown with the square and the star. The default is a mitre joint, which is essentially those corners meeting in the natural corner fashion where they both kind of intersect. Finally you can round the joint, right, which is a lot more pleasant to look at if you're trying to go for a softer type of effect. The last one is the bevel joint, which will kind of generate some interesting things. Now let's look at the star here. Let's zoom in on our star here so we can see exactly what that did. Not only did it seem to cap all of our edges, but it added these extra caps inside the edge too. Selected here is the round. Round inside, round outside. Here's the miter, pointed inside, pointed outside. And here's the bevel, flat outside, and one, two, three, four, five flat insides. Next is stroke alignment, and stroke alignment basically says where we want the stroke positioned. So we can put a stroke on the inside where the edge of the object is the outermost bounds of where strokes go. The default is not outside. The default is center. So, half the stroke sits inside the object and the other half outside. Inside, the outer edge is the limit. And, finally, outside. You guessed it. The stroke is entirely outside. You can see what this looks like when we don't have a completed path. They're just not available, right? There's no inside or outside to an incomplete path. You can see our circle inside, outside, center. The next thing I want to talk about is limit, right? So here's our miter joint. Now say we have a miter and we say it's outside. Well now we have this limit number here. And what is the limit? The limit is essentially how far a stroke can grow. So you can see this point is really way, way out there. If we take our limit and we keep trimming it down, We just don't allow the stroke to go that much further out from the object. Now, this is especially helpful when you have a very, very pointed object like this. The limit for something that's a very sharp angle, you get pretty extreme, look, if we just keep tapping up on limit. You'll hit a point, say, even 20 isn't enough for this sharp angle. 35, 36 keep going, keep going. There it is, 70. That is huge. You can see in order to get that correct joint, right, that miter joint that we chose, a steep angle has to extend way past. Setting a limit here, like 10, which is the default, says, hey, you can't get any longer than this. Now here, 10 is no big deal. That looks correct. But out here, 10 isn't enough, and let's face it, 70 might not exactly be what you're looking for. I mean, that's a very large path. And if we put it on the inside, right, or if we make it a round joint, you could see there's no need to make it tall right? Just round it right off at that edge. The next thing we can do is dashed lines. So select your objects like your circle and just click the check mark next to dashed line. You can see what that does and right now the stroke's a little wide. If I made this, say, five. It looks a lot more like what you would expect for a dashed line. There it is inside, there it is centered. So centered creates an interesting, right? With the dashed you can half see the object coming through and half not. And finally, you can have pretty advanced customizations on your dashed line. Let's look at the square for a second. We'll bring it down to six and we'll make it a dashed line. We'll put it as its regular corner. Now, Illustrator right now is trying to keep consistent spacing between all those. We can select our square. And if we center it, its default, we can choose align dashes to corners which creates a much more pleasing shape. Right here doesn't make a whole lot of sense, we'll center it, and align to corners. We can see what that does for the star. There's a lot of different things you can do with the dash palate, as well as taking the dash and saying I want 30-point dashes. Wish it would allow me to go a bit thicker. I want 30-point dashes and then I want a 20-point gap, and then I want a 40-point dash, and then I want a 10-point gap. And then I want a 60 point dash. Here's a pretty interesting looking pattern that we've created. The idea is, you have a lot of power to create very custom paths inside of Illustrator. Finally, when we draw out a line of any type, we can take it and say we don't want it dashed anymore. We can add arrow heads to it. You can say I want an arrow on this side. And an arrow on this side. And you can change which arrow you want on each side. Maybe over here we'll do a pointer finger. And over here we'll do just a little star. Then, for each of our arrowheads with our line selected we can say, the star should be really big or real small. And that hand, it's way too big. I want that much smaller. Then we can choose how we want them aligned, at the very end of the point, or do we want them to end where the point ends. The last thing we could do with strokes is pretty new in the newer versions of Illustrator. So I have Illustrator CS5 here. And this is called beautiful strokes. Beautiful lines and the lines tool have gotten so advanced over the years. And I'm gonna take off the fill so we can just look at the line. We have this thing here called profiles, which allow us to pick what kind of line we're making. You can see, pointy in the ends, fat in the middle. This one will have an end to it. And we can crank up the size so you can see it a little bit better. There's the fat to skinny. Here's one with like a bevel to it. Here's one that's almost a teardrop or a line of some sort. Lots of different looks. Let's go back to just the uniform path. If we come over to our Tools palette, here is the width tool. And this is what I'm talking about when I say beautiful lines. What I can do is I can grab a piece of my line and pull it out with the width tool or shrink it in. And then over here I want to really pull it out. I might decide that at the end. This path is gonna get real big. Now here it's gonna be big too. Then right before the end it's gonna get super squished down. Now this creates a new profile, and I can hit the Save button here. Call it something like Crazy. And then save that as a profile so that any time I go to make a line, I can pick my crazy line. Scale it up. And it will make a funky half. And that's pretty cool. That allows you to do a lot with just lines alone now, right? You don't need to necessarily have fills. Now when dealing with lines the last thing you have to remember is that they're just lines. You really need to have a stroke and a fill to make a complete path, because lines, you're really not able to do much with them. But, here's a little secret tip before we go and start tackling our next lesson. You can take all your lines, like this circle or even one of the crazy lines. We're gonna select them both. We're gonna go to Object and Expand Appearance. Now this one didn't take, and sometimes it doesn't, so we'll just go to Expand, and we'll hit OK. What did that do? We'll check it out. If we hit Cmd+Y, this a line, this is a line, this is a line, even though we know that they have these different strokes. But up here, this is now an object. And the stroke, look at this, it's a group. We've got to ungroup it. And this is a group too, or a compound path, we can release it. It created a bunch of these curved lines and curved squares. Now, I don't want you to go crazy with Expand, because it's really not something that you need to do all the time. But, Expand will let you take whatever object you create and, basically, trace the outline of it, and create a whole bunch of different objects, which is really, really cool. If you want to see me do it one more time, I'll just show you. I'll take this guy right here. Go to Object > Expand > Fill and Stroke. Yup, okay. Now we'll ungroup it. Look at that. That's an object and it has a bunch of points, points that would have been near impossible to draw. And this right here is a separate object, right? So I could take that and put a new stroke on it. So that's back. And I'll change the color just so we can have a better look. But this one now, when I put a stroke on it, Goes around the whole thing, right? Cuz it's traced, it's outlined. So expanding, tracing, outlining, there's a million things you can do with the Stroke palette and expanding in illustrator. The possibilities are endless, and you can see it doesn't take a lot of time to create those things, which is very important when you're on a deadline or you need to work quickly. So that's all the crazy stuff you can do with lines in Illustrator. I'm gonna take this file and save it as is, and just call it Stroke inside of the lesson file. That way, you can see it and play around with it. Next time we're gonna be dealing with the Symbols palette. Something that's even cooler than what we just dealt with. So stay tuned, it's gonna be great.

