
 Lessons: 32Length: 4.1 hours
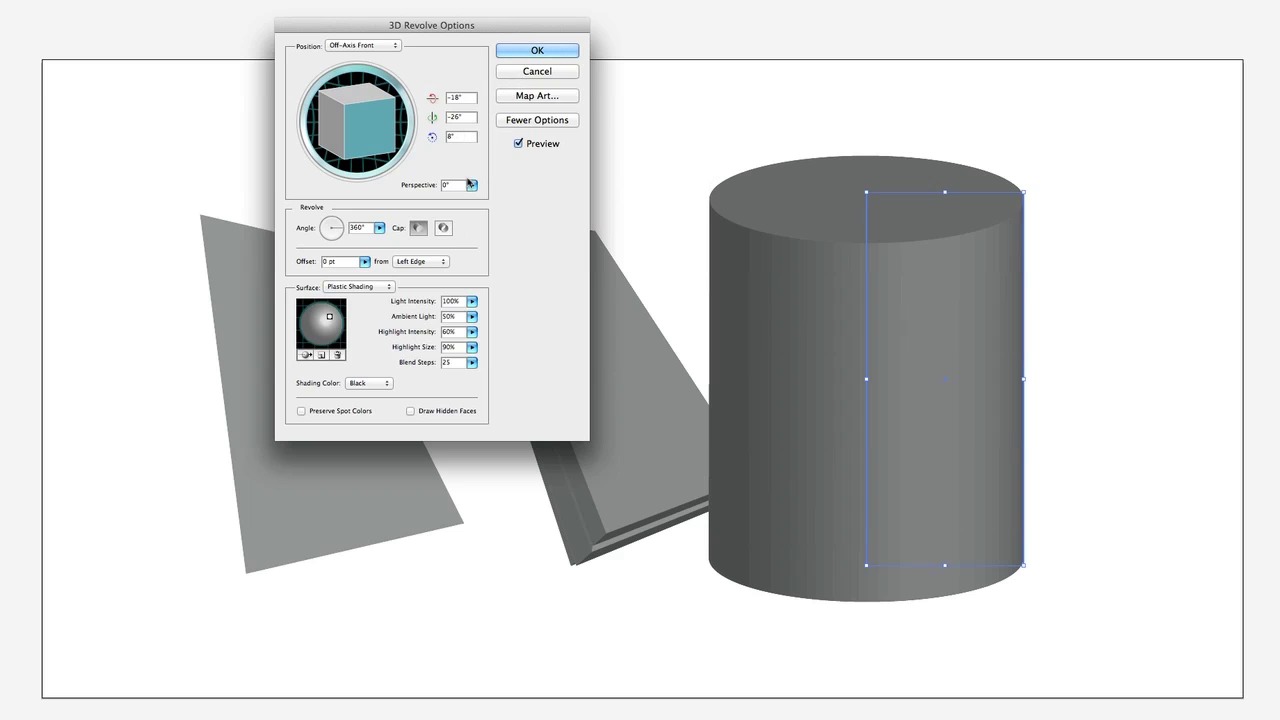
- Overview
- Transcript
5.4 3D Tools
Let’s experiment with rendering 3D in Illustrator.
1.Introduction
1.1Introduction01:11
1.2Getting Started06:56
2.Get to Know Illustrator
2.1Illustrator Interface04:52
2.2Your First Document05:02
2.3Basic Tools11:27
2.4Creating Objects09:26
2.5The Pen Tool11:54
2.6Selection Tools06:41
2.7Settings04:43
2.8End of Week One00:26
3.Object Oriented Design
3.1Object-Oriented Design04:02
3.2Grouping11:34
3.3Layerless Thinking11:51
3.4Locking & Hiding05:21
3.5Saving Files09:02
3.6End of Week Two00:24
4.Powerful Palettes
4.1The Align Palette11:24
4.2Pathfinder Palette11:38
4.3The Type Palette11:05
4.4The Stroke Palette16:09
4.5Symbols Palette09:35
4.6The Magic Wand04:23
4.7Art Boards06:14
5.Effects and More
5.1Gradients12:53
5.2Using Masks06:05
5.3Vector Effects13:53
5.43D Tools09:38
5.5Gradient Mesh and Shading09:59
5.6Tracing and Live Paint09:24
5.7End of Week Four00:35
6.Final Project
6.1Your Final Project05:23
7.Conclusion
7.1Conclusion00:35
5.4 3D Tools
So we figured out how to use gradients, masks and effects to give things a 3D appearance. But Illustrator could actually make things legitimately 3D, which is pretty cool. So let's give that a shot. Go ahead and grab your rectangle tool. And drag out a rectangle, it doesn't really matter the size. But it's important that you keep it not black or not too dark because we're gonna want to see shading on this. And then, Illustrator's gonna end shading automatically for us based on where we say the lights are and where the subject is. Let's go to Effect > 3D and we're gonna first try to rotate. So now we have this cool cube and these different options that aren't rotating. Check off preview and see what this does. So you can see here that we're able to rotate any which way. And we actually, in the preview, can see it rotating in real time and you'll notice that it's drawing all the faces. Off to the side there, where our object is, and so we have to let go, to kind of give it a chance. That's custom rotation. We can also go say off axis front, off axis back and then along with off axis front. We'll rotate a little bit, and let's change perspective. So perspective is degrees. How much it's coming at us. That's the normal queue, but now it's coming at us, right? On top of all that, we have more options, which is shading. We can go and create new lights here. Position them. We can even say how much ambient light the object's going to have. Or how intense our lights are. The shading color can be any one we wish. But, we don't really need any of this. We'll say no shading. We'll hit OK. Again, like the other things, I can hide this effect whenever I want, which is pretty great. Now, we're gonna make another rectangle. I'm gonna put back on the effect on that one. And this one we're gonna go to Effect 3D > Extrude and Bevel. Now when we hit preview here, we're getting something entirely different. This is adding geometry to our object. If we rotated this and gave it a similar perspective This object now has mass, right? It's got stuff behind it. And we can even choose to extrude it very deeply. Or very shallow. It automatically has shading turned on. In fact, we can add lights. You can try and lighten up particular sides. So you can really see the difference. Draw hidden faces will essentially create the back of the subject too if we choose to expand it. We can even choose bevel options. Classic, complex, different complexities here. And these will choose exactly what the edge of the object we are creating looks like. Pretty interesting dynamic when you consider that all we did was draw a rectangle, get such a complex shape. Now we're gonna make a copy of that. And we're gonna shut off this Extruder now because the 3D option is revolve. I'll turn on preview, and you can see what this does. This uses one entire shape to be one half of a spun or spinning cube. We can add perspective to it. We can rotate it just the same. We can even choose how offset and it's hard to tell what's happening here, because it's just so extreme, but if you look very closely at the bottom here, you can see it's forming a hole. You can also see the object itself screwing up, as Illustrator struggles to render it, because it's so complex, you're basically dealing with a CAD-like model inside your system, which is just horribly intense on your processor. But the effect is pretty cool. You can even choose how much of that revolution is. As you add to it, you can see it wrap around and become a full cylinder I guess, from this angle, something like this looks a little bit more like Pac Man. Now that doesn't have any lighting, so let's create a new light. Bring it down here. Increase its highlight size and its highlight intensity. Even the ambient light. [BLANK AUDIO] You can see. The options we have with that. So there's lots to do in 3D, and there's plenty of ways to do it. It's really how you choose to take advantage of these things. Here we can see our offset behaving a little bit better And because these things aren't really ever destroyed, I can go in, right? With a pen tool, and add points, like I did before. And then with direct select, grab one of those points and edit it. And you can see the very complex stuff that you can come up with. In fact, if we take Our pen tool and do a convert anchor point. Now, You have what went from a very basic shape to a terribly complex one with very complex lighting. We can go and turn on the preview. Take the blend steps up to 60. And what it's trying to do here is if I ran up to 200. Watch how long this takes. I'm literally getting the spinning beach ball. But that gets a super smooth object, with very smooth shading. Something that you typically see in only a 3D drawing program. And we got it all from that shape. We can see, just showing the canvas again. Coming out of Command Y. There's the beach ball. I don't recommend getting this crazy and this complex with your objects. But, if you have an ambitious project, and you have something you want to try and you want to experiment with this, go nuts. Because it's very cool. But Illustrator's got some great stuff to offer people who are enthusiasts of 3D. And it's just got great tools if you're looking to take a simple rectangle and put it into perspective without knowing exactly what that perspective is. That's 3D in Illustrator. That's the real power of this program. You've probably only been using 10% of Illustrator until now, and now you're getting your money's worth.

