
 Lessons: 32Length: 4.1 hours
- Overview
- Transcript
4.2 Pathfinder Palette
Learn how to select, merge, and divide objects in Illustrator.
1.Introduction
1.1Introduction01:11
1.2Getting Started06:56
2.Get to Know Illustrator
2.1Illustrator Interface04:52
2.2Your First Document05:02
2.3Basic Tools11:27
2.4Creating Objects09:26
2.5The Pen Tool11:54
2.6Selection Tools06:41
2.7Settings04:43
2.8End of Week One00:26
3.Object Oriented Design
3.1Object-Oriented Design04:02
3.2Grouping11:34
3.3Layerless Thinking11:51
3.4Locking & Hiding05:21
3.5Saving Files09:02
3.6End of Week Two00:24
4.Powerful Palettes
4.1The Align Palette11:24
4.2Pathfinder Palette11:38
4.3The Type Palette11:05
4.4The Stroke Palette16:09
4.5Symbols Palette09:35
4.6The Magic Wand04:23
4.7Art Boards06:14
5.Effects and More
5.1Gradients12:53
5.2Using Masks06:05
5.3Vector Effects13:53
5.43D Tools09:38
5.5Gradient Mesh and Shading09:59
5.6Tracing and Live Paint09:24
5.7End of Week Four00:35
6.Final Project
6.1Your Final Project05:23
7.Conclusion
7.1Conclusion00:35
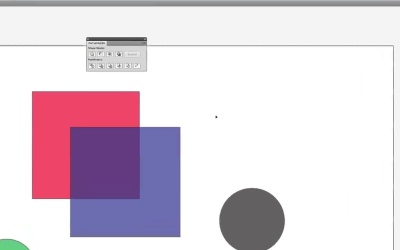
4.2 Pathfinder Palette
Now let's reset our layout. You can choose the essentials layout again, but I'm gonna use my Ryan Q layout with all my fun tools. And let's talk about the pathfinder palette. The pathfinder palette is really a way to get advanced shapes pretty easily. And what do I mean by advanced shapes? I'm saying it's kind of hard to say draw a half-moon in Illustrator in a very quick way unless you're a master of the pen tool. So, let's start with a bunch of shapes here and this time we're going to use two squares of equal or lesser size, and two circles. Again, let's choose different colors, so that we really know what the difference is here. So we have our red square, blue square, green circle, and black circle. Like before, we're gonna take the transparency, and we're gonna cut them down to about 70% so we can see through them and see what this palette really does. Let's start by grabbing our pathfinder from the side here and pulling it out so we can focus on it. Now you can see there's shape modes, and there's a whole bunch of ways to use the pathfinder. I find myself 99% of the time using the unite option. But let me show you what each of them do. Here if we take two squares, you can see it's purple in the middle, right, they're overlapping. If we select them both and then do unite, you can see they both become whatever object was on the top. They take on the properties of the top object and they become one path. So drawing this right with the pen tool. Click, click, click, click, click, click, click. Click. But now, we just make two squares, select them and unite them. And if you think that that was pretty easy to draw, try drawing a shape like this, in illustrator with any amount of ease. Pretty tough. You'd have to click, click, click, click and drag until you have a perfect circular curve, click down so the unite takes all the shapes, combines them, and takes on the property of whatever the top shape is. Next, we have minus front. So the front object is gonna cut out of the back object. Pretty simple. if you have multiple things selected when you do a minus front, you can see all of them will cut out of the back-most shape. A pretty nice way to get, actually, this kind of looks like a battering doesnt it? [LAUGH] Next is the intersection, or intersect, as Illustrator calls it. Which is basically going to cut out everything except for the parts that overlap these shapes. So all we're left with is the middle there and I'm gonna do it fast just so you can see. Then again you notice we're taking on the property of the top shape and that's always going to be the case. Now we're seeing only this spot where the three objects overlapped, right? It's not only inside this square, but its inside this part of the circle that's inside the square. Now you may be saying Ryan, what am I going to use all this for? It seems a little complicated. Well, honest, there is a lot of applications for it. I mean whether it's just you're gonna make a moon, and select them both. Then we'll come here. We'll say I'd only like the bottom one, please. Really quick moon, right? Take two circles. Rather than drawing that out with the pen tool. Likewise, if you were gonna, say, do a triangle. Well, a triangle isn't one of Illustrator's default tools. So let's take two squares. One here. We'll take a second one, we'll rotate it, position it, select both and we'll only do the intersection. Now we have a very quick triangle. And a triangle is a versatile shape, right? A triangle could very easily. Get a rectangle added to it. Now we'll take those and make sure that they're aligned. Right? With our align palette. Then we'll do unite, and all of a sudden we have a usable mouse cursor for our cover art design. So there's plenty of things to use this for. Now, you can experiment with a lot of the other modes, but the next big one I wanna talk about is divide. Divide's pretty cool because it will take your two shapes and when you hit divide, you can see what it's doing is creating this shape, this shape, and two squares. It's basically taking any lines that meet and making them cut out of each other, but leaving all the lines and paths intact. So if we have three, things here. And we hit divide, we now we are going to have a red piece that looks like this, a blue piece, a black circle, a blue square with a hole a red square with a hole, a blue circle and a red circle. So you can do a lot of advanced cutting and trimming, all with the pathfinder palette. Now, what's the application of that? Well, remember when we drew a smiley face a few lessons ago? Back when we drew that smiley face, we didn't really do it the best way we could have. We had our smile that we drew with the pen tool. But now, I can take a line, just draw it right across and hold down shift, remember, to keep it straight. Select both objects, hit divide, then use direct selection to come and just take the top and delete it. And there's a much nicer half circle than what we had before. And now that it's a half circle you can see that I can resize it and shape it and do all that sort of stuff to it. It's important to note though that when you do cut an object in half like that, I'll change the color so you can really see, we hit divide, watch the end of the lines. They go away. Lines will basically disappear and you can think of them as cut points. Right? So if I do a second line right up the middle, and do a line across here and a line across here. And I take all three of those lines and I center them both ways. I'm going to center those on the circle. Right about there. Select everything and I hit this divide. We basically just used the divide like a pizza cutter. Now, if we move it around, the path finder automatically creates groups, right? This is one object, still, as far as Illustrator is concerned. So, double clicking takes us into this group. And then we can take out pieces of our pie or our pie chart. If we were gonna do a pie chart, and we wanted to make this go out here and make another slice of data here. But this was all the same. We'll take that and use unite. Take these two and unite those. And you can really see how this pallet eventually really becomes one of your most important and versatile tools inside of Adobe Illustrator. It just has all the goods, and it really can make your designs look pretty professional and pretty great. Now again, I'm using a very simplistic example here, but you can imagine if it's just a piece of something that you wanna cut out. Let's go and open up one of our class files. Let's open up our saved document. We could take the sun and we're just going to copy and bring him paste him right into this document so we can see him alone. Now he's a complex object. Let's select him and we're gonna draw a circle like this right over him. Now, I'm gonna take that circle and I'm gonna make it a drastically different color than anything he's got. So I'm going to do purple, bright purple. Select everything here. Hit divide. Then use our magic wand, which we are going to get to cut it out. You can see you really can cut up very complex shapes very easily with the pathfinder pallet. So that's what path finder is all about. You're going to find uses for it. If you don't see them right away, they are really important. If you think instead of drawing this shape, I'm going to make a shape and cut this shape out of this shape, and I know it sounds very, I guess, soft right now, and maybe you can't think of a use for it, but its going to come in handy especially when you are handing complex shapes and projects. So that's the pathfinder palette. Start using it, start loving it, its great.

