
 Lessons: 32Length: 4.1 hours
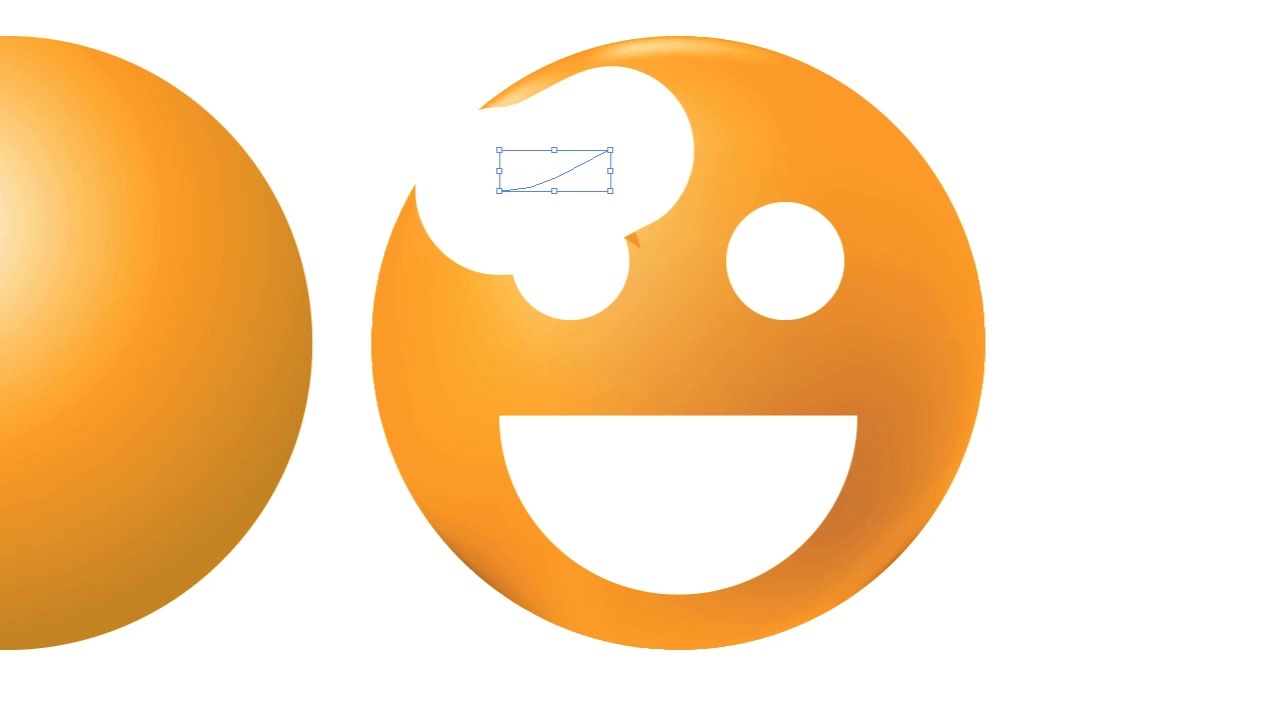
- Overview
- Transcript
5.5 Gradient Mesh and Shading
Let’s try applying gradient meshes and shading to objects.
1.Introduction
1.1Introduction01:11
1.2Getting Started06:56
2.Get to Know Illustrator
2.1Illustrator Interface04:52
2.2Your First Document05:02
2.3Basic Tools11:27
2.4Creating Objects09:26
2.5The Pen Tool11:54
2.6Selection Tools06:41
2.7Settings04:43
2.8End of Week One00:26
3.Object Oriented Design
3.1Object-Oriented Design04:02
3.2Grouping11:34
3.3Layerless Thinking11:51
3.4Locking & Hiding05:21
3.5Saving Files09:02
3.6End of Week Two00:24
4.Powerful Palettes
4.1The Align Palette11:24
4.2Pathfinder Palette11:38
4.3The Type Palette11:05
4.4The Stroke Palette16:09
4.5Symbols Palette09:35
4.6The Magic Wand04:23
4.7Art Boards06:14
5.Effects and More
5.1Gradients12:53
5.2Using Masks06:05
5.3Vector Effects13:53
5.43D Tools09:38
5.5Gradient Mesh and Shading09:59
5.6Tracing and Live Paint09:24
5.7End of Week Four00:35
6.Final Project
6.1Your Final Project05:23
7.Conclusion
7.1Conclusion00:35
5.5 Gradient Mesh and Shading
Our last few lessons have talked about radiance and effects, masks and 3D. How to do 3D for real and the right way. Also, we're seeing how to do things that are simple, and how to do things that are complex in each of these. Well, radiance aren't quite 3D, and they're not as complex as typical 3D shapes in Illustrator. And they're just awful on our processor. There's another way, and it's called the Gradient Mesh Tool. Let's create a two circles to illustrate our point. No pun intended. And we'll also get rid of the stroke. Illustrator does put stroke on things by default. But honestly, I typically like the way things look without a stroke. Now, aside from this document looking like two freshly cracked eggs, it's also two circles that we're going to make spheres by using some 3D. I like the color I already chose, so I'm gonna go ahead and pull that into the gradient palette. I'm gonna make a third color here. I'm going to put this in radial mode. Use my gradient tool to come up here and give my traditional top-left sphere. Now, that's pretty great, but it's also a little bit limiting. What if we wanted to do a curved gradient, right? Or, we wanted to do just a dark patch or there was advanced shadowing that we really can't do with gradients. Well we have two choices, we can either put objects over each other and try and shade them that way, or we can use this tool right here. The mesh tool. The Gradient Mesh tool to be specific. Now, what I like to do first with the Gradient Mesh tool is establish a few lines. And, that I do simply by selecting a couple of places where I think it's important to shade. [BLANK AUDIO] Now, I should warn you once you go gradient mesh, there's very little going back. You've basically destroyed your circle. You haven't fully there's ways around it and you can certainly go on Google or the internet to look up those ways. But it's a bit of a pain. But you can see what I'm getting with the gradient mesh tool is a much more detailed and complex effect than I would be able to otherwise get with a simple gradient. I can even select line pieces. Just sections here. And give those very subtle hints as to being darker. And I can take specific spots, and subdivide them again, To create even more complex lighting. Now, you go ahead and take those, Drop two eyes. [BLANK AUDIO] Remember before when we made our smiley? We used a line across. And we'll cut it with the path finder. Now we'll go ahead and take a circle. Paste the second one. We're gonna use our pen tool to come over here and draw a curved line. Swap it around so it's just a line, just a stroke. Divide it, cut off the bottom. This right here will take on this gradient. We'll make it linear. We'll get the stroke. Much larger, here. We'll take our circle, and make that a blue gradient. We'll make that radial and swap it around. It's a little bit of a harsh gradient, so we'll tone it down. Hit up. Just a second little eye. And we'll take two little circles. Just make those white, semi-transparent. You can see complexity, very quickly, and very easily in Illustrator. The next thing we're gonna do [BLANK AUDIO] is we're just gonna make some curves under these eyes. Those curves are gonna be a nice reddish orange. We're gonna filter, blur, give them a glossy and blur. It's hard to see the preview here. See what they look like with just a little bit blur. That's not bad, so let's go to ten. Put the eye on top, right, with the bring in front. Second one, we'll bring that eye in front too. And those are a little dark, so bring down their opacity. I know smiley faces like this typically don't have a nose, but I'm just so compelled to give him a red nose. I don't know why [LAUGH]. So I hope what you're seeing or what you're noticing, is that we're trying to take the techniques that we've learned so far, and apply them to a realistic situation. I mean, making a smiley face might not be your everyday task, but it's certainly using all the things that you learned, and it'll be something that you're glad you're able to do. Now, I'm making a smiley, but using these gradients and these complex images. The gradient mesh has another benefit for everybody who is a fan of doing wild and wacky things. You can do subtle colors, but you can also do absolutely crazy colors. Right? Try and create a gradient that looks like this. On a regular gradient, it's near impossible. And try, and go ahead, and grab your gradient mesh tool again. And change the color inside there. You can do some really deep and detailed stuff with gradient meshes that you can't really do otherwise. So they're powerful, they're useful. And now, when we're winding down to the end and getting close to our final project, you should be kind of using these tools in a smooth way. Try and make a few documents on your own and designs on your own, so you know what tools to use when. Cuz that's really gonna help you in the real world when somebody needs something in a day or week or even an hour. Well, how are you gonna do it unless you know what tools to use, what they're capable of, and when? Not only that, but play around. Go ahead and try something new and see, well, what if I mix this with this? And not just colors. Tools. What if I put on a gradient mesh and a gradient? What happens when I cut something up, or try and mask, let's try it right now. Let's try a circle. What happens when we select these and use the path finder? Nothing. Isn't that interesting? We found out something together. Now, this is all part of learning this object-oriented design. This is part of experimenting, being curious with your program, because it's so powerful. Next up, we're gonna be looking at tracing, and not the kind you did in grade school either.

