
 Lessons: 32Length: 4.1 hours
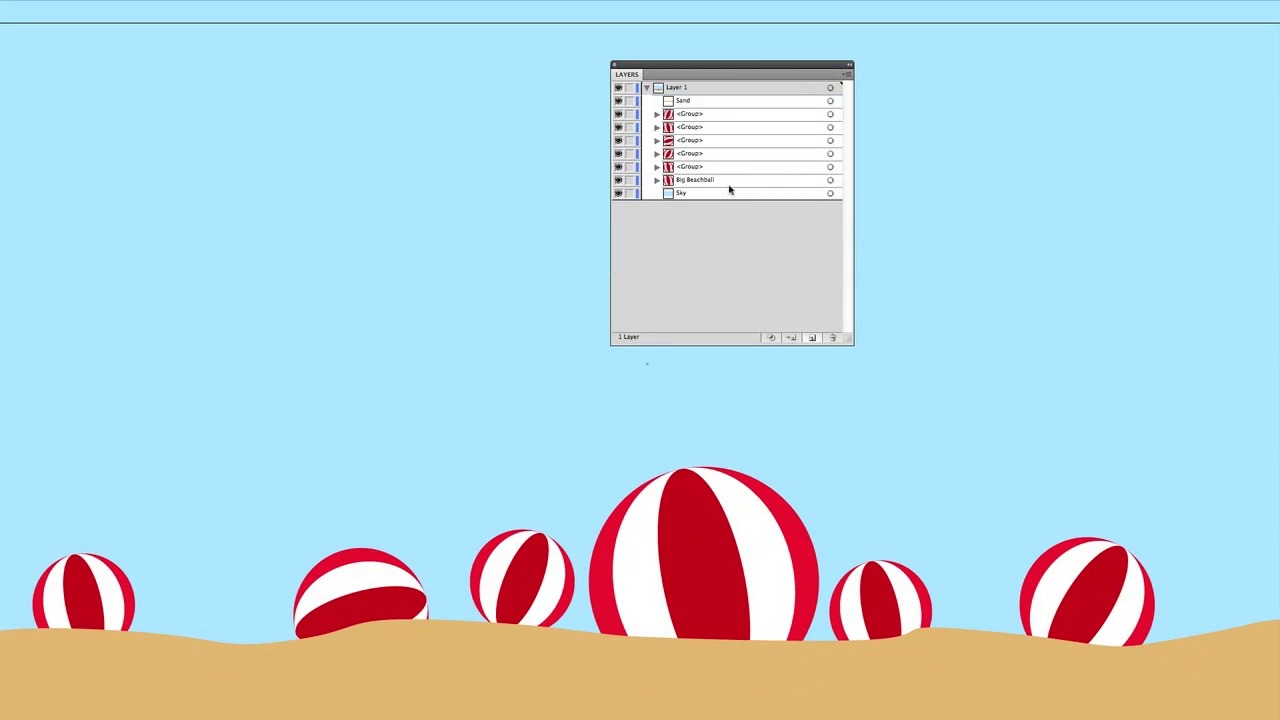
- Overview
- Transcript
3.3 Layerless Thinking
Ryan explains how layers are used (or not used) in Illustrator.
1.Introduction
1.1Introduction01:11
1.2Getting Started06:56
2.Get to Know Illustrator
2.1Illustrator Interface04:52
2.2Your First Document05:02
2.3Basic Tools11:27
2.4Creating Objects09:26
2.5The Pen Tool11:54
2.6Selection Tools06:41
2.7Settings04:43
2.8End of Week One00:26
3.Object Oriented Design
3.1Object-Oriented Design04:02
3.2Grouping11:34
3.3Layerless Thinking11:51
3.4Locking & Hiding05:21
3.5Saving Files09:02
3.6End of Week Two00:24
4.Powerful Palettes
4.1The Align Palette11:24
4.2Pathfinder Palette11:38
4.3The Type Palette11:05
4.4The Stroke Palette16:09
4.5Symbols Palette09:35
4.6The Magic Wand04:23
4.7Art Boards06:14
5.Effects and More
5.1Gradients12:53
5.2Using Masks06:05
5.3Vector Effects13:53
5.43D Tools09:38
5.5Gradient Mesh and Shading09:59
5.6Tracing and Live Paint09:24
5.7End of Week Four00:35
6.Final Project
6.1Your Final Project05:23
7.Conclusion
7.1Conclusion00:35
3.3 Layerless Thinking
So now that we've taken a look at how object are made as well as taken a look at the idea of grouping our objects, now it's time to think about our objects in terms of layers. Now Photoshop enthusiasts, you know all about layers. You probably have these massive documents with a bunch of layers that are really doing nobody any good. Now, what if I told you that there's a better way? That's right, there is a better way, and Illustrator does it. It's called layerless thinking. Now, this isn't an official Adobe term. This is a term that I like to use as part of this whole object oriented design theme. But essentially layerless thinking invites you to say hey, if I want to put something behind something or in front of something, I don't need to make it on a new layer, I can just put it, arrange it correctly. I can just arrange it correctly in my scene. So, open up your source files and lets open up the file layerless.ai. So, a big blue square, what an interesting document you have put together for us, Professor Q. No, is that nickname not going to stick? I was really hoping it would, but whatever. Anyway. [LAUGH] We have a big blue sky, but we don't really have anything here. Oh wait, lets hit command y on our keyboard. I can see all of our beach balls that we just made. Now, how am I seeing that, well Command Y let's us see the outlines of everything that's created. So our sand and our beach balls are still there, but why can't we see them? We'll hit Command Y again, or Control Y on PC, and we go okay well, we've got to get the sky out of the way. But I still want a sky, it just has to be behind everything. Well, in Photoshop or maybe other programs you would put the sky on a new layer. That's not what we're gonna do in Illustrator. Let's right-click the same we would select our object, and right click as if we were gonna group it. Then we're gonna go to this arrange palette, and you can see we have a series of options. Bring to front, bring forward, send backwards, or send to back. Think of your scene objects arranged in front of and behind each other. That's why they never cut each other off. We're gonna go over here and select send to back. So that put our big blue block behind the sand and behind the beach balls. Now all of the beach balls are behind the sand, well I don't want em all--- Behind the sand, maybe I just want most of them, except for this one, I'm going to drag it up and make it really big. And that one will be in front of the sand. So I'm going to right click on it, I'm going to arrange it, and I'm going to bring it to the front. So you can see now we have the big beach ball is in front. We have these other beach balls. So think of it in terms of, we have the beach ball is layer one, sand is layer two, beach balls behind it are layer three, and layer four is the sky. Now, every single object you create technically makes it's own layer. What do I mean by that? Well, I'm gonna drag out the layers palette from my menu here so I can show you something. You see we have layer one. And much like Photoshop, we can click this Create New Layer button and keep making layers. But I just said that stuff is in front of and behind each other already. So, what does that mean? Well right here next to the picture of layer one there's an arrow. A click on that and you can see all the virtual layers that each object, each group in this case, has created. Now the big blue box is a path and that's on the very bottom. The sand, that's another path. That's near the top but the only thing on top of it is, our other beach ball. Now if you're a real stickler, and I mean real stickler, I almost never do this. You can name each one of these things. You can go in and say that I want this to have a name and double-click here and say this is Big Beachball. And you can go in and call this Sand. And down here, Sky. And you can see if I take this Big Beachball and hit Command-C, And then Command+V to copy and paste. It makes another thing that takes on the same name. So if you named the first one beach ball they'll all basically take on that same name. Now I can use this layer palette the same way I use Photoshop's layer palette. You can see each of these groups by the way Break down into the three shapes that they're made of. So you can even arrange say in big beach ball, I can put the white behind and you don't see it anymore. You can arrange these things in whichever way you like, so you can really break down the layers. Now I can click and drag saved Big Beachball all the way back here and put it behind the sand, or take the sand and put it behind all the beach balls. This is the idea of having layers, but it's all happening if I collapse it up in to layer one. Because we have to think of these things as being stacked on top of or behind each other, let's grab the sand. Go to right click, we'll go to arrange, and we'll say bring forward. Well, that put it in front of the beach ball and not everything else. It takes kind of a long time to bring something forward and back a lot, so what I'll end up doing is using the keyboard shortcuts command+right bracket and command+left bracket. So if I hit command+right bracket and I just keep tapping it, you can see what's happening to sand in the layers list. And you can see down here what's happening to the sand with all the beach balls. This is right bracket, this is left bracket. So send forward and send backwards is what this is doing. It's essentially a really nice and easy way for you to arrange the things that you see in your object, lets say I want to add the sun to this beach and when I do that I want to give him sort of the flames around him and cool sunglasses. Really cool, cool sun. And watch some of the techniques that we use so that its kind of easy to manage. I'm going to grab the ellipse tool. And that's about a good color but we'll go for the classic yellow smiley face. And then I'm gonna draw some sunglasses. This will be the sun, right? I don't really like that, so I'll click again, remember to reset my path. Now keep in mind, I do realize I'm not putting together for you the greatest looking sun that you've ever seen, it's just kind of an example. And we'll color those black. I'll even go in and put a couple of streaks here. Then with our paintbrush, I'll come and give him a big smile with a little bit of a cheek here and a nice little nose. Then, what did I forget? Oh yeah. The sun rays around the sun. So I'm gonna go and make sure that I have orange selected here. And I'm gonna start in making a big squiggly, and I probably should have used the paintbrush on this, right? But you can see, I'm just clicking and dragging around with the pen tool. You can probably hear all the clicking being picked up. And my sunspots. Now, I made this in front of everything, so I'll right click, arrange, and send backwards. Well, now I know I have to send it behind the nose, and the two things [INAUDIBLE] on the cheek, and the smile. And the eyes, and both streaks on the sunglasses. It's just too much. So we're gonna Cmd+Shift and left bracket, sending it to the back. Well, now it's behind the sky. So I'll Cmd+right bracket and put it in front of the sky. And I can select everything. See I've got the sky too, so I'll hit the Shift I'll select the sky, so it's unselected. And my box is now just around the sun which is where I want it. You see I'm moving around, but it's not together yet. You cant see all of these paths in my layers palette. So what do we do with those? We group them, right? So we'll do Command + G. And now they're grouped. And for our sanity, we'll call it Mr. Sun. Mr. Sun, won't you come. I bet you didn't know you were gonna get some singing lessons. We'll scale him down from the center using Option, remember. Then we'll take him, move him up here. We will use the side of our select tool to rotate him. And there's Mr. Sun. So now you're starting to see that we want to use all these things together. We want to use grouping, and we want to use this layerless thinking and we want to use a manipulating objects and arranging them front and back and arranging them on the scene, rotating them, sizing them. To put together something that really makes the whole piece of art come together. I mean, when we make the vector hero cover, we're gonna need to make, I don't know, say, a pen tool on there somewhere, I would imagine, because it's the best, right? We're gonna want a background, and we're gonna want some special effects. The only way we're gonna get that done, is by being able to logically group things in our scene. Arrange them the way we want and then taking them and being able to save them and output them. Saving and outputting's coming a little bit later, but the next thing we're gonna deal with is locking and hiding. That's the final step of really understanding how you make these objects work in arranging a scene in illustrator.

