
 Lessons: 18Length: 1.3 hours
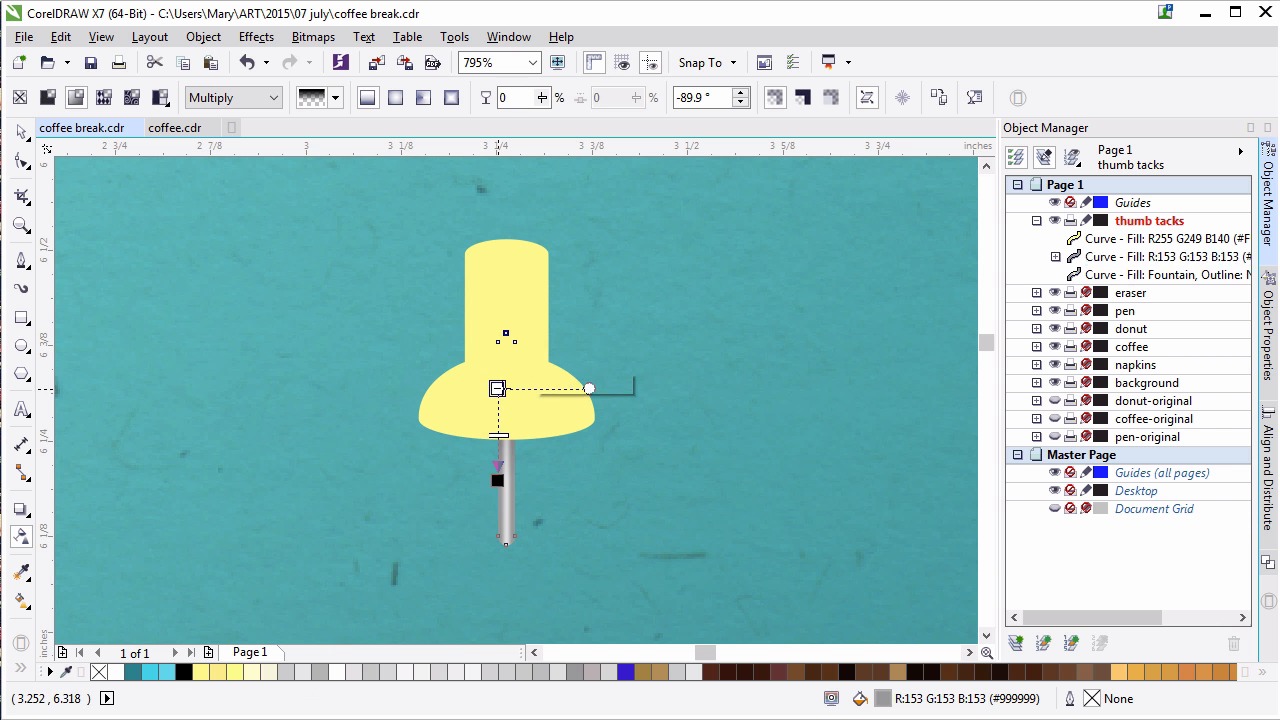
- Overview
- Transcript
5.3 The Thumbtacks
Build thumbtacks to scatter around the composition from simple shapes using the Shaping docker and different styles of fountain fills and transparency attributes.
1.Introduction
1.1Introduction00:59
2.The Background and Napkins
2.1Creating the Background03:14
2.2Rendering the Napkins03:28
3.The Coffee Cup
3.1Rendering the Cup Saucer04:30
3.2Creating a Cup05:43
3.3Creating Additional Elements for the Cup04:43
3.4Filling the Coffee Cup04:32
3.5Finishing Up the Coffee Cup04:26
4.The Sprinkled Donut
4.1Creating a Basic Donut05:14
4.2Creating the Frosting04:47
4.3Rendering the Frosting04:20
4.4Finishing the Frosting03:58
4.5Creating the Sprinkles06:54
5.The Office Supplies
5.1The Pen06:59
5.2The Eraser04:57
5.3The Thumbtacks04:55
6.Conclusion
6.1Finishing Touches04:11
6.2Conclusion01:27
5.3 The Thumbtacks
Welcome back to Advanced Techniques in Corel Draw. I'm Mary Winkler for tuts+. In this lesson, we're gonna complete our chapter in creating office supplies with some conflict thumbtacks for the left side of our composition. Dust off those shape building skills once more and let's dive right in. I've created a new layer in my object manager for this lesson. As you can see on the right, each item has its own layer associated with it, and they're labeled so its contents are easily understood. Zoom in to the upper left of the page. This is where we are going to build, and ultimately place our thumbtacks within our composition. Using the ellipse tool, draw a small, horizontal ellipse. Duplicate it and use the pip tool to widen the duplicated ellipse. Align the two ellipses to their vertical centers in the align and distribute docker. Draw a rectangle between the two ellipses. Its width should match the width of the top ellipse and hit both the ellipses centers. Zoom in a bit and make sure these items are aligned. In the shaping docker, load the top ellipse and the rectangle together. You can adjust the width of the newly welded shape if you use so choose. Center it vertically with the ellipse again. Use the pick tool to pull the ellipse, increasing its height. Now your shapes look like a tiny top hat. Grab the pen tool from the toolbox. Use it to draw a curve starting at the left of the ellipse and curving up and to the right on the cylindrical shape. Duplicate this shape and mirror it horizontally for the right side of the thumb tack. Adjust your shape so as you see fit. Group it all together. Draw a thin vertical rectangle and fillet the corners, rounding them all out. lengthen and scale it as needed and place it beneath the larger thumbtack shape. Center the group in this new shape vertically. Now that we have our basic thumbtack design, it's time to render it. Select the rendered rectangle. Apply a fountain fill to the tack and set both colors to grey. And a third color in the center and set it to light grey. Hit smooth fill, zoom in on your tack and use the interactive fill tool to adjust the gradient manually. So that it looks like a shiny piece of metal, similar to the metal that's of the pen we created earlier in this chapter. Zoom back out and duplicate your tack shape. Set the fill to uniform gray fill. Under transparency, hit multiply and apply a fountain fill transparency. Place this under the yellow part of your thumb tack and align it with the metal bit previously made. Use the transparency tool to adjust the fountain fill so that it forms a dark cast, shadow on the middle portion of the tack. Make sure your other tack shapes are welded together, the plastic portions. Set this ships full color to a fountain fill, with light yellow in the center and a darker yellow on either side. Adjust your fountain fill angle as you see fit in the docker or with the interactive fill tool. Use the pen freehand or bezier tool to draw a shadow shape on the thumbtack, using the freehand tool to draw large shape over the lower portion of the thumbtack. Choose dark yellow or yellow orange of your choice as the fill color. This would be a great time to use the blending technique for choosing colors or color pallets that we explored while making the donut's frosting in the previous chapter. In the shaping docker, with both shapes selected, hit Intersect. Delete any extraneous shapes. Use the transparency tool to apply a fountain fill transparency in the shadow shape. Set the angle of the fill so that it starts at the upper left and is pointed to the lower right. Adjust as you see fit. Repeat this process, with the creation of a shadow shape on the left side of the thumb tack. This time I´m gonna use the pen tool to create it. I´ll be creating a curve that protrudes between the barrel and flared portion of the thumbtack. Set the fill color to a dark yellow, or yellow orange. Intersect your objects and once again use the transparency tool to apply a fountain filled transparency. This time my transparency will be elliptical with the darker color in the center and the transparent one on the outer edges. Set the blending mode to multiply or color burn. Draw an ellipse for the top edge of the thumb tack. Set the fill color to the same dark yellow used for the shadow shapes and apply a transparent fountain fill to it while you're at it as well. Group everything together, zoom out and apply a simple drop shadow to your thumbtack. Duplicate your tack a couple times. Move and rotate the duplicate tacks around your page. Copy the drop shadow from the first thumbtack with the drop shadow tool. Move them around in your composition as you see fit. This concludes chapter five. Thank you so much for watching this lesson on building thumbtacks from basic shapes and fountain fills. In the next and final chapter, we'll add some finishing touches to our design by way of coffee stains and some pen doodles on our napkins.


