
 Lessons: 18Length: 1.3 hours
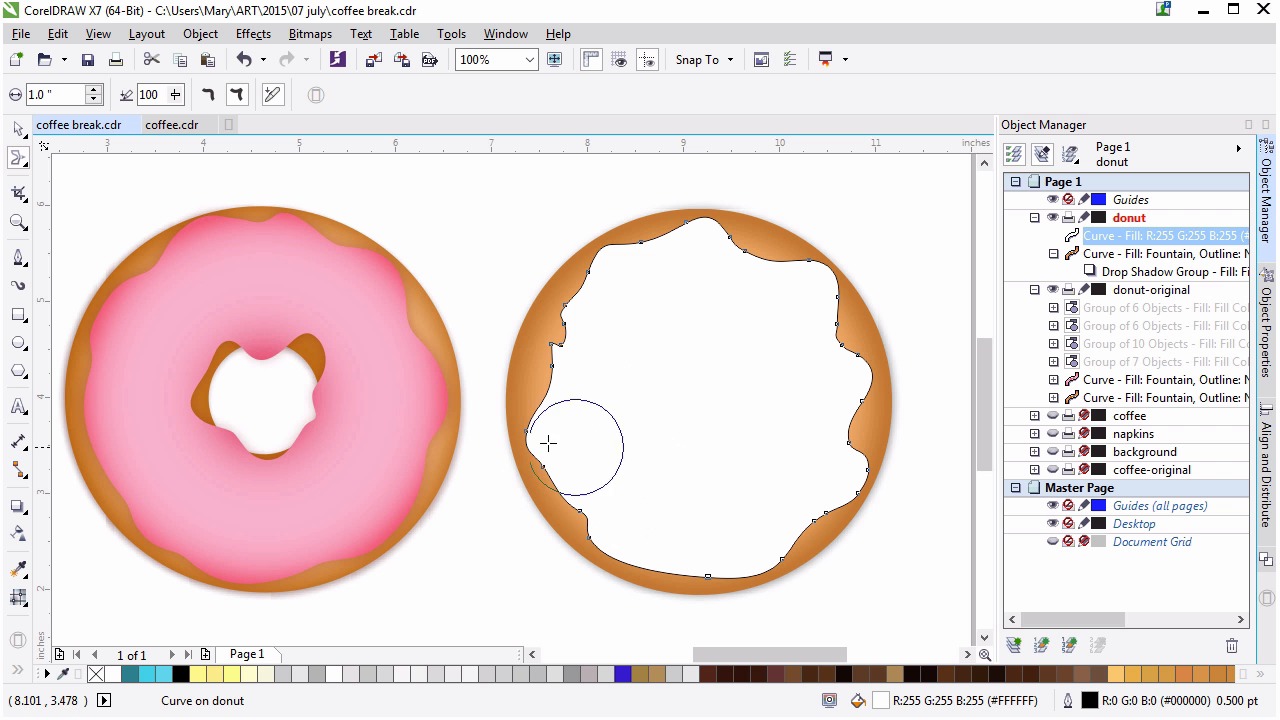
- Overview
- Transcript
4.2 Creating the Frosting
Use drawing tools and the Shaping docker to create drippy frosting.
1.Introduction
1.1Introduction00:59
2.The Background and Napkins
2.1Creating the Background03:14
2.2Rendering the Napkins03:28
3.The Coffee Cup
3.1Rendering the Cup Saucer04:30
3.2Creating a Cup05:43
3.3Creating Additional Elements for the Cup04:43
3.4Filling the Coffee Cup04:32
3.5Finishing Up the Coffee Cup04:26
4.The Sprinkled Donut
4.1Creating a Basic Donut05:14
4.2Creating the Frosting04:47
4.3Rendering the Frosting04:20
4.4Finishing the Frosting03:58
4.5Creating the Sprinkles06:54
5.The Office Supplies
5.1The Pen06:59
5.2The Eraser04:57
5.3The Thumbtacks04:55
6.Conclusion
6.1Finishing Touches04:11
6.2Conclusion01:27
4.2 Creating the Frosting
Welcome back to advanced techniques in curl draw. I'm Mary Winkler for tuts+. In this lesson we'll draw some delicious drippy frosting playing the various drawing and manipulation tools. Let's continue where we left off in the previous lesson creating a delicious donut. I'm going to unhide my original drippy frosting in the object manager so you have a good idea of what we're creating. Over in the Toolbox, we're going to use the Freehand tool for this one. Even if you're using a mouse to draw, we could adjust the settings so it's more forgiving and renders smooth lines compared to jagged ones. Double-click the Freehand tool, and you'll come up with the Toolbox Options. In the menu, select Freehand Bezier Tool to adjust the settings. I've set my corner threshold to five pixels, straight-line threshold to five pixels, and auto join to one pixel. You may want to lower the threshold of some of these setting if you're using a mouse versus a graphic tablet, but that will definitely be your choice. Using the freehand tool start to draw a wriggly scalp shape around the inside of the donut. How drippy or scalped it is is entirely up to you. You can use the shape I created in the left as a guide. Watch and follow along with the donut on the right or create your own unique shape. Once done, use the zoom tool to zoom in and make sure those beginning and ending nodes have joined. If they haven't you can easily do so with the pen tool. Select the origin known and the ending node with it and you'll find that your curve is no longer open. In the case of my shape the nodes need some adjustment. Select the node you don't want with the shape tool and hit delete node in the property bar. Now, my wiggly, curvy shape is mostly circle like versus cutting inward toward the middle, which is something that I want. This isn't quite the shape I wanted for my frosting object, it's not nearly drippy enough and some portions are just a bit too angular. We're going to manipulate the curve's path. Grab the smooth tool found in the shape tool fly out and drag it around the edge of your frosting. Now my smooth tool is set to one inch to the sides and 100 for the smoothing. Adjust this as you see fit. Wait what about drippier frosting. Grab the smear tool. Also, within the shape tool fly out and manipulate your frosting contour. Do it too much and it will be smeared wildly. Too little and there won't be much of a change. Interactive tools like this are all about creating organic objects. Get messy with vector. Set this mood tool to smooth smear and get some more bumps and rigid and scallops and contour, then switch back to the smooth tool to even out your frosting. Using these tools in conjunction with each other really helps create fantastically delicious donut frosting for our illustration. Whenever you're satisfied with your frosting shape's contour, you can move on to the next part of this lesson, which is to cut a hole in the frosting. Much like the donut, we'll use the shaping docker to accomplish this. For now, I'm setting the fill to none so I can better see the donut hole, and get an idea of what I want my cutout shape to be. Using the freehand tool, draw a smaller shape similar to your current frosting object. You want to show some of the donut beneath as well to make it look like the frosting is dropping into the center of the donut. Zoom in, and make sure you like the way your curve joined together. Using the shape tool, delete, add or reposition nodes in your handles so smoothing or smearing the curve will be easier. Use the smooth tool and the smear tool to manipulate the object to get it just the way you want it. I'm going to set my fill color back to something solid, so when I hit either simplify or back my instrument, this change will be easily seen. Select both objects and apply your shaping effect in the shaping docker. I hit simplify and then deleted the unnecessary object. From here you can decide whether or not you like your frosting shape enough to move on to rendering it or refining it further. I want to add some bits onto my frosting shape. Using the free hand tool, I'll draw these additional shapes as complete objects over my current frosting. Make sure all additional shapes have closed curves, and position them so they're overlapping the portions of the frosting you want to weld them to. If you hit Weld without making sure the newly drawn shape is closed you'll only end up with the portion of the shape connected in the way you wanted. Always make sure your curves are closed and nodes are joined when you want them to be complete shapes. Alternatively you can also play again with the smear and smoothing tools, how to create organic shapes is up to you. I like to work quickly and freely with tools that let me create unpredictable curves as though I was really frosting a donut, or letting icing melt and move over an organic surface. When you're satisfied with your icing design, you can move on to the next lesson. Thank you so much for joining me in this lesson on drawing unpredictable organic shapes. In our next lesson we'll work on rendering the frosting and explore some quick techniques for working with and choosing color.


