
 Lessons: 18Length: 1.3 hours
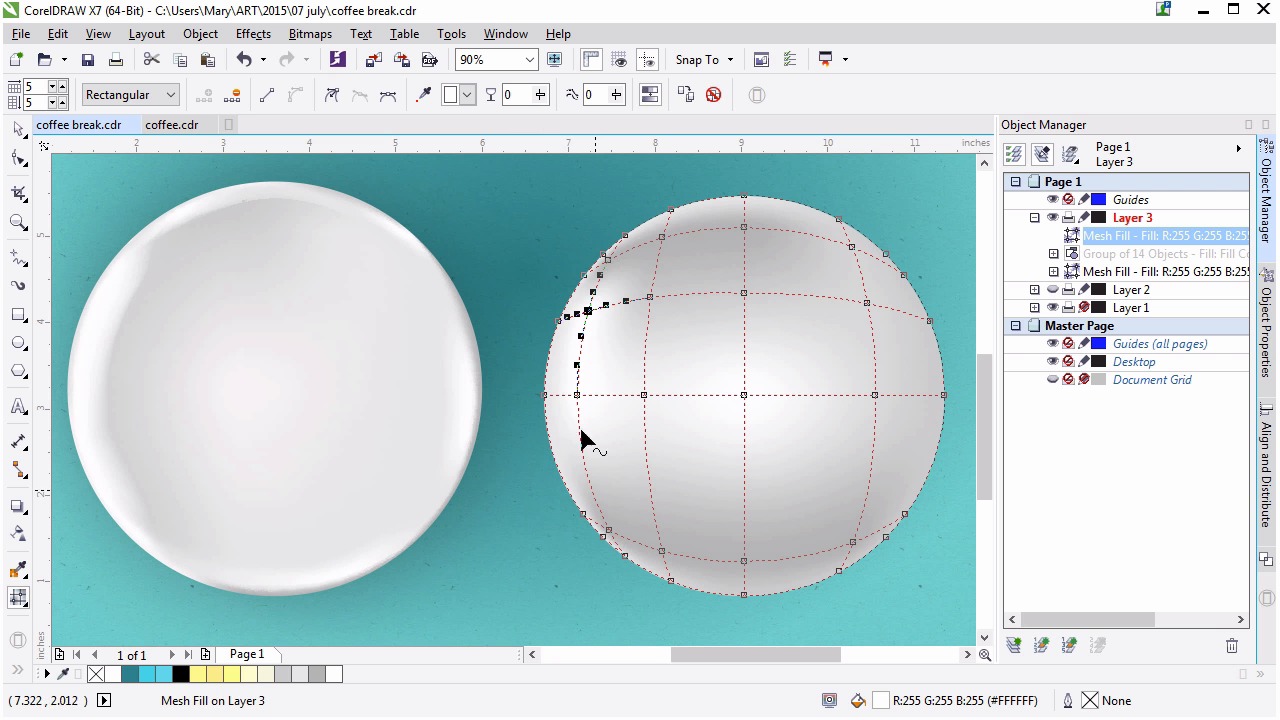
- Overview
- Transcript
3.1 Rendering the Cup Saucer
Now you will use gradient meshes to turn a simple circle into a cup saucer.
1.Introduction
1.1Introduction00:59
2.The Background and Napkins
2.1Creating the Background03:14
2.2Rendering the Napkins03:28
3.The Coffee Cup
3.1Rendering the Cup Saucer04:30
3.2Creating a Cup05:43
3.3Creating Additional Elements for the Cup04:43
3.4Filling the Coffee Cup04:32
3.5Finishing Up the Coffee Cup04:26
4.The Sprinkled Donut
4.1Creating a Basic Donut05:14
4.2Creating the Frosting04:47
4.3Rendering the Frosting04:20
4.4Finishing the Frosting03:58
4.5Creating the Sprinkles06:54
5.The Office Supplies
5.1The Pen06:59
5.2The Eraser04:57
5.3The Thumbtacks04:55
6.Conclusion
6.1Finishing Touches04:11
6.2Conclusion01:27
3.1 Rendering the Cup Saucer
Welcome back to advanced techniques in Corel Draw. I'm Mary Winkler for tuts+. In this lesson we kick of chapter three with a cup of coffee. Specifically, we're going to use the ellipse tool and mesh tool to create and render a coffee cup saucer. For the majority of this course, I'll have a portion of my enrichment illustration on the left side of your screen and a working object on the right. Let's take a look at the coffee cup we'll be recreating. Most of its components have been rendered with the mesh tool. Additionally, most of its components are circles. Since we have a bird's eye view of our still life, we can stick with very simple shapes. Let's look at the coffee cup saucer. Just for now, I'm going to hide the rest of the coffee cup components in the object manager docker. We'll get to working on our saucer together. Using the ellipse tool with shortcut F7, draw a circle. Hold down Ctrl to keep it uniform. Set the fill color to white and the outline to none. I'm going to zoom in a little bit so we're super focused on the saucer. You're welcome to zoom in more than this, since you don't have two objects to show like I do. You'll find the Mesh Tool, shortcut M, beneath the Interactive Fill Tool in the toolbox. Select your ellipse and grab the mesh tool. Now as an example you can see what my saucers mesh looks like. Nodes is all over the place to find new shape, color, light and shadow. We're going to create something similar with this ellipse. This is what your mesh should look like automatically. Nodes around the perimeter and a single node in the center. Select nodes on the bottom and right edge. Hold down shift to select more than one at a time. In the property bar, used the match fill color drop down menu to choose a shade of light gray. Notice how lovely the white and gray blend into each other from node to node. Select the nodes on the left side, and make sure you don't accidentally warp the ellipse shape while doing so. Apply a light grey to these nodes too. Double click an area within your mesh circle to add a node. Add them around the circle. Six new nodes have been placed in total. You'll notice that as you add nodes other nodes will appear at cross sections within the mesh. You want to create the rim and lip of the saucer. To do that, the object edge has to be lighter than the immediate inside edge. Make the new nodes a light gray or white and move some of them carefully toward the outer edge. You may need to add additional nodes to create the saucer lip. Think of it as a circle within the main circle. Continue around. Once done with the second layer of nodes, you'll start up on a third, who's color will be like a medium grey. This makes the saucer look indented. Let's slow things down a bit. After finding the edge of the saucer with the first inner layer of nodes. I'll place a couple of nodes and then add a light grey or a white to them for the color. If I change nodes to white immediately without adding another line of nodes, the rest of my saucer lightens up. I only want the inner edge to be lighter. So let's add another line of nodes around, it as I mentioned earlier, to make the saucer look like it's indented. For now, I'm keeping the center lighter than the area around it. Most of this will be covered up, it gives me the impression of it being a plate without having to create the next layer of details within the mesh. Which would be the indentation where the cup itself sits. Your aim is to add nodes around what is essentially, a rectangular mesh within the circular object appears to be more rounded. We do this by adjusting the colors found at the corners of the mesh. We'll have to continue the lighter gray or white that shows the saucers lip, so that it forms a soft, subtle circle, similar to what my original mesh holds. And now, adjusting the shape of the mesh by manipulating node positions and node handles within the body of the saucer. We had to keep making adjustments and deselect the object mesh every so often to see how my rendering is going. And this point is a bit too dark. I want it to be lighter and a bit more subtle. Keep the center light the bulk of the circle gray and make sure the object's edges are darker than the lip of the saucer. The other key is to define the lighting or highlighted area a little bit. I'm putting my lightest colors on the left of the object. We'll define shadow and light within the full coffee cup as we move along in this course. I'm gonna speed up the final process of defining the saucer's edge for time's sake. Take all the time that you need. Reference a real plate or coffee cup if you want to. Push nodes and pull handles so you get the realistic look you want your illustration to contain. I'm going to move on to the next part of this object. The coffee cup. Thank you so much for joining me in the lesson in the mesh tool. In the next lesson, we are going to continue using the mesh tool and rendering another circle.


