
 Lessons: 18Length: 1.3 hours
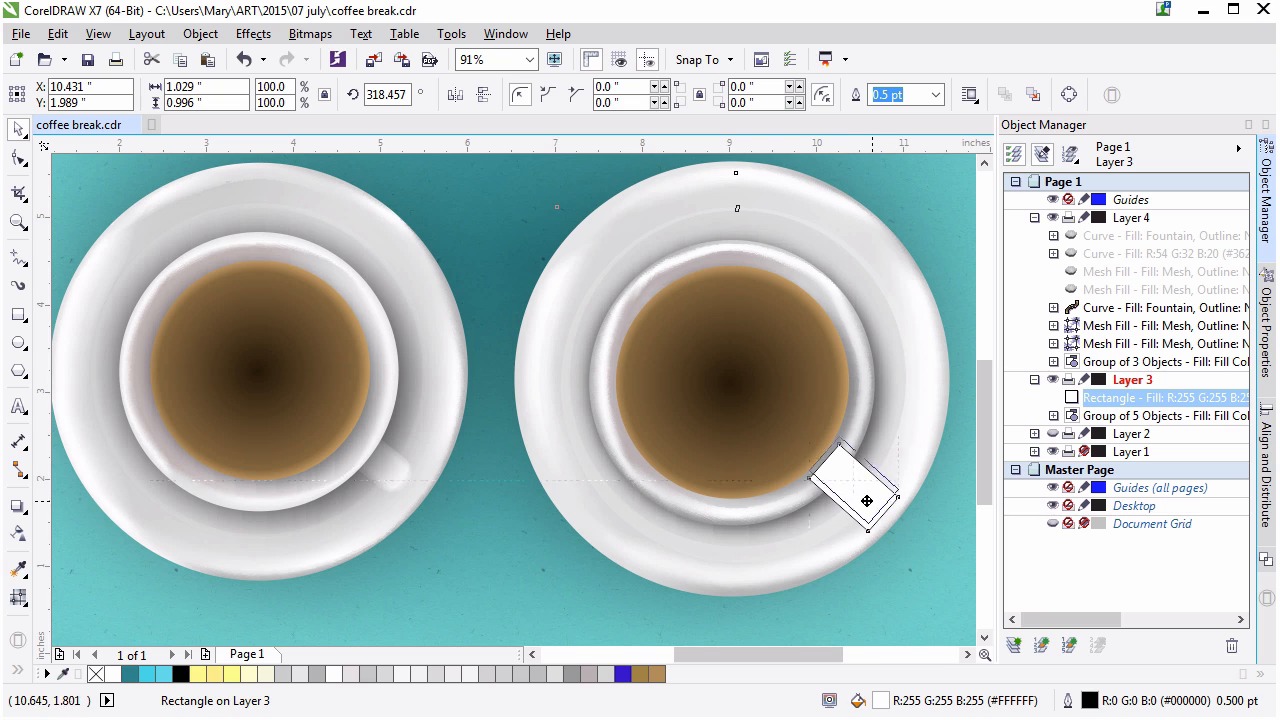
- Overview
- Transcript
3.3 Creating Additional Elements for the Cup
This is the second part of rendering the coffee cup. This includes creating the handle and the beginning stages of filling up the coffee cup. You will make use of the Mesh Tool, basic shapes, and fountain fills to render objects and bring them to life.
1.Introduction
1.1Introduction00:59
2.The Background and Napkins
2.1Creating the Background03:14
2.2Rendering the Napkins03:28
3.The Coffee Cup
3.1Rendering the Cup Saucer04:30
3.2Creating a Cup05:43
3.3Creating Additional Elements for the Cup04:43
3.4Filling the Coffee Cup04:32
3.5Finishing Up the Coffee Cup04:26
4.The Sprinkled Donut
4.1Creating a Basic Donut05:14
4.2Creating the Frosting04:47
4.3Rendering the Frosting04:20
4.4Finishing the Frosting03:58
4.5Creating the Sprinkles06:54
5.The Office Supplies
5.1The Pen06:59
5.2The Eraser04:57
5.3The Thumbtacks04:55
6.Conclusion
6.1Finishing Touches04:11
6.2Conclusion01:27
3.3 Creating Additional Elements for the Cup
Welcome back to Advanced Techniques in CorelDRAW, I'm Mary Winkler for tuts+. In this lesson we'll begin to fill a cup and render the cup's handle. Starting from where we left off in the previous lesson, we're going to begin to fill the coffee cup. This is the first layer of contents and simply forms the highlight reflection of the cup onto the coffee. Draw a circle within the coffee cup, much like the cup, most of it will not show on our final design. But if you chose to create tea or a different drink within your cup, you'll have the techniques down in order to do so. Let's set the fill color to a light brown, and outline to none. We'll need to apply an elliptical fountain fill to the circle with the inner color, the one on the right, set to a much darker brown. While you can keep it a flat color, having it as a fountain fill will give you a good basis for where to place the next part of the cup's contents in the next lesson. Like if you choose coffee with some milk in it as your contents, this would also form a good basis for that design. Use the interactive fill tool to adjust the gradient's radius. You want the lighter color to be confined to a strip of area near the edge of the circle. It's meant to act as a highlight and bright reflection within the cup. Adjust the saucer's measure and the ellipses beneath the cup, in order to give the coffee cup a bit more depth. Use the drop shadow tool to apply a drop shadow to the light brown circle. You want to make sure the shadow is aimed towards the lower right, as that's where we're placing the most dramatic shadows we have. Overall, this is a fairly light illustration who's shadows aren't terribly strong. Keep the transparency to 24 or so, and the feathering to a low, single digit number. We want the drop shadow in this case to be subtle, but add a little bit more depth to the design. We'll be doing more in the next lesson to the inside of the cup in order to render its contents. Let's move on to the cup's handle. Once again, I'm going to unhide the handle from the original cup I drew for this course, so you can easily see what we're aiming at with our illustration. The placement of the handle is up to you. I've chosen the lower right of the cup since I'm right-handed, and this is as close to where it would be if I was drinking this coffee. Using the rectangle tool, draw a small rectangle. Use the pick tool to select it twice in order to rotate it to the right about 45 degrees or so. Place it so that it overlaps the rim of the cup. In the property bar, unlock the corner radii and filet the two corners that do not overlap the cup. You'll want to round them out to a quarter of an inch radius or so. The radius of the corners will depend on the size of your rectangle, of course. You want the handle rounded, but squared ever so slightly. In the object manager, place the rounded rectangle handle beneath the coffee cup components, but above the saucer components. My object is a little big, so I've scaled it down slightly. I'm going to hide my cup components, so I can focus on the handle when rendering it. Grab the mesh tool, and let's get going. Select the leftmost nodes, and apply a medium gray to them. We're giving the handle some form, since we're only seeing the very top edge of it. If this was a different angle, there would be a much larger shape to render. Since we have such a small area, we have to do our best to make it stand out. Repeat along the outer edge of the handle shape, add a couple nodes in the center of the handle. Select the center nodes and apply a light grey or white to them. Currently, the handle doesn't stand out enough, we definitely have more work to do. Next, we need to define the handle's edge better, so it doesn't blend into the saucer. I'm going to use the zoom tool to zoom in on my handle, so I'm focused on it during the rest of this lesson. Center your object within your window, and pick up the mesh tool again. Add a node on either side of the center of the handle, this will add another line of nodes to work with. Select the six new nodes, and set their fill colors to light gray or white. Adjust your node shapes so that there isn't any sort of indent. It's easy for handles of nodes within a mesh to accidentally be manipulated in the wrong way, especially when working on a mesh while you're zoomed out. Select the edge nodes, and apply a darker gray to them. Notice how immediately the handle is more defined than it was before. How far you push this shadow will determine how much the handle stands out. While we want it to be defined against the saucer, we also don't want it to be too stark in contrast to the other coffee cup parts. At this point, I've completed my handle, and I'm ready to move on to the next lesson. You are welcome to push the rendering of your handle as far as you want for the sake of your illustration. Thank you so much for watching this lesson and completing the coffee cup and handle. Join me in the next lesson, where we continue filling our coffee up with a realistically rendered look we'd created for my shapes.


