
 Lessons: 18Length: 1.3 hours
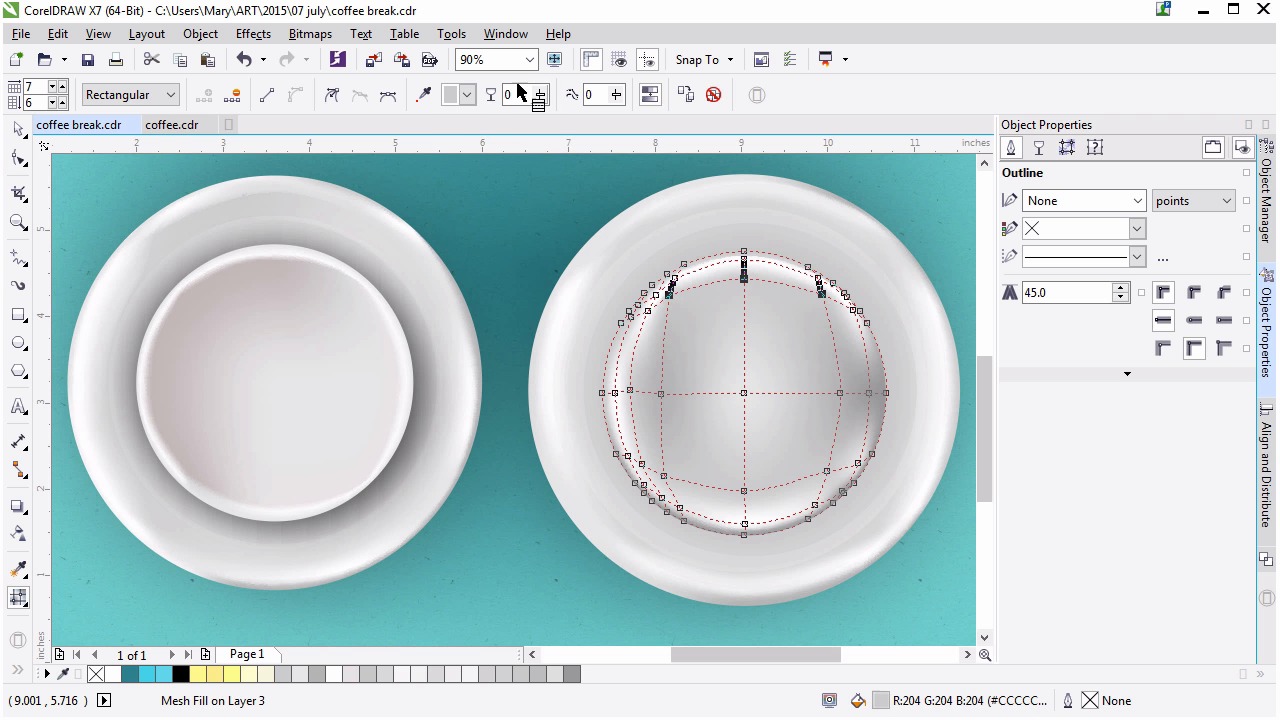
- Overview
- Transcript
3.2 Creating a Cup
In this lesson we’ll prepare another circle in order to render it into a cup shape and prepare it for its contents. This includes planning out lighting and shading for multiple content possibilities.
1.Introduction
1.1Introduction00:59
2.The Background and Napkins
2.1Creating the Background03:14
2.2Rendering the Napkins03:28
3.The Coffee Cup
3.1Rendering the Cup Saucer04:30
3.2Creating a Cup05:43
3.3Creating Additional Elements for the Cup04:43
3.4Filling the Coffee Cup04:32
3.5Finishing Up the Coffee Cup04:26
4.The Sprinkled Donut
4.1Creating a Basic Donut05:14
4.2Creating the Frosting04:47
4.3Rendering the Frosting04:20
4.4Finishing the Frosting03:58
4.5Creating the Sprinkles06:54
5.The Office Supplies
5.1The Pen06:59
5.2The Eraser04:57
5.3The Thumbtacks04:55
6.Conclusion
6.1Finishing Touches04:11
6.2Conclusion01:27
3.2 Creating a Cup
Welcome back to Advance Techniques and Girl Draw. I'm Mary Winkler for Tots Plus. In this lesson, we are going to continue using the mesh tool and rendering another circle in order to create the coffee cup. Let's kick off the creation of this coffee mug with the addition of the circle drawn with the ellipse tool. We draw a lot of ellipses in this course. So, let's speed things up a bit. I drew this one earlier, and we'll simply duplicate it so we can customize it's properties. An elliptical fountain fill has been applied to the ellipse with two shades of grey. Light grey on the outside and dark grey on the inside. Under transparency, set the opacity to 52 or so. You can play around with these settings. I'm doing this to help cast a bit of shadow from the cup we're about to create. I tend to layer a lot of shapes on to one another in addition to using mesh and fountain fills to render. Okay, let's get to work on the coffee cup itself. Allow me to find the cup in my Object Manager, so we have a guide to work alongside, and we'll get going. Just another reason why organization is key within the Object Manager. Draw a smaller circle in the center of your coffee cup saucer. In the Align and Distribute docker, align your smaller circle to the center of your other saucer objects. Change the color to light gray in the object properties docker or you can keep it as white. Get rid of the outline if you haven't already. While we will be adding a multitude of gray shades to the circle, I like to start with the basic color to build upon. It gives me a good sense of what my illustration will contain once it's completed. Use the mash tool to select the nodes in the bottom and right edges and set their color to dark gray. For the upper left nodes, a medium gray will work well. Double click along the left and lower left portion of the circle to add nodes. We're working in the cup's rim. Set the color to light gray or white and move the nodes closer to the edge. The aim's to, like on the saucer, create a circle within the circle from a rectangular mesh. Working on the lower left corner, I'm adjusting the nodes and their handles and making the area a bit lighter so it's more rounded. Continue working around the inner edge of the circle. To see how the rim shape is coming along, set the node toward the center to a medium light grey so that you can see whether or not your rim is circular or rectangular. This takes a bit of doing, playing with the nodes, their positions, their angles, and the colors that you apply to them. De-select your cup object to see how your measure shaping up. So the very center nodes is a lighter gray or white to emphasize the shadow and the inner side of the cup. Move the nodes and help to find the cup's rim toward the cup's edge every so slightly. Rendering with mesh oven works incrementally. You move nodes a bit, check out how it looks and do so again. If you used a photographic reference or aimed to match the cup on the left side of your screen, this is less of a guessing game. If you want to get a feel for freely creating mesh rendered work however, you can do so with a fair amount of trial and error to get to know what each of your actions does to the object. Deselect every so often so you can easily see glaring mistakes, like the upper left corner of my mesh. That indentation looks like someone took a large chip out of my mug and pushed inward when the ceramic wall was being created. It's not the look I want, but it's easily fixed. Zooming in on my working mesh, I wanna take the time to focus on what I'm current;y doing versus what I did previously. My mesh's nodes are clustered oddly in the upper left corner I'm going to carefully re-position them and recolor them as needed to get rid of this dent. While you may not currently have this issue with your mesh, knowing how to fix a simple mistake or how to smooth out the kinks free mesh is an important step to creating mesh designs comfortably. Speeding up once again. Smooth out those bumps, kinks and weird portions of your mesh. You can also double click existing nodes to delete them in case you simply want to replace them entirely. Meshes are incredibly malleable. Let's take a look at my previous cup, and notice the warmer gray tones inside of it. Now, to be honest, most of this will be covered up. However, I think it is important to have a good grasp of rendering and modeling so that if you wanted to create a before and after style illustration showing the coffee and donut, before it was eaten, and again after, or even during. You could easily do so without having to recreate the entire illustration. You'd simply be able to delete some components, and create a few new ones in the case of this coffee cup. The donut would be another story entirely. We'll get to that later. So I'm adding a red grey tone to the cup, and making the rim smaller than it currently is. As we've been doing this is an adjustment step. With the grey nodes closer to the white ones to make a light colored room smaller and make sure those corners are rounded or as rounded as you can get them. You can add additional nodes so that it forms a circular shape inside of a cup. Continue working on your basic cup shape until you have the shape and the lighting you want. Work out the kinks in your circles so it's no longer lumpy. How far you take this step is up to you, as we're going to move on to filling the cup and creating the handle in the next lesson. Additionally, you can always adjust your cup later in this course, so it looks right with its contents. When you're satisfied with your cup render, use the drop shadow tool to apply a drop shadow to your cup in the same manner we've done with the saucer and napkins. My shadow is further to 15, or so, and the transparency is 60. Thank you so much for joining me and rendering the circle into a cup with a mesh tool. In the next lesson we'll begin to fill the cup and render the cups handle.


