
 Lessons: 18Length: 1.3 hours
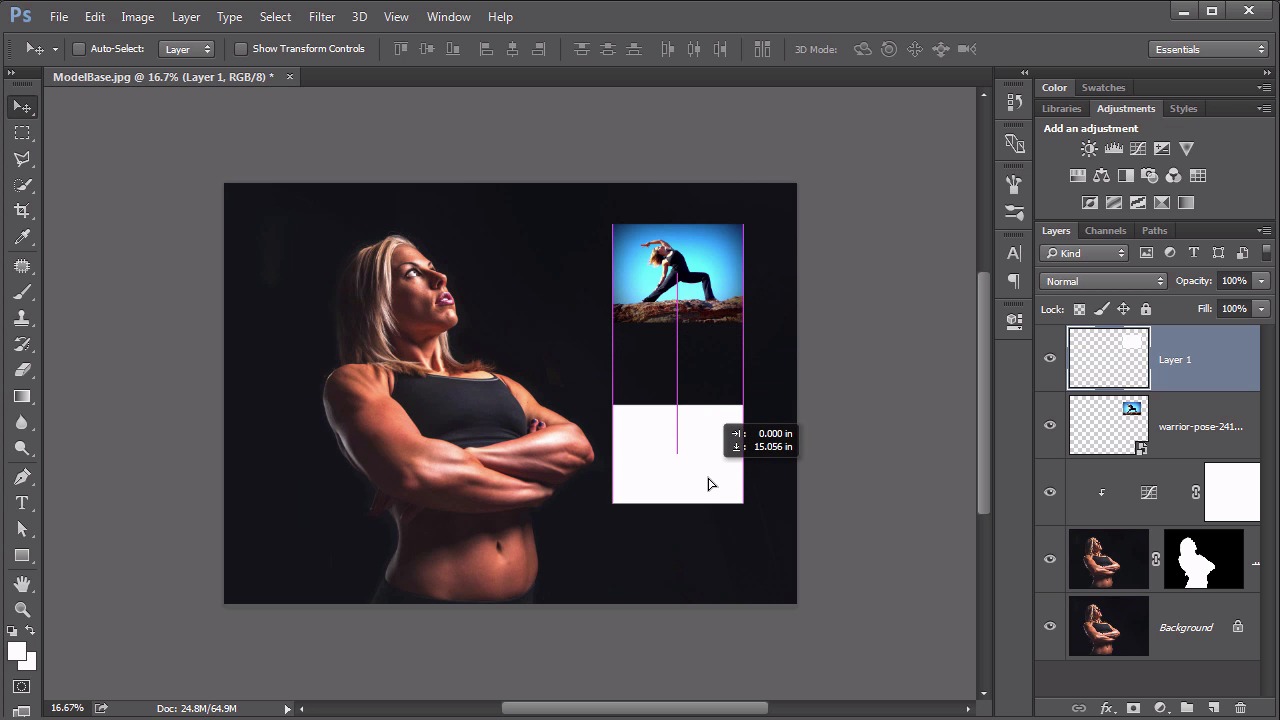
- Overview
- Transcript
4.1 Scene Planning
In this lesson we begin assembling the assets for our color digital scene. This includes discussion about the planning of the scene and advice on layout.
Related Links
1.Introduction
1.1Introduction01:22
2.Basic Color Theory
2.1The Color Wheel02:27
2.2Warm vs. Cool04:52
2.3Color Schemes04:45
2.4Hue, Saturation, and Lightness03:46
2.5When Colors Collide03:23
3.Color Modes
3.1RGB06:10
3.2CMYK05:36
3.3LAB06:06
4.Working With Color
4.1Scene Planning06:26
4.2Controlling Color With the Hue/Saturation Adjustment Layer06:00
4.3Controlling Color With Blending Modes07:35
4.4Controlling Color With Gradient Maps05:35
4.5Controlling Color With the Painting Tools04:24
5.Tips and Tricks
5.1GUI Color Wheel03:31
5.2Adobe Color Themes03:55
5.3Color Look-Up Tables (CLUT)02:56
6.Conclusion
6.1Conclusion00:53
4.1 Scene Planning
Hello, everybody. Welcome back to working with color in Photoshop. This is lesson 4.1. In this lesson, we begin planning the scene for our project. In the course files for this lesson is this model base.jpeg. We'll start with this image open in Photoshop and build on this to create our colorful scene. There's also three pictures of a woman doing yoga that we'll work into this scene and have them arranged over here within this open space. And hopefully, even add some additional fun effects in there all while learning how to work with color within Photoshop. We'll also add some water, liquid effects to our main model here. Before we begin doing that, we need to make a selection of her and separate her from the background. So first of all, let's make a copy of the background layer by dragging it down to the new layer icon at the base of the Layers panel and then let's grab this quick selection tool here. And we'll tap the right bracket key to dial up the size of that brush just a little bit and create a very simple selection completely around the contours of our model. Sometimes it'll accidentally select these large areas that you don't want, so we need to deselect that. We do that by holding down the Alt or the Option key while deselecting that area. When the selection is completed all the way around, let's use the Refine Edge feature to add some smoothness to it, increase the Radius a little bit. We'll check that Smart Radius option, so that then we can restroke around these flyaway hairs. So we can create a much Better selection along her hairline and then I like to pull that Shift Edge in just a little bit to make sure we don't accidentally select any of the background pixels around the contour of her figure. Or else sometimes, we'll end up getting a bit of a halo-type of effect around her and we don't want that. I'll change the output to Layer Mask and click OK. So now, we have a nice mask of our model and then I wanna add a curves adjustment layer. So I'm gonna hold down the Alt or the Option key while adding this curves adjustment layer, so that I can check the Use Previous Layer to Create Clipping Mask. So, it gets clipped automatically right here to our selected model layer. In this one, I'm just gonna add a point about a one-third the way from the left, pull it down just slightly, because I think her exposure is just a little bit too bright and that just helps darken it just a touch. Now, I wanna begin adding in those three images over here on the right. Start by going to File > Place Linked and then in the course files for this lesson, I'll select the warrior-pose to place this in here. Now it automatically comes in as a smart object, so we can easily scale it down. To make sure you're not squashing it or stretching it when you're scaling it down, hold down the Shift key while you scale it, that keeps its aspect ratio the same and we'll add it right about there. And once I have a good position for this, I want to use this as a basis for figuring out where I wanna put the other two images, cuz I want them to be of the same size, lined up and evenly spaced. Here's a trick that I really like to use for that. First, I'll create a new layer, then I want to create a selection of this warrior pose. So, I'm gonna Ctrl+click on that and fill it with whatever happens to be your foreground color. I did that by holding down the Alt or the Option key and tapping Backspace and then I'm gonna cancel the selection with Ctrl or Cmd+D and use the Move tool. I will take this new layer that just filled in and move it straight down. Hold down the Shift key to make sure it stays moving straight down, so that aligns it with this and my goal here is I want to have this spacing between the bottom of this box be the same distance between the top of this box and the top edge. Here's a quick little trick to do that. Use the rectangular Marquee tool and juts measure that out until we get it right to that edge and make sure the mode of this tool is on new selection. Cuz then, when you mouse inside the selection, you get the sort of arrow, which means you can move this around. So, use this as a measuring stick to go all the way to the bottom and just pop it to the bottom edge of the canvas. And so now you know where this layer needs to be Aligned tool, but be careful. You can't just grab this layer now, because it's not gonna move things right, it's gonna grab this selection in the layer and move them together. Instead, we need to put a guideline there. First, we need to see our Rulers. So we can add them by going to View > Rulers and drag your guideline down right here to the very top of that selection edge. And now, we know where we want this layer to align with. So we can cancel that selection, Ctrl or Cmd+D. Now we can move that straight up, so it pops right into there. So we know that´s where we want that second image to be, let´s create a third one too. This one´s pretty easy, I can hold down the Alt or the Option key with the Move tool and just drag a copy of that and look at that. I get these smart guides that pop-up that let me know when it's positioned exactly in the center there. So, I know that spacing is identical between those. With my boxes in place now, I can begin adding in those other images. Once again, let's go to File > Place Linked. And for the second one, let's use this yoga pose. I know they're all yoga poses, but this one's actually called yoga pose. And I want this to be inside the bounds of the box that I have here, but I don't wanna use the entire image. I kinda wanna have that crops down. So I'm just gonna leave it where it is for right now, click the check mark to commit that transformation. Create a selection of this Layer 1 copy, that´s by Ctrl or Cmd+clicking it and I wanna use that selection as a Layer Mask. That's this add Layer Mask button down here at the bottom. And so now I'm using that as essentially a container to show this image, but I need to move it over. The problem with just grabbing it and moving it is the whole thing moves, including the mask and I don't want that. What I need to do is unlink it. That's by clicking it on this little chain link between the two items here, then make sure that selection border, that's this wide outline isn't on the mask. But instead, it's on the actual layer. Now I can move that around, it look like it's even a little bit too big there. So Ctrl and Cmd+T to get the transformation handles. I move my center point, so that I can hold down the Shift and the Alt. And scale from that center point, then the enter key to commit that and then I can throw away this one measurement layer that I was using to create the spacing for it, then I'm gonna do the exact same thing for this lower one. File > Place linked, I'm gonna use the other yoga pose here. Apply the transformation, create the selection, add the Layer Mask. Unlink it, grab the layer, transform it into place. And when it's positioned properly, commit that transformation and then we can even throw away that measurement layer too. So at this point, we've got our basic elements for our scene setup. This will be the foundational file, we'll build the rest of our effects on. The next lesson, lesson 4.2, we'll work with changing colors using the hue saturation adjustment layers.


