
 Lessons: 18Length: 1.3 hours
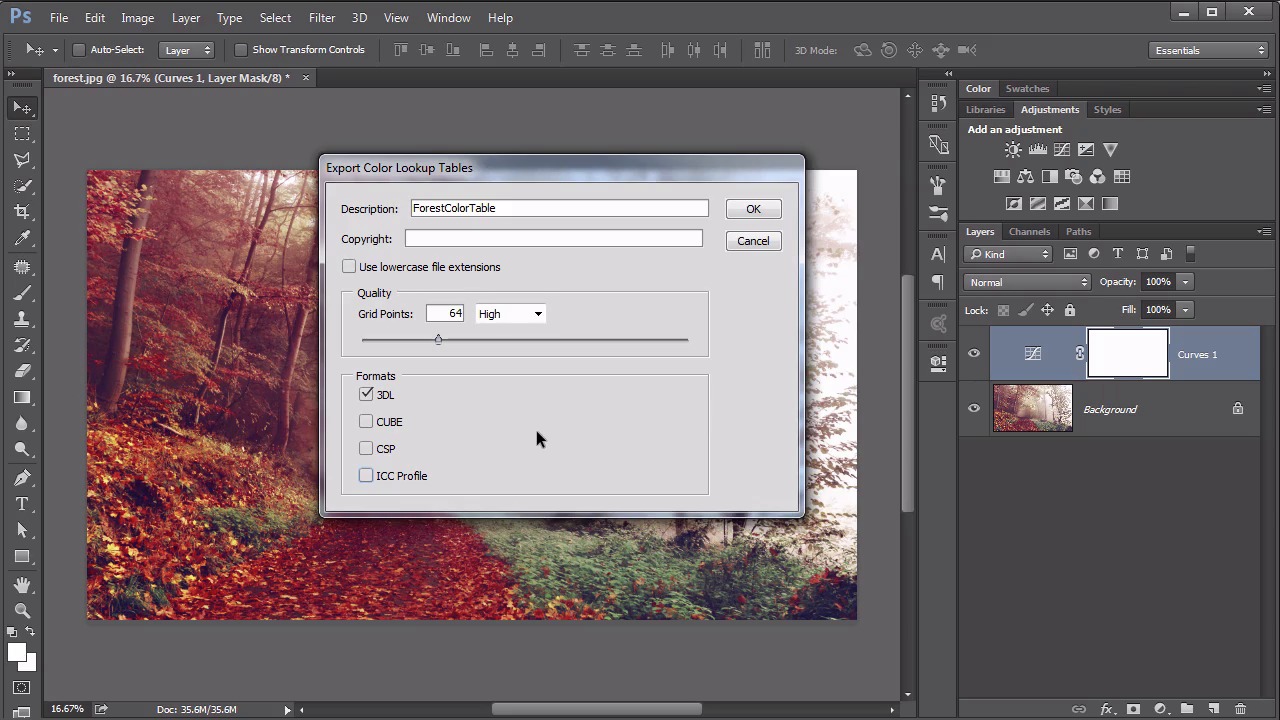
- Overview
- Transcript
5.3 Color Look-Up Tables (CLUT)
In this lesson we show how to use one image to define a set of colors, and then how to make other images fit into that color set.
Related Links
1.Introduction
1.1Introduction01:22
2.Basic Color Theory
2.1The Color Wheel02:27
2.2Warm vs. Cool04:52
2.3Color Schemes04:45
2.4Hue, Saturation, and Lightness03:46
2.5When Colors Collide03:23
3.Color Modes
3.1RGB06:10
3.2CMYK05:36
3.3LAB06:06
4.Working With Color
4.1Scene Planning06:26
4.2Controlling Color With the Hue/Saturation Adjustment Layer06:00
4.3Controlling Color With Blending Modes07:35
4.4Controlling Color With Gradient Maps05:35
4.5Controlling Color With the Painting Tools04:24
5.Tips and Tricks
5.1GUI Color Wheel03:31
5.2Adobe Color Themes03:55
5.3Color Look-Up Tables (CLUT)02:56
6.Conclusion
6.1Conclusion00:53
5.3 Color Look-Up Tables (CLUT)
Hello everybody.Welcome back to working with color in Photoshop. This is lesson 5.3 which is a quick tip on the color look up tables. Color lookup tables are a valuable tool when you're trying to work with several images, possibly in a series or a sequence, and you want them all to look fairly similar. The method to go about doing this involves creating a color table from one image, and then assigning that color table to all the other images in the series that you're working on. This ensures that all the images have the same type of look and feel to it, and they all use basically the same range of colors. Before you can export a color table, you need to make sure your image has a background layer and at the most some adjustment layers. This doesn't really work on other layered images. You need to flatten everything out to a background layer, with the exception of the adjustment layers. They will still work with those. And then really it's just as easy as going to File, Export, Color Lookup Tables. We get this dialog box for exporting the color lookup table. And we can put in a name for it and we can choose a quality. By default it's at Medium, which is 32 grid points. I usually like to bump this up to High, which makes it at 64. It can go all the way up to 256, which is usually way more than what you need. 64 tends to work out pretty well. Now the different formats. Really, if you're working with RGB files, all you need it the 3DL. If you're working with some of the other color modes, like the LAB or the CMYK, that's when some of these other ones will be useful. But in most cases you're going to be using the RGB files and so the, 3DL is all that you're going to need. Photoshop will prompt you to save the file, that's the file that actually is the color lookup table, and then you can close the file that you're working on. One you have the color lookup table saved, you can then apply it to any other image, and it's done through an adjustment layer. It's this little grid looking icon with the nine different shades of gray. And with the color lookup table populated in the Properties panel, you will load the lookup tables, that you saved previously, by just clicking on this top drop-down menu here, the 3DLUT file. Now, the LUT, means lookup table. You'll often see it referred to as CLUT, which is color lookup table. The top one is the most common one. It's the one that will be used for that 3D lookup table that we generated from our RGB image. We open up this drop-down menu and just click again on the Load 3-DLUT and we get the 3-DL file which is the Forest Color.3DL that we saved previously. And with that loaded the image shifts very subtly, but what it's doing is ensuring that the colors that are used in this image, are within the same range of colors that are used in the original image. That way we can assure that if we use these two images in a series together, maybe they're in the same layout, they have a very similar color field to them and that's done through the color lookup tables. Okay, everybody, that's all I have for the tips and tricks in working with color in Photoshop. There's only one more lesson in this course, and that's my conclusion, and I hope you'll join me for that while I share some final thoughts.


