
 Lessons: 16Length: 2.3 hours
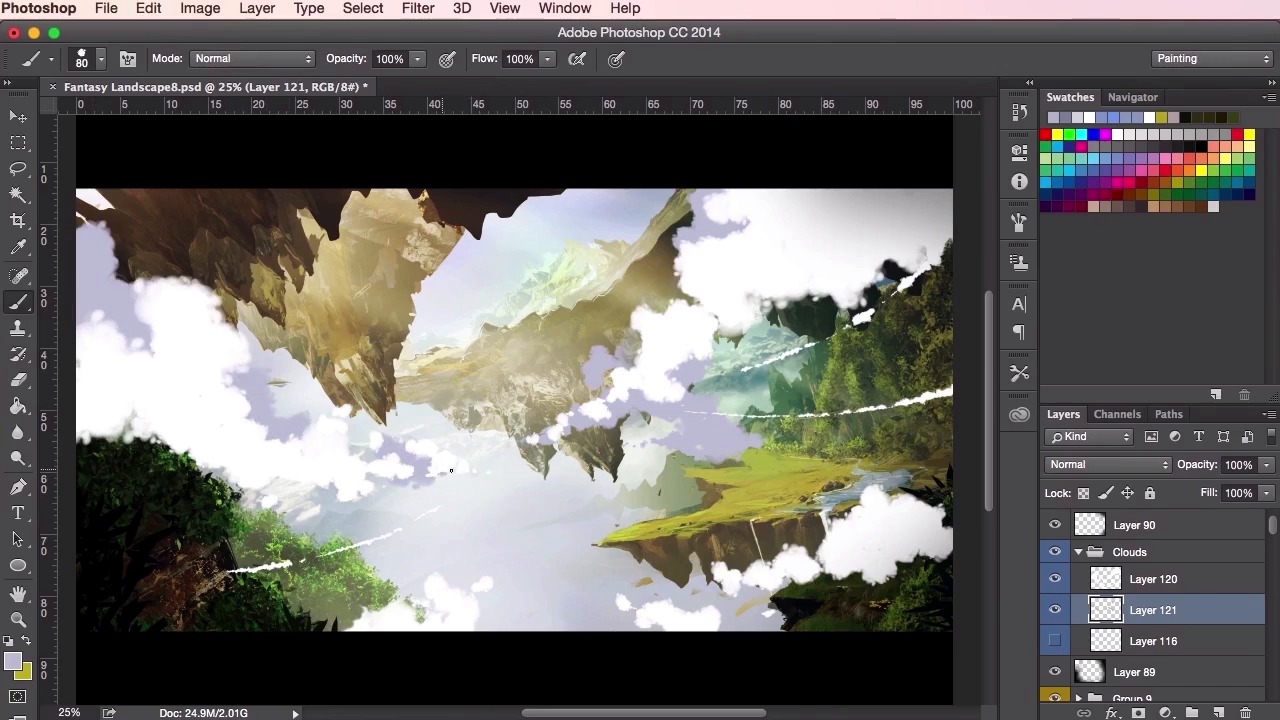
- Overview
- Transcript
3.6 Clouds
In this lesson you will learn how to add clouds into your painting. I will take you through a step-by-step process on how to add differ cloud shapes to the composition. You will learn various techniques to prepare your cloud shapes for different lighting situations.
1.Introduction
1.1Introduction01:31
1.2Adobe Photoshop Setup05:28
2.Shapes and Thumbnail Design
2.1Experiment With Shapes08:20
2.2Designing Shapes10:20
2.3Thumbnail Setup05:46
2.4Value Studies12:39
3.Painting
3.1Translating the Thumbnail08:19
3.2Initial Painting09:22
3.3Adding Texture08:31
3.4Design Development10:28
3.5Lighting and Colour10:19
3.6Clouds10:18
3.7Composition Adjustment10:56
3.8Adding Detail11:14
3.9Final Touches11:52
4.Conclusion
4.1Conclusion01:44
3.6 Clouds
Hey guys, and welcome back to the Concept Art Environment course for games. In this video, we're gonna go through a few tips and tricks on my methods of creating clouds, and how they help add a great sense of epicness to the painting. Now just to start with, we're gonna create a brand new layer and name it Clouds. Once you've got that layer selected, just use the hard round brush tool and just roughly outline the clouds, just to get you thinking about what sort of composition you want for the clouds and just gently sort of roughly putting them in. These are just rough outlines, so we don't need to be too precious with them, and once we do start painting in the clouds using our cloud brush tool, which we found on Google, we'll have erased them out anyway. This is just a rough guide for us to help us with ideas of our clouds. So yeah, it's important to have a general understanding of how clouds work when painting them. They may appear almost other worldly. However, they still adhere to the same rules for lighting and shading as all other objects written, and all other elements that we've painted. However, depending on the density of the clouds, they may appear more translucent, and just reflect the light, its' slightly differently. So here you can see I’m trying to adjust the painting a little bit first just adjusting the saturation and some elements just til I’m happy with it, just moving things about before I get back to painting the clouds. So, once you've got your rough outline set up and you're happy with the composition of your clouds, It's time to select your cloud brush, and again, there are plenty of cloud brushes out there on the Internet. Just Google cloud brush, and experiment with the ones that you like the most. So at this stage I'm sort of blocking out the main cloud shape that I want, experimenting with the size of the puffs to create something that looks natural and that helps give a sense of scale to the painting. Again, just varying the brush size from big to small and trying to get some sort of dynamic shape to the cloud overall. So I've set the cloud brush color to white, and the opacity to 100% so that I can see the shapes a bit more clearly. Then it's just a matter of playing about with the shapes and experimenting with the composition that your happy with that it's sort of working, adjusting the brush size and opacity as you go along. So again here, I've set my eraser towards the same brush as the clouds, just so that it helps me sculpt the shape of the clouds. So just dabbing them in trying to figure out a good composition to work with. It's good to try and be random when you're putting your clouds together, as there's no real sort of structure to clouds, you just wanna try and get a feel for it. So once we're happy with the general layout of the clouds, it's time to add some shading. I've created another layer underneath and started painting in some background clouds using the same brush, but set to a darker color, in this case, I've chosen a slightly light purplish gray. You can always adjust the color, like I've done here, if you're not happy with it. Just sort of again, playing about with the shapes. You don't want to go around the clouds which you've drawn already, you just sort of want to play about and see if you can come up with some interesting shapes behind it. So, again just dabbing them in, randomly, putting some shapes down, playing about with the composition. At this point, the outline layer is no longer needed, so you can either switch it off, or just simply delete it. Once again, just experimenting with the composition of the shape, always looking for what looks interesting, randomly dabbing your cloud brush and spaces to create happy accidents. Or using the eraser tool with the cloud brush selected to mold your shape to existing cloud shapes. So once that's done it's time to add some shading on top of the white clouds. Lock the transparency of the original cloud layer, and then using an even darker shade, start painting on top of the cloud, just to add some shadows, keeping in mind where the direction of the light is coming from. in this case, it's coming from the top left, so we want to paint in the shadows underneath the dark clouds to reflect this, so just playing about with a darker shade of the cloud brush. Again, still randomly dabbing it in, but keeping in mind the lighting and where the shadows will appear. So once you're happy with the general shadows that we've created, you can also do this to the background clouds as well, to add more depth to the painting, so just keep adding the shading to the clouds, trying out different shades and colors to your liking. So once you're happy with the progress, the next step is to add a bit of texture to the clouds by lowering the transparency of your cloud brush and then painting on top of all the clouds on a separate layer. Again just playing about with the shapes, painting around the clouds to add a bit of extra fuzziness. So yeah, it's important at this point not to go too crazy with this, as you'll lose a lot of the randomness and form which you already generated from before. So just a little soft touch up to the clouds, and give it that extra texture to it. So yeah, you can do the exact same thing with the shadows of the clouds, just dabbing it on, dabbing a bit of fuzziness here and there to add some random texture and just to help give it that natural look. For this stage I've decided to lighten up the shadows a little bit as well. Again you don't want to do it too much, just lighten bits up here and there, it's still cool to have a few dark shades in areas. So yeah, one thing to keep in mind when you're painting your clouds is that there are many different types of clouds, and having this sort of knowledge will help you create and paint better looking clouds. Each type of cloud has its own shapes, its own sizes, its own densities, and reflective properties. So, I highly recommend you go through Google, and just doing your own research on your own time on the types of clouds that are available, and look at some references as well. Just looking at the reference images, just like how we did with the rock structures in the painting, and practice replicating their outlines, and their shapes with the cloud brush to understand their unique shapes, flows, and the altitude in the sky. So you can also add highlights to your cloud, just by painting on top of your shadows, using a smaller brush, or by adding different colors and filters. Just keep tweaking the color of your clouds, making adjustments as you go along. All right, so here I'm gonna start using some photographic reference, just to add a little bit more texture to the clouds. The technique used here is exactly the same technique as what we've used, before. Just sort of dragging it in, tweaking the opacity's and colors to fit the painting, making sure that the lighting fits the lighting of the composition, and then just using your razor and brush tool to help blend it in. So that's it for the video on how to create and to paint clouds. In the next video, we're gonna go through some adjustments to the composition as the painting enters its final stages of evolution. See you there.


