- Overview
- Transcript
2.3 Understanding Your References
Finding the perfect references can be very difficult. In this lesson we'll discuss everything you need to know and understand about your references prior to painting, a quick tip on how to improve likeness, and using layer adjustments for minimal changes. You can find links to the references we're using within the source files.
1.Introduction1 lesson, 01:27
1.1Introduction01:27
2.Setup3 lessons, 17:41
2.1Your Workspace02:36
2.2Creating Custom Brushes07:13
2.3Understanding Your References07:52
3.Paint a Simple, Colorful Portrait5 lessons, 36:36
3.1Sketch10:21
3.2Exaggerating the Features04:57
3.3Prep and Create Your Base Colors05:42
3.4Shading06:09
3.5Final Touches, Color Portrait09:27
4.Paint a Textured, Grayscale Portrait5 lessons, 31:50
4.1Rough Sketch06:14
4.2Creating a Textured Base05:44
4.3Shading With Textured Brushes06:21
4.4Polishing Your Portrait With Soft Brushes06:06
4.5Final Touches, Grayscale Portrait07:25
5.Conclusion1 lesson, 02:31
5.1Conclusion02:31
2.3 Understanding Your References
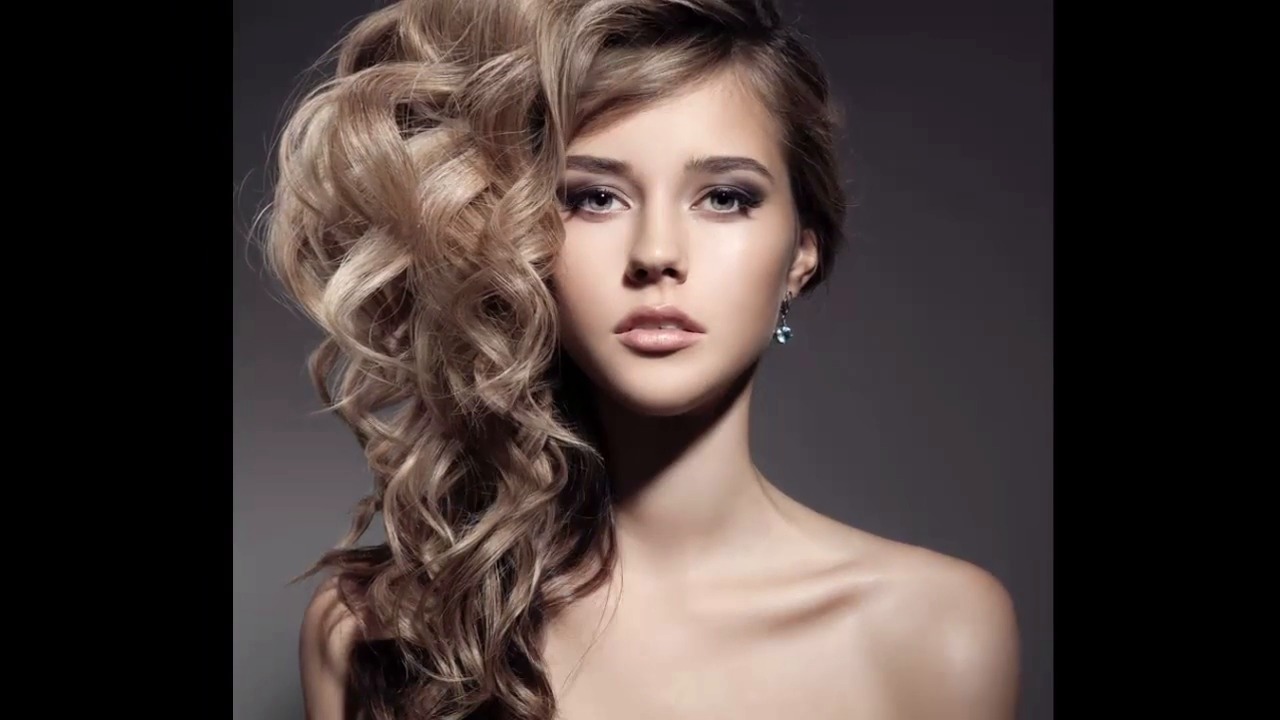
Hello. And welcome back to Digital Portrait Painting in Adobe Photoshop. My name is Melody Nieves, and this is Lesson 2.3, Understanding Your References. The perfect photo reference is always hard to find, and depending on the site you're looking on, you can end up sifting through hundreds or even thousands of photos before you find the perfect one. When I typically look for references, I avoid Google. Although many artists find their references through the site, there are many potential risks to finding references there. You see, Google's results are tailored to the keywords that are used to describe a photo. These keywords are also known as tags. Because of this, the results are not necessarily what's best for you or your painting, but instead what matches best to the keywords you're searching with. Google can't read your mind, so this would explain the sometimes funny or even odd pictures you run into when using generic search terms. Not only that, but if you decide to search for references on Google alone, you may run the risk of having issues with copyright. Just imagine how horrible it would be to encounter fines, be ordered to stop selling your work, or even to stop promoting it because you used someone else's image without permission. Luckily, there are many ways you can avoid copyright issues. You can take your own photos, use images that are strictly free for personal and commercial use, or buy photos from stock photography websites. For both portraits in this course, I'll be using two references I purchased from PhotoDune, which you can find links to within the course files. Anytime that I work with photo references, my choices are always very calculated. I can go through thousands and thousands of pictures paying special attention to body language, styling, lighting, and color. To see what I mean, let's take a look at our first reference. The first image is a portrait of a woman that is very simplistic but also has some artistic styling. With her body facing the camera straight on, this pose is one of the most popular poses you'll see in portrait art, whether traditional or digital. And I always recommend it for beginners to portrait painting. The main reason I recommend it is because it's simply the easiest pose to recreate. And when you think about it, it's also the first pose that is taught to you when learning about anatomy. The other great thing about this photo is that it's on a white background so we won't be distracted by any unnecessary shapes or colors. The only downside is that the model's hands are also in the shot. Since I only want to paint from the bust up, I'll have to really study the area her fingers are covering up in order to paint the portrait without her hands. Let's move on to the second reference. As opposed to the angular faces of men, women are much easier to paint because their faces are round and soft, which is perfect for fluid and curvy strokes. Just like our previous reference, we're working with another female model with simplistic styling, set on a gradient background. Because of the dynamic lighting and her big, voluminous hair, I know that this picture will be a great reference for a black-and-white painting. Now, you may be wondering why I chose a color reference for a gray-scale portrait. Black-and-white photos are beautiful, of course, but sometimes they aren't the greatest reference to paint from. Because of their high contrast and often super-dark tones, black-and-white photos can be harder to paint because you really can't see shapes and small details clear enough. By starting with an image in color, you can always make adjustments to make the detail sharper and eventually study its tonality for the perfect black-and-white portrait. Now that we've learned why our references are great for portraits, let's go over some quick tips for better likeness. Likeness is how close you are able to get your portrait to resemble the original subject. Assuming that you already have a foundation in painting the human body, we can go over two quick methods for painting what we see. The first method uses traditional lines to understand the placement of features like the eyes, nose, and mouth. With your reference selected, create a new layer and use the pen tool to make straightly narrow paths over our model's face. Right-click to stroke the path with a small size brush. Then right-click again to delete the path when you're finished. Now that you have these lines placed, you can use them to measure the distance between each facial feature either horizontally or vertically. Depending on the angle of the head, some features even line up with others, like oftentimes the bottom of the nose with the bottom of the ears. Use these lines to compare the placement of each feature until you understand how to construct a face. You can continue to add more lines if you like or even substitute it with a grid. If you're still having trouble with likeness, another alternative is to trace your reference. Using the brush we created earlier for sketching, roughly begin tracing over your reference. The use of tracing in art is a pretty controversial topic nowadays. The controversy lies in the fact that some artists use the actual trace as the base sketch for their painting by copying and pasting it onto a new document. Now, a lot of people argue that by using the trace as the initial sketch, digital paintings come out stiff and full of errors. But I want you to understand the beauty of tracing without being blinded by controversy. Tracing photos in this particular instance allows us to see the real angles and shapes of our subject without being distracted by color or shading. So in this example we're not using the trace as a sketch for our painting but rather as an educational tool. When you're finished tracing your image, hide the visibility of your reference layer. You see, by focusing on the rough outline of the model, you can now reference those lines instead of the picture. This simple technique is just one more step to better likeness. Depending on what you need to learn about your picture, adjust how much you decide to trace accordingly. The last thing I like to do when looking at references is making slight changes with adjustment layers. Both photos are in color, but as I've previously mentioned, the dramatic styling and lighting scheme of the second is more fit for a black-and-white portrait. But it's also important to know what this picture looks like in black and white. To do this without making permanent changes, add a new hue and saturization adjustment layer to desaturate our reference. Bring the saturation down to negative 100 and keep it on a separate layer so you can toggle the visibility whenever you need it. Now we have the perfect reference setup for our black-and-white portrait. I hope this lesson has helped you understand the importance of photo references, as they are the foundation to all our digital portraits. Now let's apply what we've learned here to paint a simple colorful portrait starting off on our next lesson with a basic sketch.


