
 Lessons: 15Length: 1.5 hours
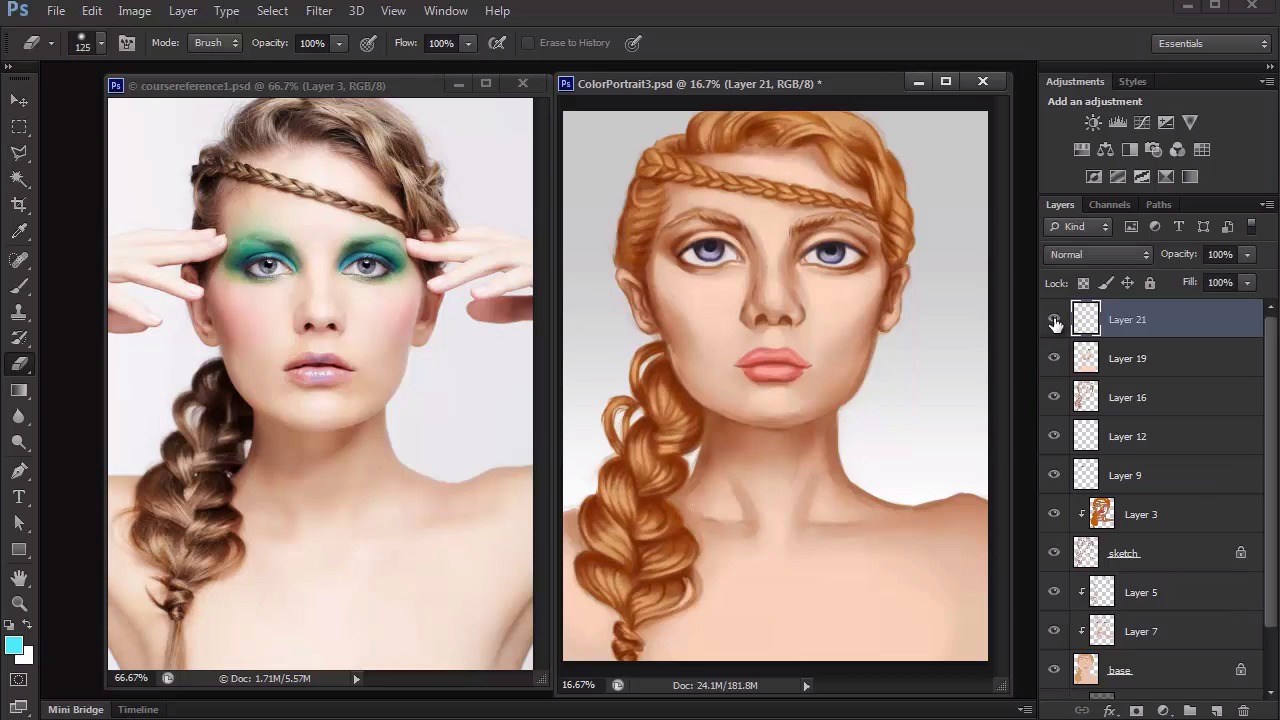
- Overview
- Transcript
3.5 Final Touches, Color Portrait
Refine the final details of your portrait, and finish it off with adjustment layers for added intensity and impact.
1.Introduction
1.1Introduction01:27
2.Setup
2.1Your Workspace02:36
2.2Creating Custom Brushes07:13
2.3Understanding Your References07:52
3.Paint a Simple, Colorful Portrait
3.1Sketch10:21
3.2Exaggerating the Features04:57
3.3Prep and Create Your Base Colors05:42
3.4Shading06:09
3.5Final Touches, Color Portrait09:27
4.Paint a Textured, Grayscale Portrait
4.1Rough Sketch06:14
4.2Creating a Textured Base05:44
4.3Shading With Textured Brushes06:21
4.4Polishing Your Portrait With Soft Brushes06:06
4.5Final Touches, Grayscale Portrait07:25
5.Conclusion
5.1Conclusion02:31
3.5 Final Touches, Color Portrait
Hello. And welcome back to Digital Portrait Painting in Adobe Photoshop. My name is Melody Nieves. And this is Lesson 3.5, the final lesson for Chapter 3. So far, we've been able to build upon our painting slowly, developing our foundation with a solid sketch and base and eventually graduating to the shading we needed to make this painting more three-dimensional. For this last lesson, we'll focus on adding highlights to the painting, as well as cleaning it up to really refine the remaining details. I like to add highlights towards the end, because I find them to be so transformational. Because no matter how beautiful you make the shadows, the highlights are what really breathe life into your portraits. So let's tackle the first stage of highlighting. With the brush tool selected, hold alt to select the skin color with the eyedropper tool. Then go to color picker and select the brighter version of that color for the perfect highlight. Begin painting the highlight on a new layer and slowly watch your painting transform. Start the highlight on the areas which the light would be hitting our model the most, like the cheeks, forehead, chin, bridge of the nose, and Cupid's bow. If you have any problems understanding where to apply highlight, you can simply refer to YouTube videos for help. Search for makeup videos where the beauty gurus apply contour and highlight to their face and you'll see that they focus the highlight only on the areas they wish to bring more forward. Highlighting also creates a beautiful glow to the skin by brightening up those areas for a nice luminous effect. And since we're cleaning things up, it's also important to study your reference in order to pick up extra details like reflected light on the chin. Continue to add more highlights while also evolving the shadows wherever it's needed. No face is flat, and by trying to understand the structure of the head, you can achieve better anatomy by applying subtle changes and shadow. Use the same technique from before to add highlights to the other details of your painting. Always pick up the color from an area first, then adjust the brightness to add its highlight. This simple technique will ensure you're working with the correct shades and values for your highlights so that you don't make the mistake of using the wrong color. Here I focused on the lip and eye areas to make sure that I don't forget to clean them up. I let the setting for pen pressure for opacity do most of my work by allowing the stylist to add the amount of paint I need on the canvas by pushing softer or harder onto the tablet. And whenever you're working on a new layer, toggle the visibility often to see how far you've come as well as how far you may need to push the highlights even further. By doing this often, you can instantly remind yourself of the areas that still need work. Now let's move on to the highlights for the hair. Just like before, pick up the original color of the hair with the eyedropper tool and use the color picker to select a much brighter version of that color. Concentrate the highlights only on the points where the light would be hitting the hair, which in this case means the middle sections of each braid loop. By using a smaller brush, you'll see that those sections instantly look crisper, and you can easily soften any harsh edges by using the eraser tool to lift away some color. Continue highlighting all the way down the larger braid, and don't forget to add highlights to the braid across her forehead. Because the braid is smaller, we don't need to concentrate on creating individual hair strands. Instead, just add a couple of highlights to make the lighting scheme more uniform. Work your way through the top of the hair as well. It's very easy to over-highlight, so just know that it's not necessary for each section to have intense lighting. By adding a little shine here and there, you can make certain areas really pop out and achieve better realism. And the eyebrows need highlights, too. I really liked adding to this section, because you can instantly see how the eyebrow shapes looked more curved once you finish the step. Make the highlights delicate like the eyebrow hair for a more believable and realistic effect. Here is what the painting looks like before and after highlights. Not only does this go to show the incredible difference that highlights make, but the more you push your painting the better it gets. Now that we've made significant progress by adding highlights, let's merge all the layers of the model together so we can really close in on our final details. Again, lock the transparent pixels for that layer and create a new clipped layer set to overlay. As I mentioned before, that was only the first stage of highlights, but now we can kick things up a notch by working on this new layer. Bring down the hardness of your brush almost completely to make the brush edges super soft. Using the color white, add bright white highlights all over your painting. Anytime that you want to add extra brightness to your painting, always add highlights with the color white on a layer set to overlay. It's really easy to overdo this step, so you might want to work with a lower brush opacity or keep the eraser tool handy to control the intensity of this effect. First, I start off with the face to wake up the eyes with even more light. Then I move on to the hair. A great way to show hair shine is to just use straight lines of highlight across the middle sections where we've already established the light. Continue this all the way down the bottom braid, and, of course, make sure this effect comes full circle by adding highlights to the top of the hair as well. We can also use this layer to add a little more highlight to the face, adding subtle strokes of white for an instant shine. It might seem like you're turning your model into a shiny disco ball, but the T-zone area is usually the most oily area of our face and picks up a lot of shine. Makeup also creates a shiny effect because of the gloss and glitter used in lip and eye products. With this step, be a little more sporadic in your brush strokes so that the highlights create an interesting texture. Keep stepping away from your painting to see what else you need to add to it. Here I continue tweaking the eyes, adding more shadow and detail for better realism. And don't forget to add a little shine to the eyes as well. It automatically makes the eyes appear more lifelike since our eyes are naturally wet. Take this opportunity to continue making edits, because we're closing in on the final phase to this portrait. And if you're worried about perfecting details like eyelashes, simply use the copy and flip technique we used earlier. Paint one eyelash first. Then flip a new copy to position it into place. When you study photography, you learn a lot about environmental light. Here I added environmental light from the gray background so that it reflects on our model. It may seem like a simple addition, but it really creates a distinct look that ties all of our lighting together. If you want to create a pretty makeup look similar to the one our model has, you can add eyeshadow easily on a new layer. Paint it a bright blue color and set it to the blend mode difference. Yes, the color isn't the same from the picture, but I think it works better here for our digital portrait. Sometimes it's hard to stop painting, but as you close in on the final touches, continue to tweak as you see fit. For even more intensity, I'll create a new adjustment layer for color balance. By bringing out the blue hues and the mid tones and highlights, I create a uniform color palette that ties in perfectly with the eye makeup. Initially I thought the painting was done, but looking at it further, I realized that her eyes are not as symmetrical as I would like. You could argue the features in the real world are not always symmetrical, but if it does bother you, we can fix this with one easy step. Simply merge all your layers together and use the polygonal lasso tool to create a selection around the right eye. Right-click to go to layer via copy. Then go to edit, transform, flip horizontal. Position the second eye into place and clean up the edges with the eraser tool for perfect symmetry. This final step concludes the efforts for our colorful digital portrait. I hope you've enjoyed learning these techniques to create your own whimsical digital painting, full of life and color. Now, if you find this a little intimidating, then stay tuned for Chapter 4, where I'll show you how to create a simple gray-scale portrait full of texture and character.


