
 Lessons: 15Length: 1.5 hours
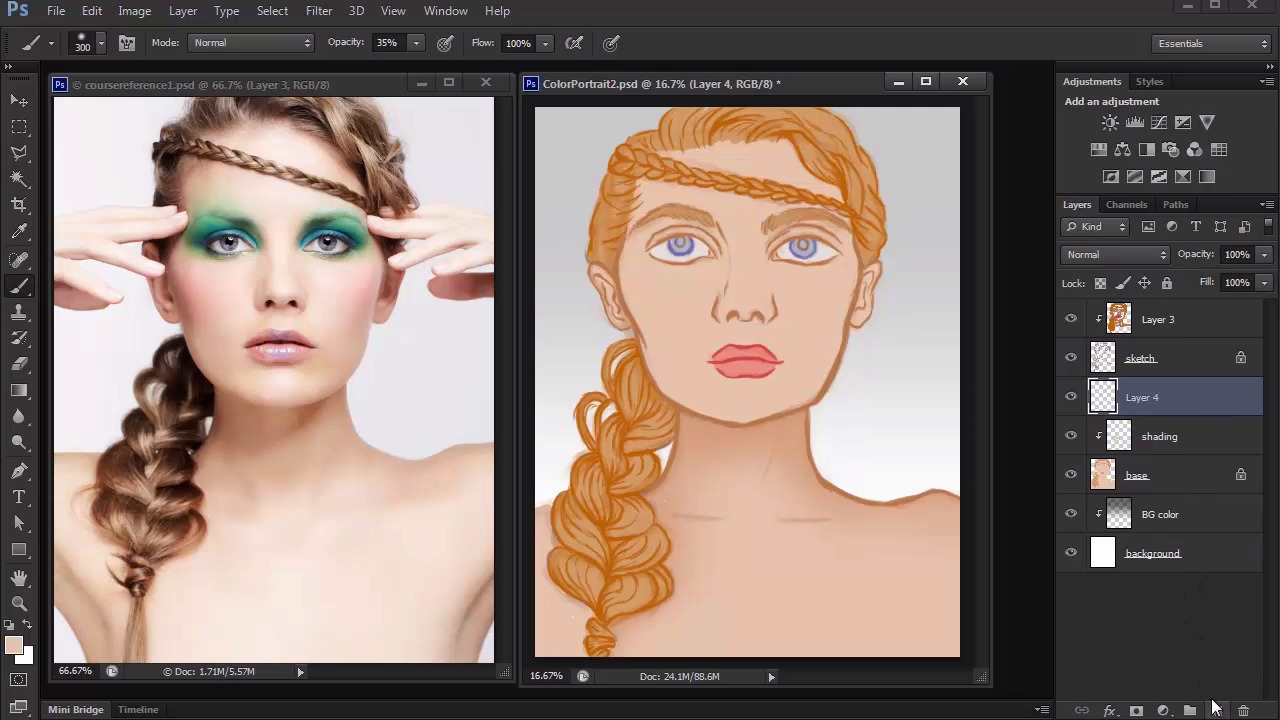
- Overview
- Transcript
3.4 Shading
Shading made easy. Learn how to incorporate layer blend modes into your digital painting for shading and detail.
1.Introduction
1.1Introduction01:27
2.Setup
2.1Your Workspace02:36
2.2Creating Custom Brushes07:13
2.3Understanding Your References07:52
3.Paint a Simple, Colorful Portrait
3.1Sketch10:21
3.2Exaggerating the Features04:57
3.3Prep and Create Your Base Colors05:42
3.4Shading06:09
3.5Final Touches, Color Portrait09:27
4.Paint a Textured, Grayscale Portrait
4.1Rough Sketch06:14
4.2Creating a Textured Base05:44
4.3Shading With Textured Brushes06:21
4.4Polishing Your Portrait With Soft Brushes06:06
4.5Final Touches, Grayscale Portrait07:25
5.Conclusion
5.1Conclusion02:31
3.4 Shading
Hello, and welcome back to Digital Portrait Painting in Adobe Photoshop. My name is Melody Nieves, and this is lesson 3.4, Portrait Shading Made Easy. Shading is one of the hardest things to master when it comes to digital painting, and not just for portraits. In the beginning of this course, I said that you should have a good understanding of basic art principles. That's because it's important for you to already have knowledge about the influence of light on an object in order to achieve similar results to these portraits. In this lesson, I'll be able to provide some insight on making the process easier. But if you still struggle with light and shadow, the best thing you can do is study photography. Gather as many references as you can and do quick painting studies to train your eyes in picking up all the little nuances of great lighting. Apply what you've learned and you'll be able to create beautiful digital portraits in no time. For this portrait, I'll start off the shading by tackling the background first. Since the original picture has a white background or at least a very light gray tone, I'll keep the background nice and subtle. To do this, I'll be creating a soft gradient transition from gray to transparent. When you make a painting all on one layer, it's incredibly difficult to make changes to the background without affecting everything else. But because we've already separated our layers for the background, base colors and sketch, we'll be able to add a gradient tone easily. First, add a new layer and set it as a clipping mask to the white background. Then select the gradient tool and make sure that's it's set to transition from the foreground color to transparent. Use the gradient tool to apply a linear gradient downward, holding Shift to make sure the line goes straight. If you want the gradient to be lighter without having to do it over again just bring the opacity down to 30%. Now let's shade our model. Select the new layer, set the clipping mask above the base layer, then set the layer to multiply. First we'll shade the neck and body area. Use the polygonal lasso tool to make a selection around the neck while trying to avoid the hair as best as you can. With the selection closed, use a large soft brush to begin applying shadow. Since the brush tool is selected, all we have to do is hold Alt and use the eye dropper to pick up the brown colour that's already laid down for the base. Because we have the blend mode of this layer set to multiply, the color will automatically be darker, or multiply to create a darker color than the base. Even though we're essentially using the exact same color. I first learned about this technique when studying about ambient occlusion and ambient light in digital painting. It's an incredibly simple technique that allows you to paint shadow fast. And because we're only painting within the selection, you don't have to worry about the color going on any unwanted areas. Continue this technique all around the face to apply the first level of shadow. Painting often takes many layers, so work slowly through it and be strategic in your application for a more fluid workflow. Apply more shadow onto the hair, and this time, set the layer to darken so that the color blends better with the blonde. Focus the shadow towards the top and bottom section of each braid so that we can leave the middle for highlights later. As you move on to the rest of the hair, pay special attention to the reference to allow it to give your cues as to where the light is hitting. Only add shadow to create more depth to certain areas and try not to over due this step. Now that we have the hair done, we can move into the face. Again, paint on a layer set to clipping mask with a layer blend mode set to multiply. Pick up the skin color and begin carving out the structure of the face with the shadow only. The nose is a great area to start because you can immediately established the bone structure there. Next, move onto the cheekbones and eyes using the shadow to push them further back into space. This is where we begin to see the three-dimensional aspect of the painting take form. Naturally, because the base color is lighter than the shadow, it automatically becomes the middle tone of our painting. It also shows us how the lighter tone brings those face features more forward. Of course, when we move on to highlights, this effect will be even greater but for now, continue adding more shadow. Besides looking at your reference, the best way to add shadow is to make sure you understand where the light is hitting your subject. Since the light is above, almost all of her features will have at least a subtle shadow underneath them. So luckily this becomes an easier lighting scenario to paint. If you want your shadow to be darker, especially around the neck and shoulder area, simply use the eye dropper again but this time, pick up the color that was used for shadow. Because the layer is still set to multiply you'll just keep adding to that depth of tone and really developing the sense of lighting. The beauty of this trick is that you never have to go to the color picker and struggle to see which colors you should use for shadow. I used to always pick the wrong colors because they would usually turn out to be way darker than what I needed. By just using the colors that are already on the canvas and setting your layer blend modes accordingly, you can achieve easy shading that'll match your reference perfectly. Now that we have our first layers of shadow applied, it's time to move onto highlights. In the final lesson of this chapter we'll cover a super easy trick for picking the perfect highlight color. And finally how to complete your painting with bold and vibrant colors. So join me in lesson 3.5 to see how its all done.


