
 Lessons: 15Length: 1.5 hours
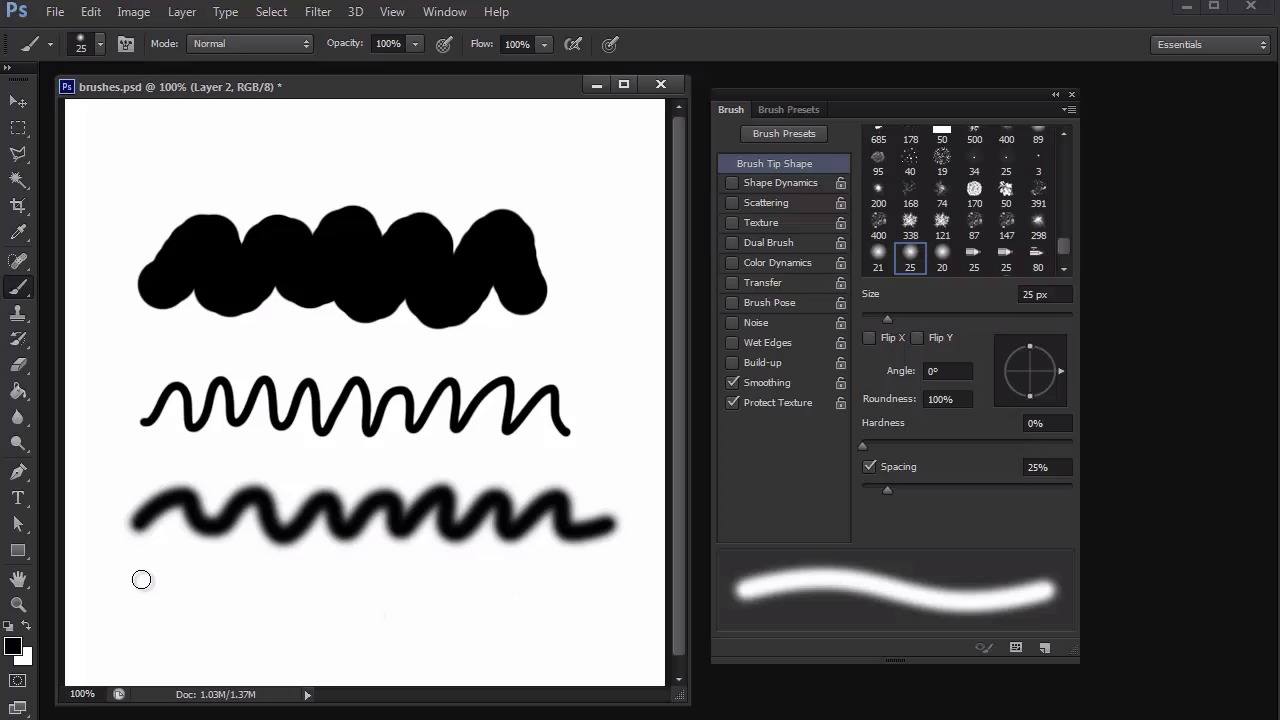
- Overview
- Transcript
2.2 Creating Custom Brushes
Brushes are an integral part of digital painting. Here we'll learn the difference between the types of brushes we'll need for our projects and how to customize our own for future use.
1.Introduction
1.1Introduction01:27
2.Setup
2.1Your Workspace02:36
2.2Creating Custom Brushes07:13
2.3Understanding Your References07:52
3.Paint a Simple, Colorful Portrait
3.1Sketch10:21
3.2Exaggerating the Features04:57
3.3Prep and Create Your Base Colors05:42
3.4Shading06:09
3.5Final Touches, Color Portrait09:27
4.Paint a Textured, Grayscale Portrait
4.1Rough Sketch06:14
4.2Creating a Textured Base05:44
4.3Shading With Textured Brushes06:21
4.4Polishing Your Portrait With Soft Brushes06:06
4.5Final Touches, Grayscale Portrait07:25
5.Conclusion
5.1Conclusion02:31
2.2 Creating Custom Brushes
Hello and welcome back to Digital Portrait Painting in Adobe Photoshop. My name is Melody Nieves and in lesson 2.2, we'll learn about the three different brushes we're using. As well as how to customize them for the best experience. The most important tool for any artist is their paintbrush. In digital art, we know this as the Brush tool. Which you can access easily by hitting b on your keyboard. In combination with the other tools and features with Photoshop, digital artists use the Brush tool to create all their beautiful paintings. So it's no wonder that the Brush tool becomes one of the most essential tools you'll need when working in Photoshop. And depending on your version of Photoshop, some of your settings might be different. But with a little exploration of the Brush panel, you should be able to achieve similar results to the brushes I'll be creating here. But before we get started with the brushes, let's go over the importance of using pen tablets for our digital paintings. One of the first ways you can ensure that your paintings come out great, is by using a pen tablet, also known as a graphics tablet. A graphics tablet is a tablet that comes with a stylus pen that allows you to paint digitally in the same manner that you would create art traditionally. The feeling of the pen against the tablet is similar to drawing with a pencil on paper. This feeling allows you to mimic the same fluid movements that you wouldn't normally get with a standard optical mouse. Another great benefit is that you can enable pen pressure sensitivity which result in a nice tapered effect to the end of your brush strokes. Unfortunately, this option is only available if you're using a graphics tablet. Otherwise, your brush strokes will come off more blunt and won't be tapered at the end. Pen tablets come in many sizes and shapes too. And often include buttons on their surface. Take advantage of these buttons because you can program many shortcuts right into the tablet and ultimately speed up your workflow. Now it's a huge misconception that you need the biggest tablet available in order to make great paintings. But the size of it actually has no influence on the quality of your work. At the end of the day, success with your pen tablet just comes down to taking out the time to get used to it. Now that we've covered pen tablets, let's take a look at our brushes. Hit F5 on your keyboard to view your Brush panel at any time. The first brush we're using is a standard round brush. You'll find that this brush is the main one you'll need whenever painting in Photoshop. When using this brush, make sure you get into the habit of constantly adjusting the settings whether it's the size, hardness, opacity or flow. So let's quickly go over these settings. Small brushes are great for details and sketching, but try not to use them for things like filling in your work. Because it'll just take much longer. Large brushes however, are great for filling in sketches. Adding soft shading to your work and creating atmosphere in the later parts of your painting. While the Brush tool is still selected, right-click to access the Hardness option. Hardness is how blunt or soft the edges of the brush will be. To know when to adjust your hardness, study the needs of your painting. Soft brushes are great for general blending and painting skin. While hard brushes cover a lot more ground and can be used for sketching, detail work and adding an overall sense of texture to your piece. Opacity refers to the opaqueness of your brush. One of the biggest problems digital artists run into, no matter their difficulty level. Is either being too heavy-handed or too light-handed with their opacity. As a rule of thumb, try to stay between 50 to 100% opacity when digitally painting. This opacity range will keep your colors bold and vibrant. And you'll avoid any dull results caused by using brushes too opaque. If you select pen pressure for opacity, your brush's opacity is now controlled by your graphics tablet. Simply press harder on your tablet to get a much better color out of your brush. I like to use this option a lot whenever I don't feel like manually adjusting the opacity. And lastly, adjusting your flow determines how long it will take for your brush to build up color. Low flows will take longer to build and high flows will instantly give you full color intensity. Now you can see why the standard round brush is so important and why we'll be using it for both portraits. It's essentially several brushes in one. There are of course, more settings in the Brush panel you can explore. So feel free to experiment to discover what those settings do. Let's move on to our second brush. For a more textural portrait, I'll need a chalk brush with a few customized settings. First make sure the pen pressure for opacity is still selected. Now go to brush tip shape and select the 36 pixel Chalk brush. Except for the edges, this initial Chalk brush will be pretty solid, so let's add some scattering for more texture. Place a check mark next to Scattering and adjust the scatter to 75%. Test out your new brush and make sure it's got enough texture. When you're finished, save the brush so you'll always have it for later. Our last brush is a prime example of the many benefits to working with a pen tablet. Clean, beautiful line work is an essential component to many digital paintings. To create a brush perfect for line art, sketching and details, use a standard round brush as its foundation. Then select Shape Dynamics and enable the Pen Pressure sensitivity under Control. Now your brush strokes will have a beautiful tapered end. You can keep the brush pretty solid like this or select pen pressure for opacity for a more dynamic brush. And do take note that this option automatically selects the transfer setting within the Brush panel. And that's it for our three brushes, take some time to get familiar with them by testing them out. Join me in our next lesson. Where we'll learn more about our portrait references and how to make the appropriate changes prior to painting.


