
 Lessons: 15Length: 1.5 hours
- Overview
- Transcript
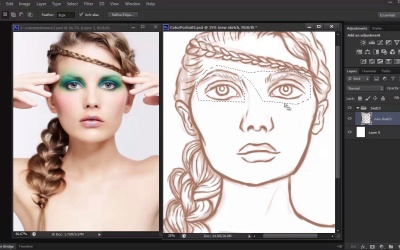
3.2 Exaggerating the Features
Add personality to your portrait by exaggerating the features with this simple scaling technique using the Free Transform Tool.
1.Introduction
1.1Introduction01:27
2.Setup
2.1Your Workspace02:36
2.2Creating Custom Brushes07:13
2.3Understanding Your References07:52
3.Paint a Simple, Colorful Portrait
3.1Sketch10:21
3.2Exaggerating the Features04:57
3.3Prep and Create Your Base Colors05:42
3.4Shading06:09
3.5Final Touches, Color Portrait09:27
4.Paint a Textured, Grayscale Portrait
4.1Rough Sketch06:14
4.2Creating a Textured Base05:44
4.3Shading With Textured Brushes06:21
4.4Polishing Your Portrait With Soft Brushes06:06
4.5Final Touches, Grayscale Portrait07:25
5.Conclusion
5.1Conclusion02:31
3.2 Exaggerating the Features
Hello, and welcome back to Digital Portrait Painting and Adobe Photoshop. My name is Melanie Nueves and this is lesson 3.2, Exaggerating Features of our Digital Portrait. In the first lesson of chapter three, we covered the tips and techniques to sketching your model as best as you can. In this lesson, we'll take that same sketch and exaggerate her features using a simple scaling technique. Referencing the photograph is a normal part of creating digital portraits. But sometimes, it’s fun to change a sketch to add a little uniqueness and separate it from the original picture. If you're familiar with caricatures, then you already know they are drawings or paintings where an artist creates interesting portraits by exaggerating the features of his model. Typically, they end up with large heads on small bodies for a funny cartoonish effect. But the key to a great caricature is making sure there is a distinct balance between exaggeration and likeness. So no matter how much you bulge someone's eyes, it's important that your painting still looks like that person in the end. And great caricature artists are able to warp and exaggerate their subject's face to such an extreme extent while somehow maintaining great likeness. Now don't be too intimidated by what I've just said, because for this portrait, we'll only be slightly exaggerating our models features to achieve, sort of like a beginner's caricature effect. And since our model already has a great focus point with her beautiful eyes and bright eye makeup, we can focus our attention there. Zoom into your sketch to get a clear view of the eyes. Now, use the Polygonal Lasso Tool to create a selection around both eyes. Don't forget to include both eyebrows in your selection, too, so that they also get affected when scaling. If all of your sketch is on one layer, you might have to go around other features, like the nose, hair, or sides of the face. So, take your time with this step. You can also just trace around one eye first, then hold the shift key to add a second selection for the other eye. Once you have both eyes selected, right-click and go to Layer Via Cut. This option cuts and pastes your selection onto a whole new layer separate from the rest of the sketch. Notice how when I toggle the visibility of a new eye layer that only the eyes and eyebrows are hidden. By putting them on their own separate layer, we can edit the eyes much easier without affecting anything else. To enlarge the eyes for a fun caricature effect, Ctrl+T to free transform and hold the shift key while making the eyes much bigger. Since this step displaces the eyes a bit, you'll have to go back in with selection tools like the Rectangular Marquee Tool to reposition the eyes into place. At first, I almost repeated this step with the nose, but eventually decided against it because I didn't think it worked out too well. Changes like this are something you just have to fill out. So, don't think that you have to change everything in order to make it work. I did, however, decide to repeat the step on the lips. Selecting the lips first then cutting and pasting them onto a new layer, I Ctrl+T to free transform them. This time, instead of making them bigger, I made them much smaller for an added emphasis on the model's large eyes. If you feel the need to continue tweaking the placement of any feature, continue to do so until you're happy with it. And once you're finished with any last minute tweaks, merge all layers together for the final sketch. And that's it for this simple technique. Always experiment with a Free Transform tool to see how you can make your sketches more unique. And join me in our next lesson where we'll start prepping the sketch for painting.


