
 Lessons: 15Length: 1.5 hours
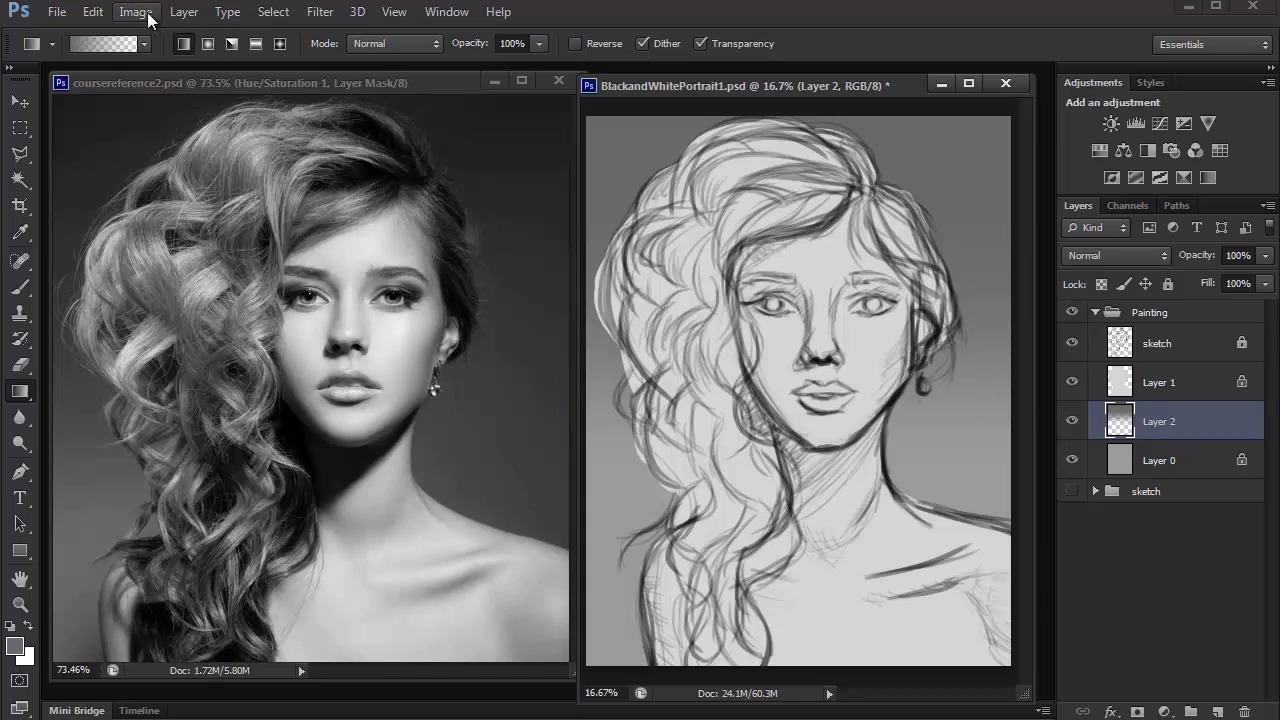
- Overview
- Transcript
4.2 Creating a Textured Base
Before we begin the bulk of our shading, we must start off with base layers. We'll do this by creating a textured base using the custom brush we created earlier.
1.Introduction
1.1Introduction01:27
2.Setup
2.1Your Workspace02:36
2.2Creating Custom Brushes07:13
2.3Understanding Your References07:52
3.Paint a Simple, Colorful Portrait
3.1Sketch10:21
3.2Exaggerating the Features04:57
3.3Prep and Create Your Base Colors05:42
3.4Shading06:09
3.5Final Touches, Color Portrait09:27
4.Paint a Textured, Grayscale Portrait
4.1Rough Sketch06:14
4.2Creating a Textured Base05:44
4.3Shading With Textured Brushes06:21
4.4Polishing Your Portrait With Soft Brushes06:06
4.5Final Touches, Grayscale Portrait07:25
5.Conclusion
5.1Conclusion02:31
4.2 Creating a Textured Base
Hello. And welcome back to Digital Portrait Painting in Adobe Photoshop. My name is Melody Nieves. And for Lesson 4.2, we will take the sketch we just created and bring it to a whole other level by adding a textured base. This portrait is a lot different from the color portrait we created in Chapter 3. And because it's different, we can approach it a lot differently. By keeping the tones and values very smooth in our first painting, we were able to really focus on creating something that was full of life with bold and solid colors. As I mentioned previously in Chapter 2, our second reference, the girl with the big curly hair, was a much better fit for a black-and-white portrait because of the dramatic lighting scenario. To add even more drama, we'll use mostly textured brushes for this painting. There won't be any funny gimmicks like big eyes or exaggerated features. Instead, we'll focus on allowing the texture we paint to create a more realistic portrait. If you're looking to double into hyperrealism or the concept that you can paint so well it looks like a living, breathing person, then it's best to start off in grayscale. Once you conquer grayscale, then move on to exploring color, and see where you can go from there. But for now, let's get back to our textured base. Now that the sketch is finished, I can start off this lesson by changing the group name from sketch to painting. Just like with the color portrait, I'll need to create two separate bases for the background and model. First I use the paint bucket tool to fill a new layer with a dark gray color. Then I select the brush tool and change the setting so that I'm using a hard round brush at 100% hardness. Next I go to the color picker and adjust the brightness of the first gray so that it's much lighter. This new color will be a great base for me to build more texture and tonality later. Just like before, you want to fill in the model completely with the base tone. When I'm finished filling it in, I lock the transparent pixels so that I can continue to paint without going out of that light gray border. The original reference has a nice gradient background we can easily imitate. And a great way to knock out the background lighting as soon as possible is to use the gradient tool. Select the tool with the foreground color, moving to transparent, and begin applying a linear gradient using a dark gray tone. Hold the shift key to make sure the line is straight and apply the gradient so that there's a little bit of lighter tones peeking behind her shoulders. If the first color you chose is not as dark as it needs to be, we can change it easily without disturbing the gradient. Go to image, adjustments, hue and saturation, and bring down the brightness of your gradient for more dramatic lighting. I also added another linear gradient behind our model to reflect the picture even more. You can adjust or take away any dark tones by simply using the eraser tool to remove some color. To ensure our gradients only affect the areas we want, it's important to set new layers to clipping masks. So when you're finished, right-click to set the gradient as a clipping mask for the background. And don't forget to create even more clipping masks to paint our subject. Before I move on to texture, I'll apply one last gradient, but this time to our subject. I keep the shadows low so that the brightest spot for the light is on her face. And now that I'm finished with all the gradients, I can begin laying in texture. Select the brush we created earlier or recreate the settings in the brush panel. We'll be using a chalk brush set to a slight scatter to apply a dark grunge effect onto the subject and background. As you begin to apply paint to the canvas, change the size of the brush often so that the tones don't get too stagnant and boring. Move your brush around the canvas and feel out where it's best to apply this dark tone. If at any point it seems like you've added too much, simply use the eraser tool to start over on that section again. Now, this step might seem a little harsh in the beginning, especially because it seems like you're just throwing dirt on your sketch, but just remember, we still have plenty of room to develop the shading of our work. Next use the eyedropper tool to pick up color from a lighter area and begin using both mid and lighter tones to show where the light will be hitting our subject. You'll need to apply this not only to the model but the background as well for greater continuity. As we finish up the textured base, toggle the visibility of the textured layers. Turn them on and off to see how much of a difference is made when you go from a simple flat or gradient base to one that is full of chalky grunge texture. It may seem messy for now, but it definitely has a lot more character, and we'll be able to clean up this painting easily within the next few lessons. All in all, creating a textured base is really as simple as that. We're officially on our way to painting a dynamic grayscale portrait. But for now, let's move on to our next lesson where we'll use the same textured brush to begin shading our subject.


