
 Lessons: 15Length: 1.5 hours
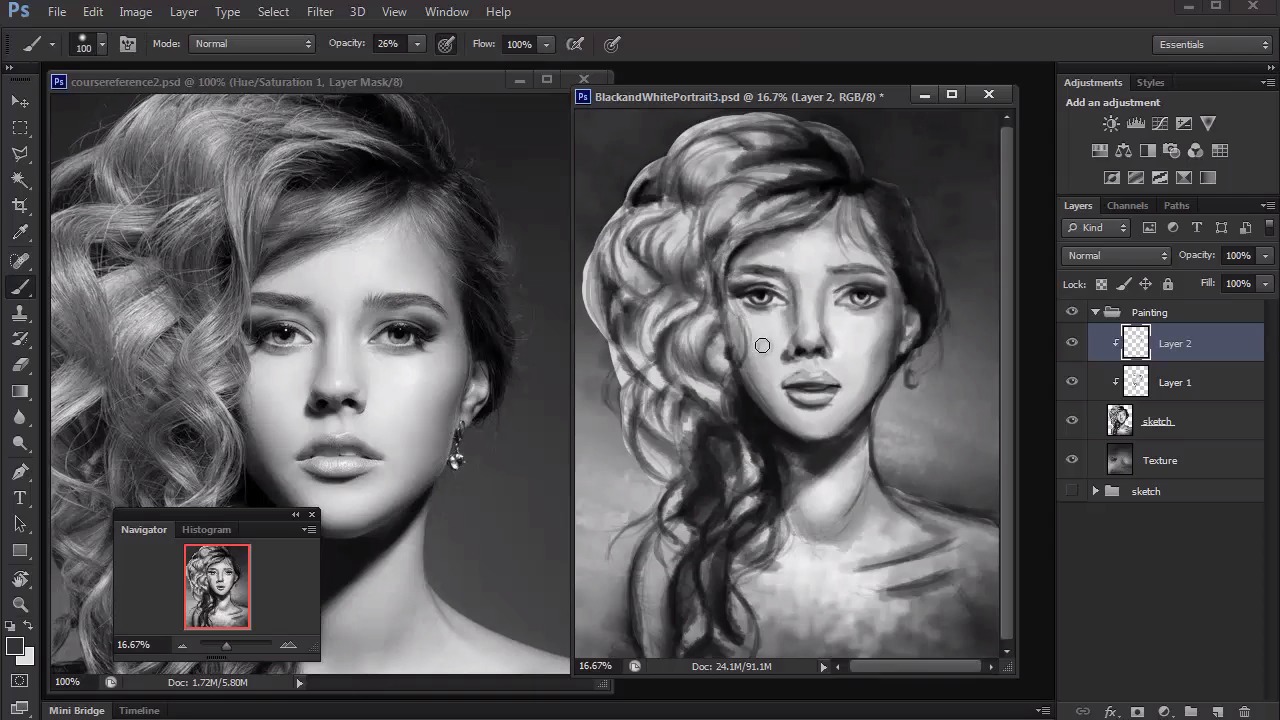
- Overview
- Transcript
4.4 Polishing Your Portrait With Soft Brushes
Soft brushes are essential for blending details and smoothing out some of the roughness from our textured brushes. Here we'll learn how to polish our portraits before moving on to the final details.
1.Introduction
1.1Introduction01:27
2.Setup
2.1Your Workspace02:36
2.2Creating Custom Brushes07:13
2.3Understanding Your References07:52
3.Paint a Simple, Colorful Portrait
3.1Sketch10:21
3.2Exaggerating the Features04:57
3.3Prep and Create Your Base Colors05:42
3.4Shading06:09
3.5Final Touches, Color Portrait09:27
4.Paint a Textured, Grayscale Portrait
4.1Rough Sketch06:14
4.2Creating a Textured Base05:44
4.3Shading With Textured Brushes06:21
4.4Polishing Your Portrait With Soft Brushes06:06
4.5Final Touches, Grayscale Portrait07:25
5.Conclusion
5.1Conclusion02:31
4.4 Polishing Your Portrait With Soft Brushes
Hello and welcome back to Digital Portrait Painting in Adobe Photoshop. My name is Melody Nieves and in Lesson 4.4, we'll use softer brushes to polish our portrait details. So far for Chapter 4, we've had a healthy dose of working with texture, but now it's time to blend things out. Because this step really is impossible with the original chalk brush we were using, it's important to change over to a standard round brush to achieve a smoother brushstroke. To save on file space and give myself an extra file to fall back on just in case, you'll notice that I saved this painting as BlackandWhitePortrait3. So that means that this painting has taken three files so far to make. And just like before, I immediately merge layers together to save file space and begin my new changes to the painting. If you remember, I originally had the sketch layer set to 70% so I could focus on light and shadow. But now that I've progressed a bit, I'll bring it down even further to around 40% before finally merging it with the layer dedicated to the model. As you become more advanced with portraiture, you may even delete the sketch layer entirely. But for now, I'll keep it so that I won't have to repaint the sketched areas. With your standard round brush in hand, let's get to blending. We worked on most of the painting zoomed out, so let's zoom back in to focus on detail. Use a round brush with high opacity to begin blending your painting. If you enable pen pressure for opacity, then you can control the amount of paint that goes onto the canvas by either pressing lighter or harder onto your graphics tablet. First things first, I'll use a soft brush to blend out the skin. Women are known for their soft delicate skin, so using a soft brush to blend out the mid tones of the face will help to portray that poreless, airbrushed effect. However, whenever you move on to the other features of the face, it's important to make sure you're using a much harder brush. Soft brushes will make your painting look dull or even blurry, so use brushes between 80 to 100% hardness to clean up your details. Here I work around the face, committing to all my details by using a hard brush to define the edges. Although you can get away with soft edges for some features, it's important to paint the eyes, nose, and mouth with clear, solid lines. With grayscale paintings, you don't have to worry about color, so at least you only need to use the eyedropper tool to pick up nearby tones for seamless blending. After painting the face for a while, I move on to the hair using a soft round brush to add soft spots of highlights to each mound of curly hair. This helps to reinforce all of the voluminous shapes we've been creating. Now, try not to get too carried away with using a softer-edged brush. We didn't work so hard creating texture earlier to completely cover it up with smoother brushwork. Find balance in your painting by varying the brush edges to achieve better realism without completely wiping out the textured base. To make your paintings look like photos, it's a good idea to focus on painting shapes instead of lines. This is why we've decreased the visibility of the sketch layer so much. Now we can focus on creating the tonal shapes needed to achieve an elegant neck and shoulder area by blending out the harsh lines. When you get to this stage, that's when the excitement really begins. Your main focus at this point is to be in constant tweaking mode. So you paint a little, then study the reference, you paint a little more, then study the reference even more. But don't mistake this stage for being almost done. Because depending on how fast you paint, being almost done can mean the difference between one more hour of paint or five more hours of painting. And if you end the painting now, it won't take much time before you realize you could have put a little more work into it. Pace yourself, of course, but also force yourself to push beyond this current stage for a painting that is much more polished. And don't be afraid of over-rendering. Over-rendering is the idea that you can polish your painting so much that it loses some of the character it had with the beginning strokes. If you've ever seen digital paintings that are really beautiful, despite having messy, chaotic strokes, then this is an example of not over-rendering. But, honestly, over-rendering is a bad habit many advanced digital artists have, most likely due to deadlines or high professional standards. As a beginner to intermediate digital artist, you still have plenty of room to grow. And you're most likely at the stage where you still have to train yourself to add more to your painting to continue cleaning it up. Despite it only being a grayscale painting, there are plenty of details to take note of. From the curls to the makeup and everything else, you might have to keep a mental checklist to make sure you don't forget anything. Now that we've been able to use the round brush to refine the details of our painting, we can take a step back to check to see where any mistakes have been made. And, yes, I've definitely noticed by now that my painting doesn't look quite like the model yet, but I'll be able to show you how to magically alter any painting to achieve better likeness to your subject. So join me in the final lesson of Chapter 4 where we'll see the magic behind the liquify tool as we bring this textural grayscale portrait to an end.


