
 Lessons: 16Length: 1.3 hours
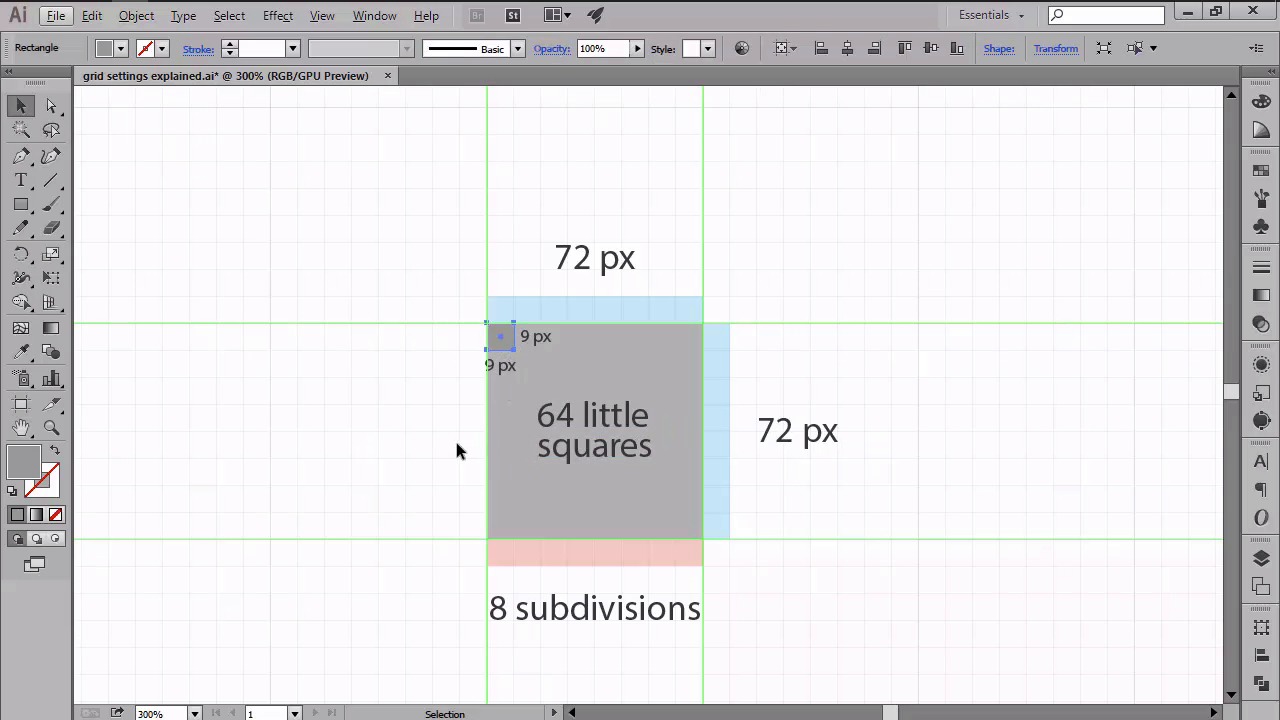

- Overview
- Transcript
2.4 Introducing the Grid
In this lesson, we will learn what a Grid is, talk about the two different type of Grids available within Illustrator, and see how we should make use of them in order to improve our workflow.
1.Introduction
1.1Introduction01:37
2.Understanding the "Pixel-Perfect" Concept
2.1Understanding How Illustrator Works02:26
2.2Defining the Concept04:09
2.3Advantages of Using a Pixel-Perfect Workflow03:01
2.4Introducing the Grid06:29
2.5Correct Use of Measurement Units06:09
3.Pixel-Perfect Workflow
3.1Adjusting Illustrator for a Pixel-Perfect Workflow04:49
4.Creating the Icons
4.1Size and Consistency05:54
4.2Creating the MacBook Icon06:30
4.3Creating the Window Workflow Icon06:03
4.4Creating the Designer Resources Icon06:11
4.5Adding Colors06:56
4.6Adding Finishing Touches: Highlights and Shadows08:23
4.7Creating Size Variations05:16
5.Saving for the Web
5.1Exporting the Icons03:16
6.Conclusion
6.1Conclusion01:32
2.4 Introducing the Grid
Hi, and welcome back to Creating Pixel Perfect Icons in Adobe Illustrator. My name is Andric Stefan, and you're currently at lesson 2.4, Introducing the Grid. In the previous lesson, we talked a bit about the perils of using a pixel perfect workflow, more precisely, why and when we should adopt it in our designs. In this video, we're going to talk about what a grid is, and how it can affect the way we use Illustrator to create crisp looking artwork. So, what is the grid? Well, according to the Merriam-Webster dictionary, a grid is defined as a network of uniformly spaced horizontal and vertical lines. Which is absolutely correct. But since we want something in the context of graphic design, we should see the grid as a two dimension structure, made up of a series of intersecting vertical and horizontal lines, that serve as an armature on which a designer can organize graphic elements in a rational manner. In other words, we consider a grid as a tool meant to help designers structure their designs. Okay, so we now have a better understanding of what the grid is. But you might be wondering how is this important for establishing a pixel perfect work flow. Well, this is where things get interesting since Illustrator gives you the ability to use two slightly different types of grids. Yeah, you heard me right, two types. The first is the, let's call it structural grid, which we've just talked about, while the second one being the pixel grid. I'm going to talk about each of them in the following moments. And show how you how we can benefit from implementing them through our work flow. Let's start with the structural grid. In order to understand how the grid works, one must first be able to actually see it. So, I'll open up illustrator and create a 800 by 800 px document. As you've probably noticed, there aren't any vertical nor horizontal lines visible. That's because Illustrator only displays them once you instruct it to. So lets go to view, show grid, and see what happens. Well, we now have a clear first sight of how the grid actually looks like. But how does it work, how do you align the objects on your artwork to it? Lets create a 100 by 100 px square and try to move it around. Oddly, nothing seems to happen since we can drag the shape around but we can't actually make it align to the grid. But why is that? Why can't it simply snap to one of the lines? Well, that's because Illustrator wasn't told it needs to snap the object of this artwork to the actual grid. In order to do that, you have to go to the view top menu, and click on snap to grid to enable it. Okay, so now that we have our snapping enabled, let's try and see what happens if you move our square this time. As you can see, the object is now perfectly snapped into the grid as soon as I move it around. I can even use my keyboard arrows to nudge it in the direction I want and it will continue to snap, making it easy to position it wherever I need to. But why does it behave the way it does? Well, the answer lies within the way Illustrator creates the grid itself. If we go to edit, preferences, gauge and width, we can see that the software read lines every 72 pixels using 8 subdivisions. But what do these settings actually mean? Well, it's quite simple. At this 72 pixels, it instead will draw 4 delimiting lines, 2 horizontal, and 2 vertical, creating a 72 by 72 pixel square. Which will be further divided into 64 smaller 9 by 9 ones. The size of these smaller squares is the exact number that we get if we divide our gridline to our subdivisions. So 72 divided by 8. When you move the object around, Illustrator will make a jump one position. One square out of the 64, thus giving you the ability to precisely structure your design. This is super helpful when you work on prototyping, since you can create a custom grid, and position it to our components by simply moving them using the arrow keys. But 72 but 8 is quite a large grid. And since I can design neutrally involved working at a pixel based level, we were going to tweak the settings to make them as precise as possible. So, going back to guides and grid settings, let's set both the grid line and sub division options to 1 and see what happens. Well, as you can see my grid is now super elaborate. Show me more dividers than ever before. But what happens if I try to move my 100 by 100 pixel square now. As you can see, it no longer jumps at 9 by 9 pixel distance but instead it makes a super precise move of just 1 pixel. Which is exactly what we want when dealing with pixel perfect art work. So we've now seen the structural grid can go beyond it's intended purpose of establishing a reference system for our elements. Giving us the ability to create sharp artwork by snapping object at a super-precise level. At this point, you might be wondering what the pixel grid is, or why would we even need it anymore. Well, if the structural grid is responsible of the way you arrange objects on your art board, the pixel one is in charge of making sure that everything you create snaps perfectly at the pixel-based level. Now here's the trick, if you want to use the Pixel Grid, you should first hide the structural one and then enable the Pixel Preview mode by going to View and clicking on Pixel Preview. Once you've enabled this mode, you might notice that the Snap to option is a bit different since it's now showing that the snapping of the objects is made to pixel. Which is the actual pixel base. Okay, but how does it work? Well, let's continue on the previous example and move the square. Either by grabbing and then dragging using the mouse, or by simply pressing one of the directional arrow keys. As you can see, the square jumps exactly one pixel no matter what direction we instruct it to. But what happens if we turn the Pixel Preview mode off and repeat the same process? Well, if we had a snap to reduction active, it would continue to use it, which means that each time we move the object, it will jump exactly 1 pixel, to the classic way that we just set up a couple of moments ago. There will be situations where you'll be using a larger structural grid with snapping disabled. When you will want to be able to move things around without them falling off the pixel grid. Since going back and forward into pixel grid mode is mostly annoying, you can instead select the object and then enable the line to pixel with option found under this transform panel. Once you do this, your objects will snap back to the pixeled width giving you the liberty to move them around as you need. I myself usually prefer working inside of the pixel preview mode, since I'm always sure that my shapes are perfectly snapped. Giving me the joy of a job well-done. So, there you have it, a close insight of how the two grids can help you create with pixel perfection no matter the situation. That was it for today's lesson. I hope you found the information helpful and most importantly learned something new along the way. Stay tuned for the next one, where we'll discuss about the correct used of measurements when establishing a pixel perfect workflow.


