
 Lessons: 15Length: 1.6 hours
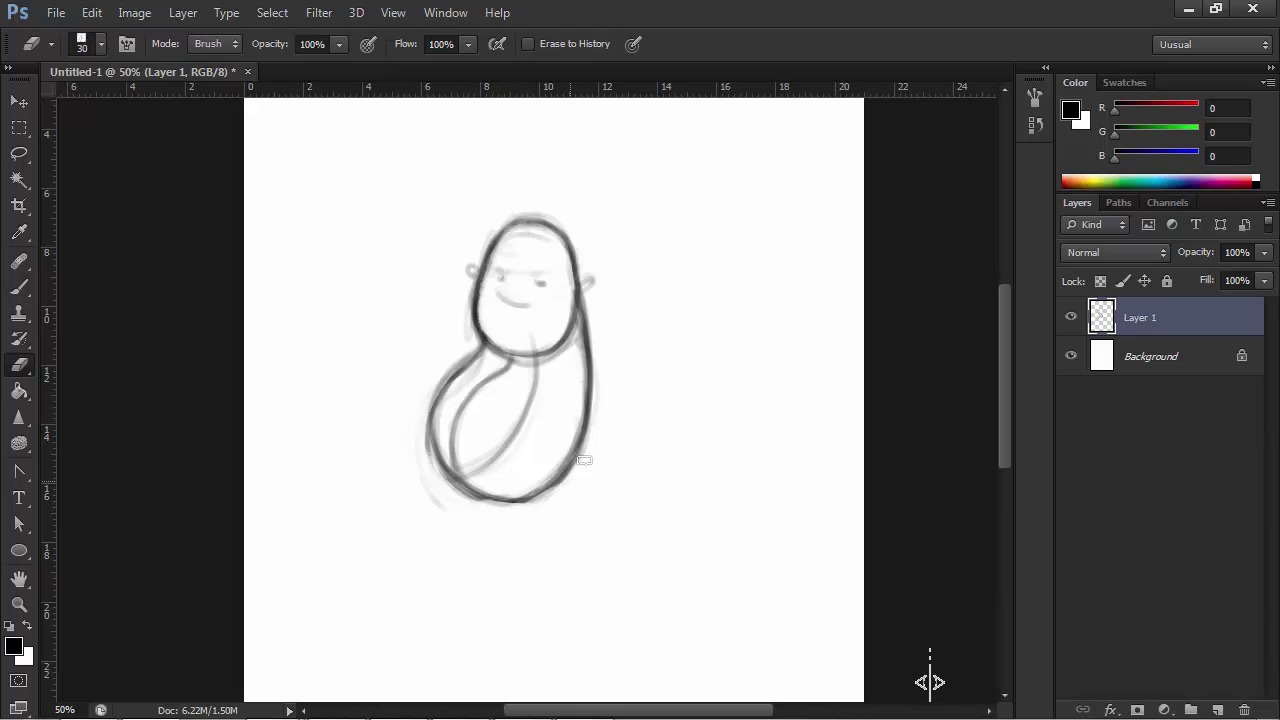
- Overview
- Transcript
2.1 General Form and Sketching
In this lesson we’ll experiment with form to establish the character's overall look and feel. Let's see why shapes can suggest a character's traits before anything else, and how you can use that information in creating your cute pirate character.
1.Introduction
1.1Introduction01:51
1.2Tools and Resources01:34
2.Creating a Cute Pirate Character
2.1General Form and Sketching06:07
2.2Detailing06:32
2.3Line Art07:10
2.4Base Colors04:55
2.5Light, Shadow, and Texture09:01
3.Creating a Tough Pirate Captain
3.1General Figure and Pose05:37
3.2Detailing the Figure08:05
3.3Expression09:00
3.4Detailing the Head04:55
3.5Detailing the Body08:15
3.6Line Art and Base Colors11:09
3.7Shading and Texture09:05
4.Conclusion
4.1Conclusion01:31
2.1 General Form and Sketching
Welcome back to Illustrating Personality in Character Design. My name is Ioana Sopov and this is Chapter 2, Lesson 2.1, General Form and Sketching. In this lesson, we are going to learn how to loosely sketch out our character's figure, taking into account what we want our character to be like personality-wise. In this stage, we won't focus too much on details or line quality, but rather just try to find a pleasing shape and posture for out character, before moving on to the detailing stage. We'll be using the sketch tool brush preset that has been provided in the course files. Let's start off by loading the brush tool preset that we will be using in this sketching part of the course. Select the brush tool. Go to the top left corner and click on the arrow and you will see a list of your tool presets for the brush tool. Click on the little cog icon and select load tool presets from the drop down menu. Then browse to the source files folder and click on the sketch toolbrush tpl file. Then select it from the tool preset list, and we're good to go. First of all, I'm going to be working in an A4 shape 150 DPIY file. This is an okay resolution to use for preliminary sketching or thumbnailing, but the final illustration should be at least 300 DPIY, especially if they are meant for print. Now using the sketch brush tool preset set to 13 pixel size and a simple ball shape as the base for our character's head, I will start sketching out the general shape of his figure. Since this character is supposed to be cute and friendly, perhaps even a little goofy, we're going to want to use curvy, rounded shapes, as these are almost universally perceived as childish, soft, and cute. Avoid any angle that is too sharp or line that is too straight and that will emphasize our character's easy going nature. Always try to think of the shapes you are using to build your character as three dimensional objects from the start. This will make your character pop out without much effort where as mentally using flat shapes will make your character just as flat. Notice that while I'm sketching, my lines are loose and relaxed. I'm trying to find the overall shapes and not focusing too much on the quality of the line work. Now for the body, we want to avoid stiffness as much as possible, so let's use an action line as a virtual spine for his body. After I find the line that I want, I draw the body as a bean shape around the action line, keeping in mind that it is a 3D object and not just a flat shape. To emphasize this, after you're happy with the overall shape, try to find the front facing midline ofthe body, and draw it accordingly. This will definitely help you see the volume of your character's body. Next, come the hips and the legs. Try to imagine where the hips would be placed in our character's body. And sketch them in so that you can have a guide for drawing his legs. Let's give him short, stubby legs for extra cuteness, and roughly sketch out the position of his feet. We don't need to get into too much detail at this point. The idea is to capture our character's pose while not worrying about details such as footwear that will be added on top of this figure drawing. The shoulders and arms work much in the same way as the hips and legs. Find the shoulder line, and try to dot down a visual guide for where your shoulders are. Characters look their best while doing something and not just standing around. So let's draw one of his arms his arms up holding the cutlas. Keep in mind that while his legs are short and stubby and thus his knees are not that obvious the arms require three joints to look dynamic. The shoulder, the elbow, and the wrist. Much like in traditional figure drawing, to render movement in a character the action lines should never be straight especially in the arms. Try to find the curve of your action and adapt it to the jointed structure of the arm. After drawing the action lines and marking the joints for the elbow and wrist, start adding volume around these guides. In this character, we're going for a semi-realistic arm structure. So keep in mind that the forearm has a little bump in it before thinning out toward the wrist. After finishing the arms, I'm going to draw a midline for the head just like I did for the body in order to emphasize its volume. And then I'm going to roughly sketch out his facial features for further detailing. I'm going to give him big wide smile, and just roughly mark the place of the rest of the features such as the eyebrows, eyes, and nose. Don't worry about them being perfect now. This will serve as a guide for the detailing stage later. Let's also draw in the cutlas and a few other wardrobe developments to our character's figure. Fixing contours that are not quite what we want along the way. At this point, I'm going to imagine a rather simple pirate outfit. A vest, some high-waisted pants, boots, maybe a scarf tied to his head. His right arm seems a bit too long. So, using the lasso tool, I select the part that contains his forearm on our sketch layer, hit control T, which is transform, and then rotate and move it into the desired position. Then I'll erase and redraw the lines in order to avoid confusing overlaps in the initial sketch. Having sketched out most of our character's general features, it's time to move on to the next stage. Detailing facial features and expression, as well as refining hands and feet. Which we will tackle in the next lesson, along with refining our line art as well.


