
 Lessons: 15Length: 1.6 hours
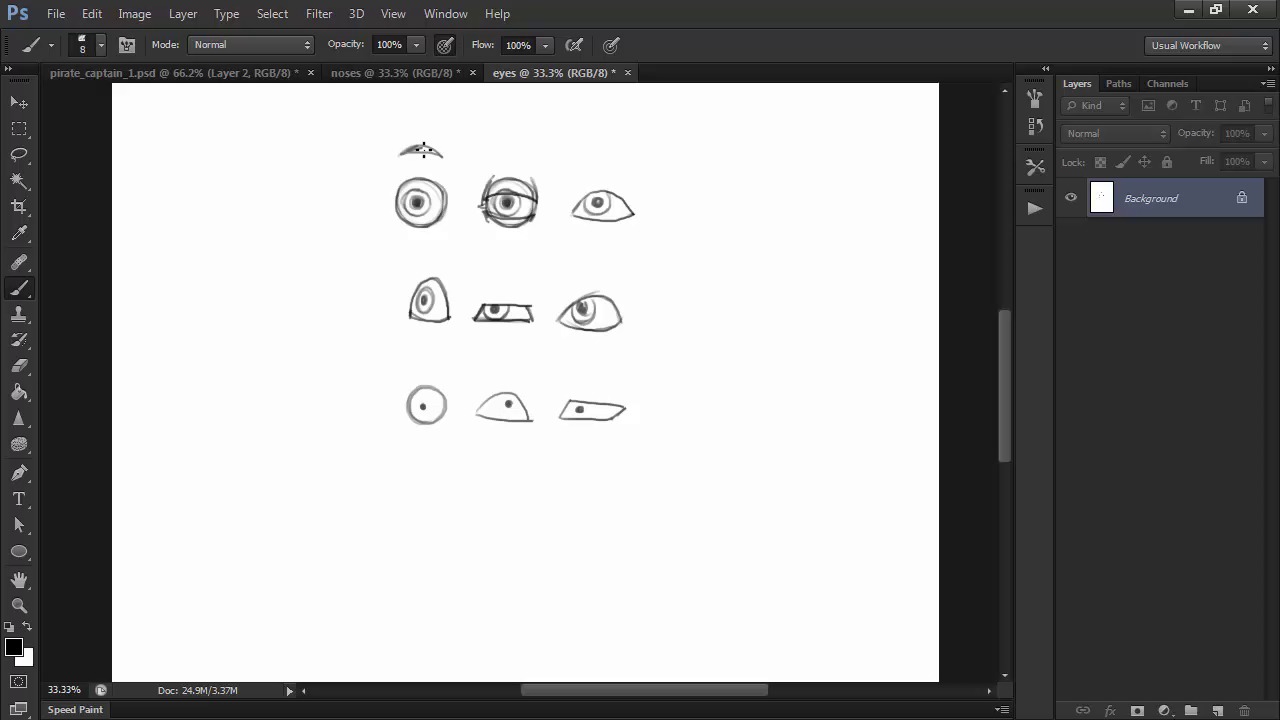
- Overview
- Transcript
3.3 Expression
Learning a bit about facial features in this lesson will help you develop your character's face and expression.
1.Introduction
1.1Introduction01:51
1.2Tools and Resources01:34
2.Creating a Cute Pirate Character
2.1General Form and Sketching06:07
2.2Detailing06:32
2.3Line Art07:10
2.4Base Colors04:55
2.5Light, Shadow, and Texture09:01
3.Creating a Tough Pirate Captain
3.1General Figure and Pose05:37
3.2Detailing the Figure08:05
3.3Expression09:00
3.4Detailing the Head04:55
3.5Detailing the Body08:15
3.6Line Art and Base Colors11:09
3.7Shading and Texture09:05
4.Conclusion
4.1Conclusion01:31
3.3 Expression
Hi and welcome back to Illustrating Personality in Character Design. My name is Ioana Sopov, and we are currently on Chapter 3, Lesson 3.3, Detailing Our Character's Expression and Facial Features. In this lesson, we'll learn about the basic facial anatomy of our character and the many possible ways of stylizing features and adding expressions. Let's pick up our rough sketch where we left off in the previous lesson and get right to it. What we have now is the rough sketch of our character's face. For this lesson we'll zoom in on his face to start detailing this area. Let's turn the initial sketch's opacity to 40%, so that we can see what we're drawing on top, and make our brush eight pixels in size in order to get a more fine line for detailing. His nose is going to be broad and big, so let's start with that. You can split the nose into three basic shapes. The bulk of the nose and the nostrils. Let's see how we can stylize noses in characters. Oftentimes, you can reduce the tip of the nose to three spherical parts that intersect. The larger one in the center is the tip of the nose, the smaller side spheres act as the nostril shapes. But if you want to go for a more rectangular version of the nose that can work as well. Mix curved and straight lines get an expressive and funky shape. You can play around with wacky shapes, keep the width of the nostrils as the width of the entire nose, or thin it out towards the bridge of the nose. Play around with shapes, and you can get broad rounded noses or big tapered noses. You can flatten them up like we did for our previous pirate or make then longer and rounded, and so on. The beauty of characters is that they don't entirely play by the rules of anatomy. You have a lot more freedom in experimenting with shapes than with drawing lifelike faces, but at the same time, inspiration for stylized features comes from life, and the wide variety of features in encountered in different people. This means that the best way to learn how to draw a variety of noses is to study actual real noses in people and try to find ways of simplifying their shapes as much as possible. For our pirate captain, I want a bulky, broad, and rectangular looking nose to fit into the style that we've chosen for his body type and personality. Don't forget to imagine the volume of these shapes while drawing them. Otherwise, they might end up looking very flat and lifeless on your character. Our character's head is not a flat rectangle, but rather a box shaped 3D volume. We want our pirate captain to have a stern look. So for the mouth, I'll go with a straight line and connect his nostrils to the edge of his mouth to give him a more aged appearance. This is an exaggeration of the wrinkles and lines that naturally appear on the human face with age, and translate in the same way into characters. This illustrates the important correlation between observing and studying real faces and the control you will have over stylized features for your characters. Now let's move on to the eyes. Windows to the souls as they say. The eyes will play a very important part in your character's expression. These very subtle differences can change its look entirely. The eyes, in their basic shape, are spheres. They have a pupil and an iris surrounding that pupil. Surrounding this sphere are the eyelids that you can think of as thin material wrapping around the eyeball. There are many shapes of eyes and eyelids, and there's many ways of stylizing eyes. There's a classical cartoon eye, the tall cartoon eye, all one shaped and lots more. Keep in mind the big wide eyes are most often perceived is baby or childlike eyes. And smaller, more angular shapes, are more mature or masculine. A shape resembling a cat's eye will usually be interpreted as being more feminine as well. You can also simply the shape to the basic round eyeball shape and a tiny tiny pupil, or any other basic shape. This is entirely up to you and your preferred style or direction. Now eyebrows come in the same amount of shapes as eyes do. There is the short curved brow, the angular one, and so on, and so forth. Eyebrows in there relaxed state have a certain expressive quality from their shape alone. When they are animated in different positions, they truly come alive though. The general perception of thin, angular brows, is that they're either really feminine or somehow evil. Thicker angular brows are often associated with the male face. These nuances are, however, very subjective. They are most often related to the cultural background and personal taste of the viewer. So they shouldn't be thought of as general rules for designing the character's face. The overall relationship between the features can also contribute to the change in perception of a single feature, so keep in mind that combining different genres of features will give you very interesting results. Now a little bit about the different expressions of the eyes. When the pupil and the iris are located in the center of the eye, they appear as perfect circles. When they move to either sides of the eye, they become elliptical in shape, due to the eye's spherical surface. The further towards the sides they go, the narrower they will become. The eyelids also help create the eye's expression. If the character is relaxed and laid back, the top eyelid will cover the top of the iris. The more of the iris that is shown, the more surprised or scared the character is. When looking down, the eyelid will come down towards the bottom of the eye. When the eye will be closed, both eyelids come together somewhere on the surface of the eye, depending on your eye style. For simple shapes, the eyelid works in the same way. Your relaxed eye can even have no eyelid visible at all. And you can use the presence of the eyelid to suggest a change in mood. The middle eye can represent a lot of different emotions with that eyelid, like, being slightly tired, skeptical, or focused. The third variant of the eye with the lid might suggest anger, concentration, or even sadness. When you pair these different options with different types of positions of brows, you can get a lot closer to expressing a very specific emotion. Generally, we are always accustomed to responding to people's expression because humans are social beings. This means that you can intuitively draw basic expressions, because they're signs are a familiar image. A furrowed brow means anger. Wide eyes and upward tilted brows show fear, and so on. When in doubt, try to study these individual expressions on people around you and take notes what's the features do when showing a particular emotion, especially if that emotion is a complex one like disgust, bittersweet smiles, and many others. Now going back to our pirate captain character, my choice is to go for simple, round eyes with tiny pupils. I think this suits his overall stoic look a lot. For his brows, at first I think of giving him an angry expression, but somehow I find that it's a bit too much. He's stern, but not really angry. So I complete his expression with rectangular, thick brows, that stay straight atop his eyes. I'll move forward with defining his head. Remember what I said about it having a box shape and protruding chin when drawing the contours. Note that my contours are still a little curved and not perfectly straight. Add the years and the hairline, and roughly redo the contours of the beard. We'll detail his facial hair later, but it's good to start now and have a base. Finally, I want to give him some circles under his eyes and add the cheekbone line to give his face even more volume and detail. Overall, we're done with our character's face for this part. Now that we've learned about facial features and basic expressions, we can move on to detailing the beard and hat in the next lesson.


