
 Lessons: 15Length: 1.6 hours
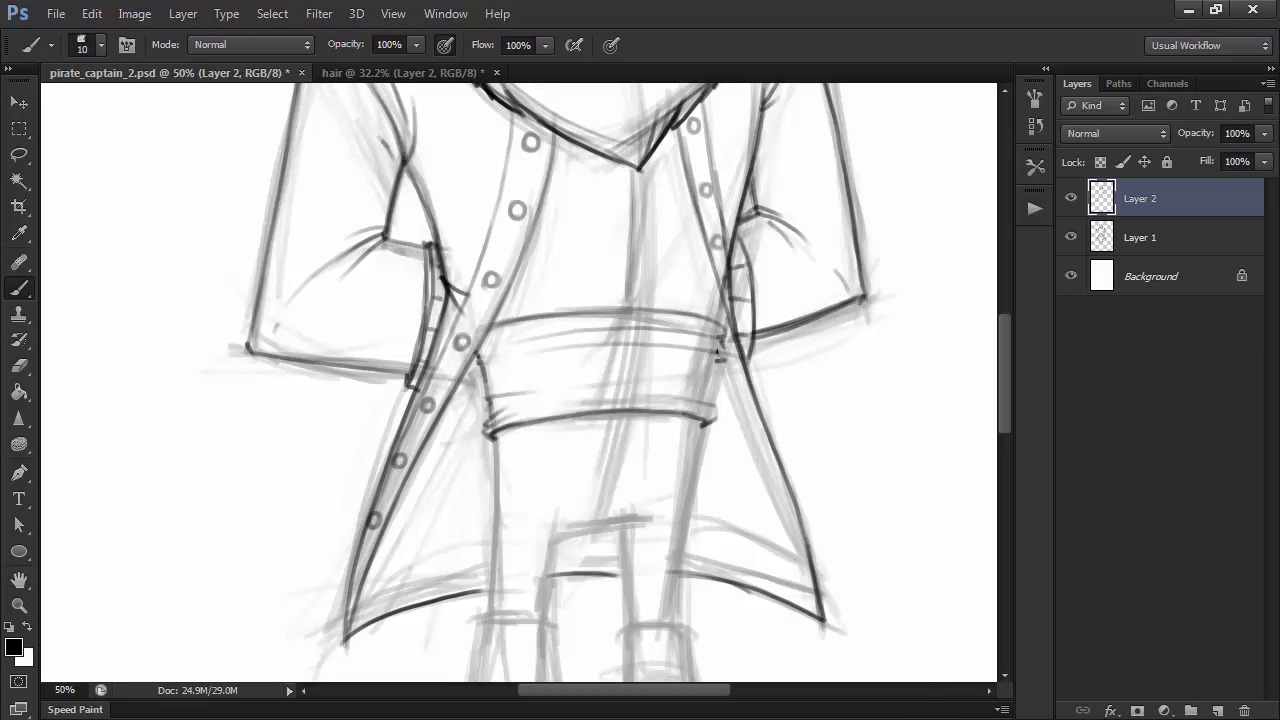
- Overview
- Transcript
3.5 Detailing the Body
Let's choose our character's clothing and develop the rest of his body, while also taking a look at how folds and creases in fabric work.
1.Introduction
1.1Introduction01:51
1.2Tools and Resources01:34
2.Creating a Cute Pirate Character
2.1General Form and Sketching06:07
2.2Detailing06:32
2.3Line Art07:10
2.4Base Colors04:55
2.5Light, Shadow, and Texture09:01
3.Creating a Tough Pirate Captain
3.1General Figure and Pose05:37
3.2Detailing the Figure08:05
3.3Expression09:00
3.4Detailing the Head04:55
3.5Detailing the Body08:15
3.6Line Art and Base Colors11:09
3.7Shading and Texture09:05
4.Conclusion
4.1Conclusion01:31
3.5 Detailing the Body
Hi, and welcome back to Illustrating Personality in Character Design. My name is Ioana Sopov, and together, we will drawing an awesome pirate captain character. This is chapter three, lesson 3.5, Clothing and Costume. Where we'll talk a little bit about how material behaves, and then go into the detailing of our character's clothes and accessories. So let's get started. The first thing that we'll have to know about drawing clothing on characters, is that materials behave in different ways when the object they're wrapped around changes shape. Clothing moves away from points of tension, to form creases and folds. These tension points are usually joints like elbows, knees, wrists, shoulders, and so on. When the tubular piece of cloth abruptly changes direction. Such as in a bent elbow, it will spawn folds on the opposite side of the tension point. These are generally called Half-Lock Folds. These types of folds can be used to emphasize strong changes of direction in characters and their body parts. If we look at the t-shirt example, you'll notice that the material will bunch up beneath the sleeve. This causes another type of crease to appear, more cylindrical in appearance. This is the result of the condensation of the material towards the armpit versus the point of tension located on top of the shoulder. If we bend the body beneath the t-shirt, we'll get the same half-lock fold that I've told you about before toward the waist. The more tension present in the underlying form, the more creases and folds will appear opposite the tension point. So keep that in mind when drawing the same material on different body parts and different positions. It's also worth noting that not all materials behave the same. Some crease more than others, some are very stiff, and so on. Like with all things that take time to learn how to draw, cloth and its folds and creases are best understood when drawing from life or photos. So I highly recommend taking the time to research and study the way fabrics behave. Now, let's return to our pirate captain. We've decided on giving him a long coat. So let's start with that. I'm going to place a little bump on the shoulder to mark the place where the sleeve would be sewn on the rest of the coat. Next, I'll go about lightly retracing the contours of the arm, from my sketch, so that I can establish the final shape. Let's think a bit about the dynamics of the fabric on his arm. There will be creasing where his arm meets his torso, because of the tension point on his shoulder. And also opposite his elbow, because of the change in direction there. I want this coat to fit him rather snugly, so I won't go overboard with the creases. And I'll only draw just enough to render the material. There is also going to be creasing towards the waist, as his coat opens up a lot towards the bottom. For his other arm, the process remains about the same. I'll draw the little bump on the seam of the shoulder and creases moving away from it. And then for the elbow, again, I add more creases because of the bent position. I'll also draw two rows of buttons on either side of the coat and maybe some cuffs on his sleeves that are slightly visible. Then I'll move towards the rest of the outfit. The cloth wrapped around his waist is basically a bunched up tube of fabric. So, it will crease a lot, following the shapes of the body. This is where I feel the need to show a lot of folds and creases that emphasize the tension of the fabric being wrapped tightly around his body. I've mentioned adding a belt across his body for his weapon holster, so let's draw that one now. Like I've mentioned for our previous character, keep in mind that his belt also has a thickness to it. It also wraps around our character's body, so don't just draw it with straight lines. Try and imagine how it falls across his torso, taking volume into account. No weapon holster is complete without a weapon, so let's add a cutlass. If we're to study the basic anatomy of a cutlass, the handle is a mostly cylindrical element, usually ribbed to improve the grip. The handle is firmly planted into the sword hilt. The hilt is a protective shield for your hand that in the case of cutlasses is usually connected to the handle by a thin band of metal. They come in a variety of shapes and designs from the simplest to really, really decorative ones. But in our example, let's use one that I found most common among cutlasses. A very rounded and curved upward shape. The shape of the blade is also very varied, so we have lots to choose from. Do some pictorial research and find the element that you like the most in the blade. And then go back and build your own version just like I did. Now for the holster we need a patch of hearty leather sewn across the belt. This should be wide enough so that the entire width of the sword can pass between the patch and the belt. But narrow enough that the sword will stop at the hilt and not just fall down. We'll detail everything in the final line art. But, for now this should be a good guide to what our weapon and holster look like. Shifting our attention back to our captain pirate character, we add some thickness to the belt, so that we can move on to the rest of the body. His shirt will be made from a soft cloth. So, it will have a few creases above his waist. Don't add too many. That area wont be too visible and we don't want to clutter it too much. After that, we can focus on the pants. I don't want creases for his pants. My intention is to have most of the attention directed towards the upward part of his body and face. So his legs and pants can be less detailed, in order to not draw attention. I refined the contours of the legs until I'm happy with them and I'll go into a little bit of detail though. There are some seams on the inside of the legs, and some seams on the pockets in front. The boots are going to be tall, buccaneer boots, with the top folded part really larger than his feet. These tiny feet, just like in our previous pirate character, contribute to the overall interesting silhouette by contrasting with his large torso and tall frame. The large upper folds of the boots add to that effect as well. So now that we're mostly done with the details in our character's body and clothing, you can turn off the sketch and make your final adjustments for this stage. We will, of course, be adding some finer details when drafting the final line art. But for now, you should focus on getting as much content into your sketch as you can. In the next lesson, we'll get around to drafting the final line art, and adding all sorts of tiny, but effective details. We'll also lay in the base colors beneath our final line art in preparation for rendering the lights, shadows and textures.


