
 Lessons: 16Length: 1.4 hours
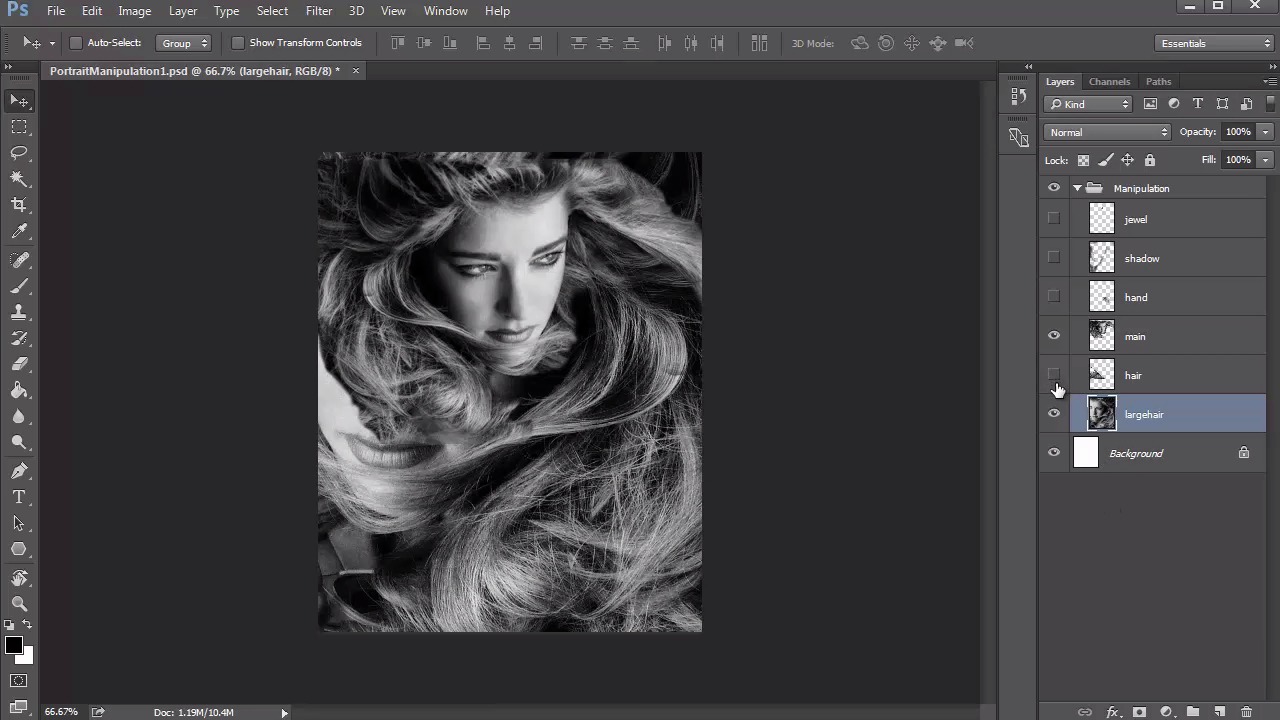
- Overview
- Transcript
2.4 Manipulating Your References: Female Portrait
We'll use the same photo manipulating techniques from lesson 2.3 to create another painting concept for our female fantasy portrait. Using free pictures from Pixabay, this new photo manipulation will help us know exactly what to sketch for our final drawing.
1.Introduction
1.1Introduction01:37
2.Set Up
2.1What You'll Need06:25
2.2Developing Strong Concepts06:29
2.3Manipulating Your References: Male Portrait06:30
2.4Manipulating Your References: Female Portrait05:59
3.Paint a Male Fantasy Portrait
3.1Male Portrait: Sketch05:49
3.2Male Portrait: Thumbnails for Light and Shadow05:56
3.3Male Portrait: Create a Base Painting05:11
3.4Male Portrait: Shading05:40
3.5Male Portrait: Final Touches05:13
4.Paint a Female Fantasy Portrait
4.1Female Portrait: Sketch05:15
4.2Female Portrait: Thumbnails for Light and Shadow05:01
4.3Female Portrait: Create a Base Painting04:12
4.4Female Portrait: Experiment With Shading05:49
4.5Female Portrait: Final Touches05:33
5.Conclusion
5.1Conclusion02:14
2.4 Manipulating Your References: Female Portrait
Hello and welcome back to Fantasy Digital Portraits. My name is Melody Nieves and in lesson 2.4, we'll continue the photo manipulating process by creating another reference, this time for the female fantasy painting. As I mentioned previously, the purpose of these photo manipulations is to remove all of the headache and frustration that comes along with figuring out what you should draw and how you should draw it. By creating these photo manipulations, you save so much time because the entire composition and all of its details are right there in front of you. But what happens if you wanna be a little more experimental with your painting? Even if you're not looking to make a hyper realistic portrait, you just still let this photo manipulation process help you with the general composition. How you then decide to interpret it is up to you. You can always add your own flair or personal style to any painting as long as you have the core idea set in place. So let's take a look at the references. For this photo manipulation we'll be using just two pictures. The first picture is a black and white photo of a woman with wild, flowy hair. The position of her head has are looking off to the distance and her hand is also within the shot, which I don't really mind at all. The next picture is a shot of two silver earrings. It's most likely done as a product shot but will work well for what I have in mind because it's a great close up of the earrings as well as all the jeweled details. The beauty of research is that we all see something different in the reference photos we pick. Can you guess what I have in mind for these two? Take a look at the final photo manipulation. It probably seems like I've used more photos, but I assure you that I've only used just the two. The key to this photo manipulation is simple. I adjusted the canvas size to eight by ten inches so that it was much longer in height than the original. Let's hide some of these layers to see how I got to the final result. First I took the image of the woman and flipped it so that she was looking in the right direction as opposed to the left. You can do this easily by going to Edit>Transform>Flip Horizontal. Flipping an image just comes down to what feels right in your gut. It's also a great way to make your composition a little more unique, so that it's not a boring carbon copy of the original. Then I use the eraser tool to erase away any parts of the image that weren't her hair. Because the picture is in black and white, it's a little hard to tell where the hair stops and the other textures begin. But just try your best in removing what you can, because it doesn't have to be perfect. If you take a look at one of these layers underneath, you can see that as unhide it, it's actually another copy of the original picture, but at a much larger scale. The reason why I did this is because I wanted the model to be floating in a sea of her own hair. And just like with the other portrait, there's no sense of where her neck or other body parts might be, aside from her hand. Take a closer look at the setup. I really love how the section of hair next to her right cheek flows to the bottom. So I made sure to position the picture underneath to go along with this in a way that made sense for a flowing and fluid effect. In order to cover the part of her face that are still showing, I just used the Lasso tool to cut and paste a random piece of hair over the face. And, even though I originally wanted to do just floating head style portraits, I really loved the shape of her hand and feel like it might add more to the composition by breaking it up a bit. So I cut and pasted the hand onto a new layer to make it not look like it's emerging from the lower half of her hair. You could keep your photo manipulation as a mere collage of photos, but sometimes it's necessary to make a couple more adjustments that will ultimately improve the composition. To add a little more depth, I created a new layer and used the brush tool to softly paint black shadow along the left side and center areas. Doing this not only helps reinforce the lighting scheme, but it adds a little more drama that I think was missing. The last thing I did to finalize this photo manipulation was cut out one earring and copy and paste it onto her forehead. And because I set the layer to darken, I didn't have to worry too much about erasing any excess areas. I place the earring and what is considered the position for the third eye. This automatically adds a sense of mysticism and fantasy to the overall concept. Because the third eye position is a common symbol that represents the gateway to the inner realms of one's self and a higher state of consciousness. A detail so simple automatically adds symbolism to your painting. With the tool in place, I think it also gives this portrait a very goddess-like appeal. Not only will she make for a powerful fantasy portrait, but it gives the composition that extra bit of drama by adding details that will force the viewer to create a magical story in their minds. Although the photo manipulation is done, there is one very pressing matter that needs to be discussed. Aside from the earring, the entire reference is in black and white. And that can only mean we might run into a bit of trouble with color. No worries, though, because I want you to be able to navigate any painting and know what to do to ultimately make it work. Unlike the other portrait, this scenario requires experimentation but we do have at least a good sense of lighting and great details. With both of the photo manipulations done, we can move on to sketching. I chapter three, dive into the sketching process with me as we tackle our first painting, the male fantasy portrait. So join me to get started in lesson 3.1


