
 Lessons: 16Length: 1.4 hours
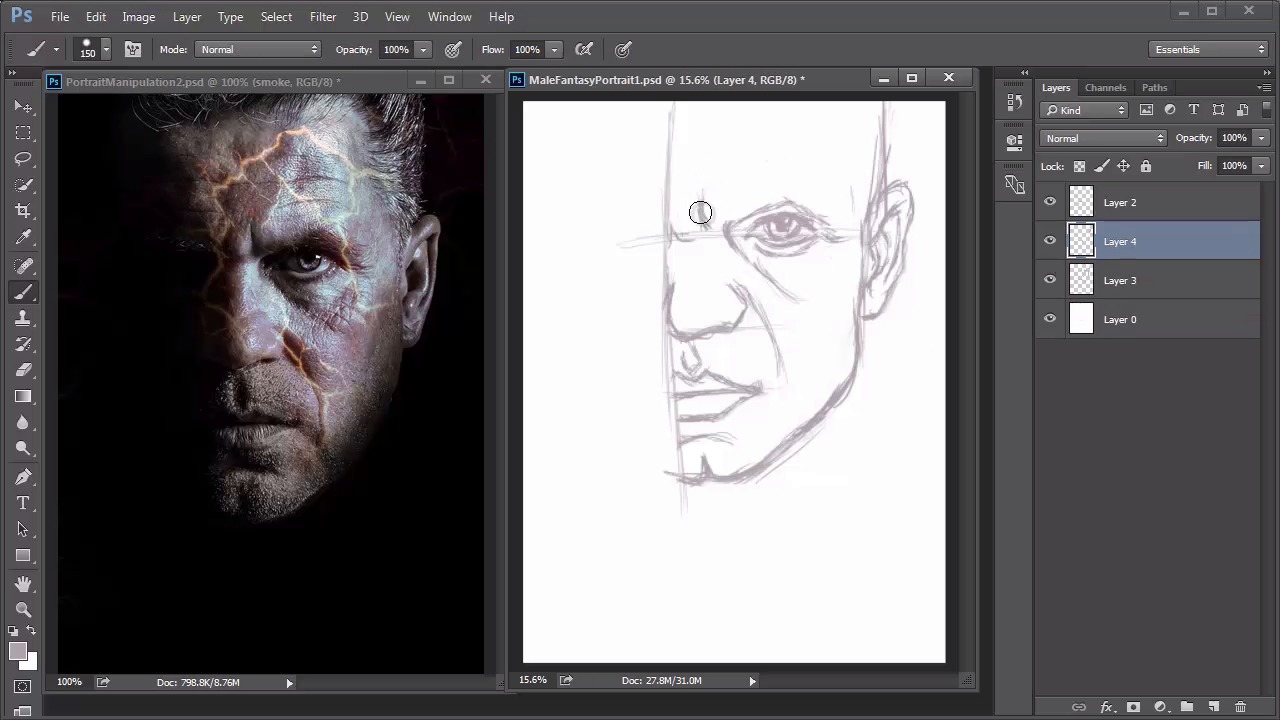
- Overview
- Transcript
3.1 Male Portrait: Sketch
In this lesson, we'll draw sketches for the male fantasy portrait using Photoshop's Brush Tool. Starting with a rough sketch, we’ll use this as a base to create a much cleaner sketch before moving on to thumbnails.
1.Introduction
1.1Introduction01:37
2.Set Up
2.1What You'll Need06:25
2.2Developing Strong Concepts06:29
2.3Manipulating Your References: Male Portrait06:30
2.4Manipulating Your References: Female Portrait05:59
3.Paint a Male Fantasy Portrait
3.1Male Portrait: Sketch05:49
3.2Male Portrait: Thumbnails for Light and Shadow05:56
3.3Male Portrait: Create a Base Painting05:11
3.4Male Portrait: Shading05:40
3.5Male Portrait: Final Touches05:13
4.Paint a Female Fantasy Portrait
4.1Female Portrait: Sketch05:15
4.2Female Portrait: Thumbnails for Light and Shadow05:01
4.3Female Portrait: Create a Base Painting04:12
4.4Female Portrait: Experiment With Shading05:49
4.5Female Portrait: Final Touches05:33
5.Conclusion
5.1Conclusion02:14
3.1 Male Portrait: Sketch
Hello, and welcome back to Fantasy Digital Portraits. My name is Melody Mannis, and so far, we've learned everything we needed to know about our first painting. In this lesson, we'll get started on the first get which is solely based on the photo manipulation we created earlier. So, let's begin. Think of every drawing you make as a skeleton for your painting. Without a good sense of structure in place, your painting may fall apart. My goal with every sketch, is to try to draw as many details as I can, so that when I do move on to painting, I'm working on a complete, and finished concept. Hit F5 on your keyboard to bring up the brush panel. Make sure that you're using a nice tapered brush for the step. I like to get into the habit of drawing with colors other than black, because I feel like the transition is much easier when I need to start painting. Usually when you sketch in black, you get very harsh black lines that you have to paint over. This is super annoying, because either you have to lower the opacity of the sketch, or literally paint over the sketch again, forcing you to take more time to finish the painting. After making a few test strokes, begin sketching a rough outline of your composition. If you notice, I decided to hide the visibility of the smoke layer. Because I find it distracting. Hiding the layer temporarily, will allow me to focus on the structure of the face, before moving on to the smoke. This subject is a little tough, because I only have half of a face to draw, but sketching some guidelines will help me figure out the placement of each main feature. What you decide to draw first usually depends on what you're comfortable with. In the beginning, I like to go for shapes that are easier to mimic, like in this instance, the nose. Once you have one solid feature in place, you can use it to measure,and figure out where other features, like the mouth and eyes, should go. Just like me in real life, this model has a cleft chin. Since I have one too, I'm actually used to drawing this interesting trait. But if you struggle with it by any chance, just keep adjusting the structure of the chin to make sure it has a little dip in the middle. This man also has really deepset eyes, and the general expression on his face is a bit of a scowl. To make sure you get the expression down, it's important to keep sketching lines for wrinkles, and areas where the brows furrow, to accurately express his mood. You'll also see, that I constantly adjust the structure of his face like his jawline. Typically, men have more angular features, and this means that it might be a little harder to sketch, because you have to pay special attention to the skeletal structure of the face. This is why I always choose to draw the nose, mouth, and eyes first, because they can tell you a lot about the structure. Once you have them drawn, you can move on to secondary details like the ear, hair, and any additional wrinkles. Now, that his face is done, it's time to draw the fiery cracks into his skin. I use simple squiggly lines to represent them. I try to draw them almost like veins, and only keep the cracks that complement his face the most. Last, but not least, let's move on to the smoke. First, unhide the smoke layer from your photo manipulation. Then, add a new layer,and follow the path the smoke makes as it billows up from the bottom, and travels across the man's face. Smoke is such an interesting feature to replicate. And I wouldn't be surprised if it frustrates you a little. The key to drawing smoke is to allow some of your lines to take an orgatic shape. So, as much as you want to draw lines that are even or balanced out, it's best to let a little of perfection show through. Create big voluminous shapes next to ones that are slightly more chaotic, and you'll see in no time how much your sketch begins to reflect the natural flow of smoke. Now, that I have a rough sketch complete, I'm going to use this as a guideline to create a cleaner sketch above it. To do this, I'll first change my brush settings slightly, and enable the pen pressure for opacity. Then, I'll lower the opacity of my sketch layers, and create a new one above it dedicated to a much cleaner version. With this version, my focus is to create clean lines while also lightly shading certain areas to illustrate the structure of the face. If you want to make the shading process much easier for you later down the line, the best thing you can do is add a bit of shading right out of the gate. Not only does it complement the sketch, but it's always a good reminder to be conscious of the lighting scheme when you paint. And because of its soft edges, this brush works so much better in illustrating smoke. Continue this process until you're done. And don't worry if your sketch isn't similar to this outcome. It's always a good idea to strive for the best get you can possibly make. But it's certainly not the end of the world if it doesn't come out pretty. I don't know about you, but I am super grateful for this photo manipulation. It saved me so much time in coming up with a composition that looks pretty solid as a sketch. And now, that the sketch is complete, we can test out the lighting scheme by creating several thumbnails dedicated to light and shadow. So join me in the next lesson, where I'll show you how to convert this sketch into three small thumbnails.


