
 Lessons: 16Length: 1.4 hours
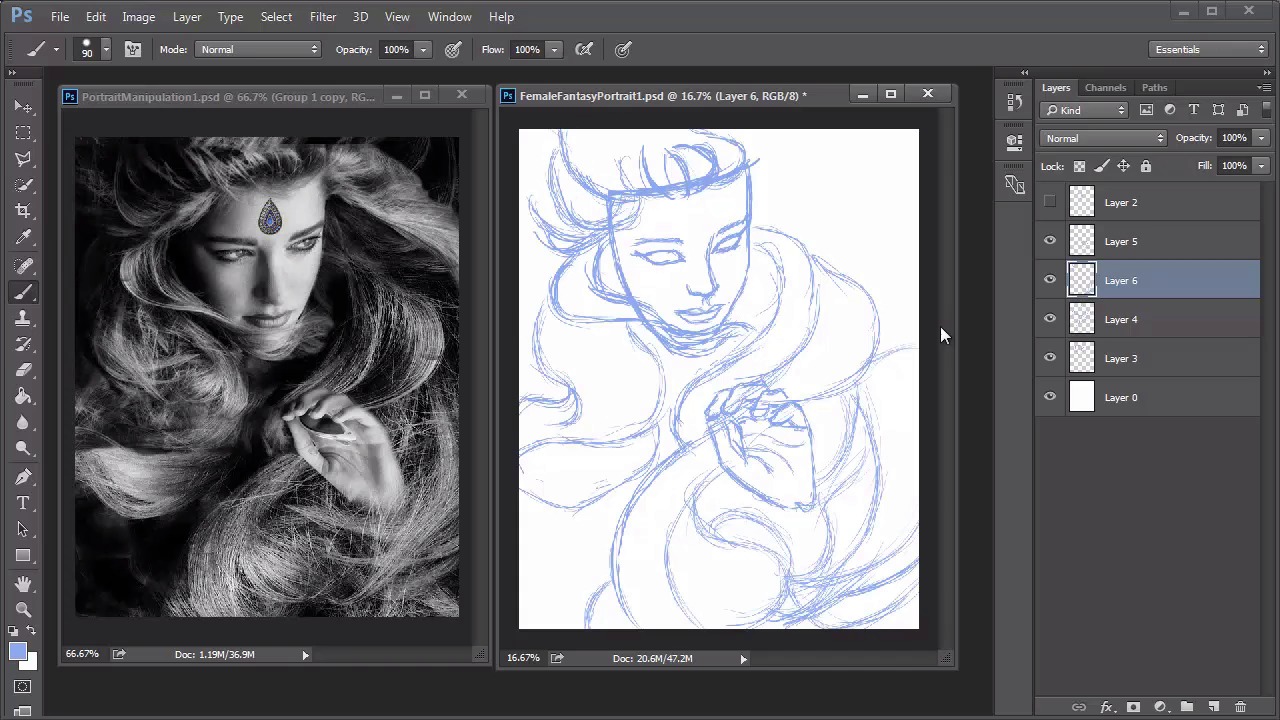
- Overview
- Transcript
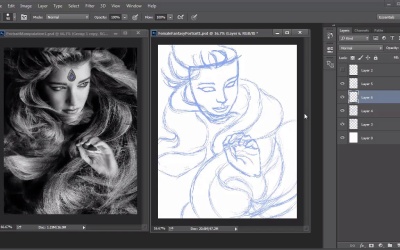
4.1 Female Portrait: Sketch
We’ll start the second fantasy portrait by sketching the photo manipulation we created earlier. Use Photoshop's preset brushes for the perfect sketching brush, and improve your line work by following these simple tips for clean drawings.
1.Introduction
1.1Introduction01:37
2.Set Up
2.1What You'll Need06:25
2.2Developing Strong Concepts06:29
2.3Manipulating Your References: Male Portrait06:30
2.4Manipulating Your References: Female Portrait05:59
3.Paint a Male Fantasy Portrait
3.1Male Portrait: Sketch05:49
3.2Male Portrait: Thumbnails for Light and Shadow05:56
3.3Male Portrait: Create a Base Painting05:11
3.4Male Portrait: Shading05:40
3.5Male Portrait: Final Touches05:13
4.Paint a Female Fantasy Portrait
4.1Female Portrait: Sketch05:15
4.2Female Portrait: Thumbnails for Light and Shadow05:01
4.3Female Portrait: Create a Base Painting04:12
4.4Female Portrait: Experiment With Shading05:49
4.5Female Portrait: Final Touches05:33
5.Conclusion
5.1Conclusion02:14
4.1 Female Portrait: Sketch
Hello and welcome back to Fantasy Digital Portraits. My name is Melody Nueves and this is the first lesson for chapter four where I'll show you how to create a sketch based on the photo manipulated concept for our female fantasy portrait. There are so many things that I like about this photo manipulation. But I feel like in this instance I'm dying to take a non-literal approach. What I mean is that for the first painting I try to get as close as possible to the photo manipulation. But with this portrait I want to experiment a little and see where my creativity could take me. Just because you've made a photo manipulation to help guide you along the way doesn't mean that you have to paint it literally. So for this portrait my main focus is to get the general flow of the woman's hair down without having to draw it strand by strand. Like before I've decided to use a nice blue color to draw this sketch. If you notice in the last painting I didn't have to waste any time painting over the sketch lines because they weren't a harsh black color. So this method really works wonders in the drawing department. After selecting a new brush with a nice tapered end I begin the sketch. It's important to first make sure you get the proper direction of the face down. Then I use guidelines to begin laying in the core details like the eyes nose and mouth. Once I have those major details, I can go back and adjust the structure of the face and begin sketching the hair. If you start at the crown of the head you'll have a much better understanding of how the hair flows downward. Instead of trying to draw lots of individual strands to represent the hair I tackled the hair in blocks to make sure that I get the proper movement. Before I finish the hair I sketch in the hand, so that I know where it sits within the composition. Originally the model is holding a pair of glasses in her hand but I'm going to do my best to sketch the hand without the glasses. This will require me to study my own hands in a similar pose to create details that go in line with the proper anatomy of hands. Once I adjust the placement of the hand to be a little more centered I continue sketching the hair around it. As well as fill up the entire composition. After the hair is all done I add the small jewel detail to the woman's forehead. I decided to keep the design simple because I thought it ultimately worked better with the overall look of the piece. Although I used a tapered brush for the sketch the lines are a bit more jagged than I would like. For the best line art possible I'll lower the opacity of the old sketch to 40% and trace over it on a new layer dedicated to a much cleaner version. Enable pen pressure for opacity and zoom into your portrait to begin sketching. Trace over your sketch using smooth fluid strokes. Make sure the sketch looks great on its own by flipping the visibility of the original sketch on and off to check If there are areas that could be smoother do your best to perfect them. Continue all around the portrait adding more details that you may have missed from the photo manipulation. When you get to the hair hit R on your keyboard to use the Rotation Tool. Rotate the canvas to help you draw each curve. This method works wonders in allowing you to get beautiful fluid strokes. And naturally the hand movement is much more organic if you are able to rotate the canvas. Think of it this way. When you're drawing on a piece of paper you might turn the paper so that you can draw a circle better. This is the same idea, but since you can't rotate your graphics tablet you have to rotate the canvas instead. You can add more strength here and there to play with the composition even further. As the sketch evolves you'll probably notice that we're only loosely basing it on the original photo manipulation. Finish up by drawing elegant hands and don't forget to add fingernails. Here is the final sketch. By tracing over the original you end up with clean line art that is perfect for your painting. Now it's time to test drive the sketch by creating three new thumbnails to experiment with light and shadow. So join me in lesson 4.2 to see what magic we can come up with.


