
 Lessons: 16Length: 2.5 hours
- Overview
- Transcript
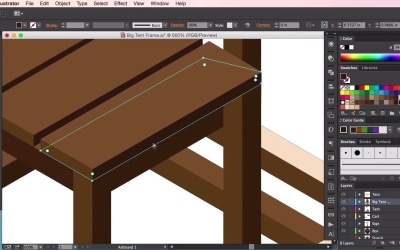
3.7 Tent Roof
In this lesson you will learn how to create a roof to go with your isometric market tent.
1.Introduction
1.1Introduction01:08
2.Planning
2.1Creating an Isometric Grid07:17
2.2Sketching the Design09:19
3.Props
3.1Isometric Box15:18
3.2Signpost05:50
3.3Cart Top Frame10:56
3.4Cart Bottom Frame10:18
3.5Cart Roof12:44
3.6Outer Tent Frame15:41
3.7Tent Roof14:44
3.8Tent Roof Colour14:30
3.9Isometric Anvil10:04
3.10Flag and Fruit05:22
4.Final Environment
4.1Setting Up and Arranging the Props06:34
4.2Adding Final Touches06:40
5.Conclusion
5.1Conclusion01:14
3.7 Tent Roof
Hey, guys, and welcome back to the isometric environment course for games. In this video, we'll be looking at creating some tent roofs for our large market tent design, so we'll start off as we had for our previous markets. Market roof, which was for the cart that you see over in the right there, and we'll just use the same colors as we did before. Just using the Pencil, dragging and clicking to create that curve there, and then making sure that we've got the right corners. Then, just making out this shape, so I'm just making sure that it's in the right layer. Transform and Flip. Now, you see here that I've cut out the shape for the construction poles there, so it looks like they're coming out from from the tent. Now, I'm just going to make out this drape over for the tent here. It looks like it's draping over the construction pole. Now we've got our main Tent, our frontal tent here, and I'm just going to slope that brighter color to go over the tent poles here. Okay, like so. Just dragging using the White Selection Tool to drag it all the way on top, and then, copying, pasting, and then pushing over the top of our pole like that. All right, so now I'm just going to do the same thing for the other side. Now, it might be an idea to just bring out our guidelines here to make sure that I'm doing it in the right place. Now, just bringing over the other one. Now, you'll see here that the tent is just in the wrong plane, but we can fix that by selecting our central construction and bringing it forward. Okay, so now it looks like we've got a tent, or a roof at the top. Just gonna bring this structure down a little bit. Just experimenting with what's the best place to put it. Now, I'm just going to use our wooden planks from the previous market cart, and now I'm just going to try and place it on top of our wooden construction beams here. Now, the problem with that is that our wooden planks are a little bit too long for this square construction, so what we'll have to do here is, we'll have to shorten these planks. The best way to do this is, again, going back to our isometric guide, I'm just going to cut using different shapes, just sort of cut into these shapes like we have done before. Just dragging it into the right place, cutting the top shape, and now we have a nice, shortened wooden plank for us to experiment with. Now, I'm just going to try and figure out a way to place this wooden plank into the right section. Just duplicating it as we did before for our market cart and creating a nice wooden flooring for our tower. Then, just the same sort of thing again that we did before, just resizing it so that it fits. Potentially using the Alignment tools to try and find a nice arrangement, a nice look for the wooden flooring. Okay, just resizing it ever so slightly so that it fits with our construction here. This may take a little bit of time to figure out the best way because, now that I've resized it, the problem with that is, it's a little bit too short over here now, so I have to duplicate our initial plank to try and see if I can I can lengthen it, but that's a bit too long. I'm just going to have to bring out the guides again and reshape from scratch. Now, you'll see that our plank, hopefully, should be the right size for the floor, so just bring up the guides here, guessing the shape for our plank, and now I can duplicate. And place it into the correct shape for our tower structure. Okay, so now we have our flooring. Just experimenting with the colors here to see if we can create a better sense of depth. Okay, so what I've done here is I've made sure that the planks are lighter, they appear lighter, and the construction beams below appear darker, as if they're underneath the planks. I've duplicated it now, and what I want to do is I want to make another floor, so it looks like there's two wooden plank floors within our tower structure here. Now, what we'll do is, we'll continue with the tents, I think. Again, just making sure that we've selected the correct color for our tent roof, using the Pen tool to draw out a nice, triangular structure here. You can use the handles here to affect the curvature of the line. Just duplicating this, and now what I want to do is, I want to sort of go in there, make sure that the line is correct. Then, what I'm going to do here is, I'm going to cut the triangle shape here and create a wooden pyramid at the top. Now, I've duplicated our tent. Okay, bring out your guidelines, making sure everything connects correctly. Okay, now I'm just going to continue the drape over using the same technique as before and the same color. Swap, it duplicates swapping around, making sure it connects correctly. Okay, so now it's starting to look more and more like a central tent. I'm just going to finish it off by creating this with a pyramid that I mentioned before, so we've got one here, swap it around. Okay, and then just using the Eyedropper tool to create some depth. There we have it, a top roof tent for our tower structure. Okay, so what I'm gonna do here is, I'm going to add the little bit more depth here, so I've created this curved shape on top of our roof structure here. I'm going to duplicate our roof structure, cut it using the Pathfinder, and just create some shadow here, using the same technique here again. Just gonna find a nice curved line here. Create this on top of our tent. Copy, paste, and now here's the Pathfinder to create that sort of curved shadow. This is just a technique to add a little bit of that extra sense of depth to our tent. Okay, so the next thing we're going to here is, we're going to continue our tent structure. Our roof, so it looks like there's some roofing or some sort of drape going on behind our roofs here. I'm just going to color in this part of our construction beam, making sure it's behind our current tent. Now, going to try and create some sort of drape behind our structure here, so I'm just going to color in the construction poles here just to make things easier, creating the same color here. Now, what the aim of this here is, I want the construction here to appear as if there's some drapage going on inside the tent as well. I'm just going to create a curve here just to represent the roofing behind our structure. Okay, now I'm just going to send it to the correct layer and make sure it's set behind our tower structure here. Okay, so grouping everything here, and now I want it to be sent to the right plane. Make sure everything's selected. Now, it's set to front. We need to make sure that these elements here don't overlap with our front elements. Make sure that, sometimes, when you get to complex structures like these, you find yourself going back and forth with the arrangements of the shapes just to make sure that everything is in the correct alignment. So I'm just going to duplicate this, reflect, and then just put it in the correct place. Again, just send it to the correct alignment. Got a little bit of tent there showing, so, right, and there we have it. Some tent roofs for our large market tent design. So, that it's for this video. In the next video, we'll be going through how to add some color to our tent, and exactly the same way, that's how we did it for our market cart. See you guys there.


