
 Lessons: 16Length: 2.5 hours
- Overview
- Transcript
4.2 Adding Final Touches
In this last lesson we will be adding some final touches to our environment, such as shadows and lighting.
1.Introduction
1.1Introduction01:08
2.Planning
2.1Creating an Isometric Grid07:17
2.2Sketching the Design09:19
3.Props
3.1Isometric Box15:18
3.2Signpost05:50
3.3Cart Top Frame10:56
3.4Cart Bottom Frame10:18
3.5Cart Roof12:44
3.6Outer Tent Frame15:41
3.7Tent Roof14:44
3.8Tent Roof Colour14:30
3.9Isometric Anvil10:04
3.10Flag and Fruit05:22
4.Final Environment
4.1Setting Up and Arranging the Props06:34
4.2Adding Final Touches06:40
5.Conclusion
5.1Conclusion01:14
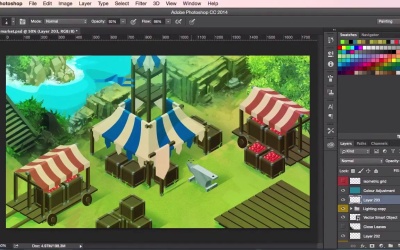
4.2 Adding Final Touches
Hey guys, and welcome back to the Isometric Environment for Games Course. In this video we'll be looking at the final touches to our isometric game environment by adding some simple lighting and shadow to the piece in Photoshop. So the first thing we're going to tackle here is the shadows. So just turning on the isometric grid, here. We're just going to use the lasso tool, to create some simple shadow shapes, which are moving from the left side of the screen to the right side of the screen. So the easiest way to do this is to just start with the bottom of whatever prop you plan to create the shadow for. And then just move just a few squares along. Just to represent the shadow. It doesn't have to be accurate here. Just create those shapes using the sew tool for every single prop which casts a shadow. And then once you've done that all you need to do is click on the fill tool. Create a layer, first of all, which is called, shadows. And then just fill all of those shapes in black. Now, once you've done that, just turn the opacity down to about 30%. Choose a nice, round brush eraser which has been softened. So make sure it's a soft round brush for the eraser. And then just go around the sharp edges of the shadows. Keeping some of the shadows sharp. Mainly the shadows which are close to the object, and the rules of shadows goes that the closer the shadow is to the actual object, the sharper it becomes. And the further away the shadow is, the further away the shadow is cast, the blurrier it becomes. So just keep that in mind while using the eraser. Just eraser out top of the shadows like so. And then you'll have the shadows for all of your props. Next thing we're going to do here is we're just going to get the brush tool, choosing a nice bright green. We're just going to add some nice, grassy bits here on where the props touch the ground just to help them get implement the props into our environment design. So just using the brush tool and painting those grassy bits just here and there, just to add that implementation. Next thing we're going to do now is add some lighting. So just using a nice long white rectangle from illustrator we're going to add that into Photoshop. Creates a new group called Light Rays and just angle this rectangle to a point, remembering how our shadows are cast so we want the light to go from left to right. And then just placing it here like so. And we're going to rasterize this layer so we can Use the eraser on it. Change the opacity down to about 40%, maybe a little bit less, maybe about 30%. And in just going back and duplicating this light ray. Just in case we add, we make any changes which we don't like. I'm just going to use the eraser here to, again, just erase out some of the light rays here. Just to soften it up a little bit. Duplicate that layer, now. Just move it along. And then just seeing how I can cast this light ray. And you'll see now that it's created that sort of nice light ray effect. And so I just add another one up here. And there we have it. Some nice light rays for our isometric game environment. And next thing I'm going to do is I'm just going to add some highlights, just to increase the brightness of our light rays. So just using a soft round brush tool. And then just changing your opacity to 30%, just to give a sense of where the light is coming from. And now I'm just going to add some slight color changes to the composition by, again, using the soft round brush tool. Going to the tent here, just giving it a nice blue highlight and then going to overlay just to give it that nice pop of blue for the tent there. And same thing for the red tents here as well, just adding that little bit of red. Go into overlay. And then, also, changing your opacity down so it's just not too much red. And there you have it. The completed isometric environment with all the props you need for a market. You can continue to use the tips and techniques you've learned here to create more buildings, more props, should you want to expand on your ideas. Now in the next video we'll just go through a quick overview of all the lessons learned. See you guys there.


