
 Lessons: 16Length: 2.5 hours
- Overview
- Transcript
2.2 Sketching the Design
In this lesson you will learn how to sketch out your initial design and composition using the isometric grid you have created.
1.Introduction
1.1Introduction01:08
2.Planning
2.1Creating an Isometric Grid07:17
2.2Sketching the Design09:19
3.Props
3.1Isometric Box15:18
3.2Signpost05:50
3.3Cart Top Frame10:56
3.4Cart Bottom Frame10:18
3.5Cart Roof12:44
3.6Outer Tent Frame15:41
3.7Tent Roof14:44
3.8Tent Roof Colour14:30
3.9Isometric Anvil10:04
3.10Flag and Fruit05:22
4.Final Environment
4.1Setting Up and Arranging the Props06:34
4.2Adding Final Touches06:40
5.Conclusion
5.1Conclusion01:14
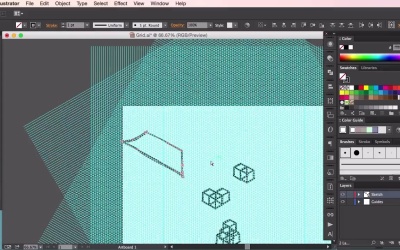
2.2 Sketching the Design
Hey guys, and welcome back to the Isometric Environment for Games course. In this video we're going to go through the initial stages of the isometric environment design by using our newly created isometric guidelines and sketching out our ideas and our composition. Then using the finished sketch as a rough plan for what sort of isometric environments we want to create and where to place them. So, the first thing we're going to do is to highlight all the lines that we've created. And while we have everything still selected, go to View, Guides, and then Make Guides. This will transform the selected lines into guidelines which can then turn on and off very easily by using the shortcut Cmd+: ir Ctrl+: on your keyboard. Next, we're going to create a new layer called guides. And then I'm just going to resize this artboard by clicking on the button on the left here. And then using the sides to drag up and down, left or right, to create a sort of landscape art board for this particular composition. So just resize it like so. And then, next thing we're going to do here, is we are going to create a new layer by clicking on the button on the bottom right here. And then rename it Sketch. This is going to be our main sketch layer. So now that you've resized the outboard and set up the guidelines. It's time to select the brush tool, on the left here. And start sketching on the sketch layer. We'll start by sketching out something very basic, which is the isometric box. Using the brush tool, we follow the guidelines. Making sure that each mark that you make lies directly on top of the guidelines. Now there's no need to be 100% accurate at this stage, but if you wish to do. So, just simply count the number of segments on each side, making sure that each side has the same number. Thus, making it a square. Next we're just going to copy and paste it. And then right click Transform horizontal to create the other side of the cube. And then just simply join the top like so to complete our isometric cube. From there we can then select it all. Hit Ctrl+G (Windows) or Cmd+G (Mac) to group the lines. And then you can copy paste another box into the composition to start experimenting with how you can lay out the different boxes. So, I'm just gonna move this box for the side here, and then move this third box onto other side there. Just experimenting with different ways that we can layout these boxes, interesting compositions. We can even try and put boxes on top of each other as well as beside each other. Boxes are really cool to start with because they're easy to make and you can fill out a composition fairly easily and quickly with them. So I'm just moving these boxes around. Seeing where we can place these boxes in a nice composition around the art board, and then once you're happy with that. Next, using the same principles that we used on the boxes will use these principles to create a central element which is the tent. Again, keeping in mind to use our guidelines for the main structures. Using the same techniques as before, copying and pasting the elements, and then flipping them around to create the opposing side. So this would be the left side of the tent here. Select it all, copy, paste. Right click > Transform > Reflect. Wrong one. So copy, Right click > Transform > Reflect and then just place it onto the other side like so. Just going to Resize this down. Okay, while I'm doing this also take notice of the stroke on the top left of the screen here, is currently set to one point. But you can change this number to make it thicker or larger if you want to. Which effects the thickness of the line or the stroke that you draw with. Next to it is the color, which you can use to change the color of the stroke. So currently it's set to black. So still the creating the main structure of this tent, and trying to make it quite a tall tent because it's our central element here. I'm going to give it some kind of tower structure in the middle. Okay. And then moving these elements around. Just going to create a new solid base here. In the middle of this tower, just so that some characters can stand on it or you can put some other isometric elements in there, and then we're just going to create the top part of the tent. She's the roof. And then just to make things interesting. I'm going to include a sort of isometric metric flag here as well, just flowing in the wind here. Just to add a little bit of the character to it. And also, every tent needs a sign. So I'm thinking this tent could be some sort of shop or perhaps a blacksmith's tent. So you can add your own sort of design for the signage there. Then we're going to select it all. Group it up by hitting Cmd+G. And I'm just going to place it in the correct place of our composition here, which is the center of our piece. Now, next we are going to create another sign. So just the flag stand here so that people can associate what sort of tent it is. Now because this is a sort of fantasy style market that you can find in things like RPGs. I'm thinking that this will be some sort of blacksmith's tent. And no blacksmith is complete without an anvil. So let's includes an anvil design here. Using the same techniques as before, just using the guidelines to construct your shape. And then we'll include a few more elements to the structure to complete the sketch. Some market carts here. Using the same sorts of techniques as before, just following the guidelines. And then to finish it off, some more structures at the back and there we have it. We can leave it there for now. Play about with the sketch. Continue to add more boxes or elements here and there if you wish. But for now, for this tutorial, we'll leave that there, and call this isometric sketch finished. So in the next video, we'll go through how to use this particular sketch to create our isometric assets, starting with the box. See you guys there!


