
 Lessons: 16Length: 2.5 hours
- Overview
- Transcript
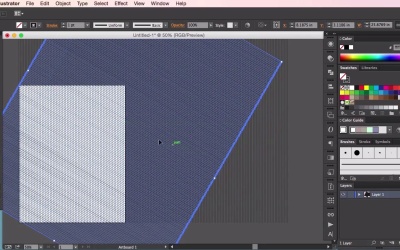
2.1 Creating an Isometric Grid
In this lesson you will learn how to create an isometric grid in Illustrator using the different tools available. This will help you set up your workflow for creating your in-game assets.
1.Introduction
1.1Introduction01:08
2.Planning
2.1Creating an Isometric Grid07:17
2.2Sketching the Design09:19
3.Props
3.1Isometric Box15:18
3.2Signpost05:50
3.3Cart Top Frame10:56
3.4Cart Bottom Frame10:18
3.5Cart Roof12:44
3.6Outer Tent Frame15:41
3.7Tent Roof14:44
3.8Tent Roof Colour14:30
3.9Isometric Anvil10:04
3.10Flag and Fruit05:22
4.Final Environment
4.1Setting Up and Arranging the Props06:34
4.2Adding Final Touches06:40
5.Conclusion
5.1Conclusion01:14
2.1 Creating an Isometric Grid
Hey guys, and welcome to the Isometric Environments for Games course. So, in this video we're going to go through how to create an isometric grid in Illustrator, which we can then use as a guide to work over directly. Or to print out if, you prefer planning or doing your planning by freehand physically. Using this grid will help us create assets for environments, as well as the landscapes for the environment itself. So because of this, it's always a good idea to create the grid in the same size as your intended illustration. So to start things off let's create a new document by going into File and then new. And so in this tutorial I'm just gonna put the settings so that it's a letter size. This makes it so that you can print it out as well. But feel free to change the size according to whatever you want to plan for your drawing. So next we're going to want to draw a vertical line. So let's go ahead and select the line tool, and click a starting point. Now once you've clicked there, a window should pop up. And so we can manually enter the values here. Just enter any sort of length. But make sure that the angle is set to 90 degrees. This ensures that we'll have a perfectly straight, vertical line. So I'm just going to move the line here. And clicking and dragging it all the way down So that it touches the lower left-hand corner of the art board. Next we'll want to go to Illustrator > Preferences and then General. And then change the keyboard increment to 0.125. Also make sure that the corner radius is set to 0.38 inches. And then click OK. With the line still selected. We can duplicate the line horizontally by holding on to the option key, or the Alt key, and then pressing the right arrow keys just like this. This will make it so that the line is duplicated at 0.125, which is our increment setting from before. Just keep doing this until it reaches off and beyond the page. And then once that's done, we can select all the lines by clicking and dragging using the black selection tool. And then, let's select the rotate tool by pressing R on the keyboard. Then pressing Enter, which should bring up a new window. And then type in 60 degrees for the angle and then press copy. Then we'll want to align the end of these lines to the top left corner. So just making sure that all the lines are still selected. You can group all the lines first by Cmd+G. Then I'm just gonna zoom in here and just try and align these lines to the artboard as accurately as possible. No, not quite happy with that. Just gonna keep, keep trying until it's safely in the corner there. And then just zooming out so that I can sort of see how it all looks on on the actual page itself. Just one more try. Drag and drop using the black selection tool onto the corner. And that should do it. Okay, what we want to do next is we want to select the Reflect tool this time. So ensuring that all the diagonal lines are still selected. We'll want to right-click the selection and then select the Reflect button. And then we're going to just ensure that Vertical is selected and that the angle is set to 90 degrees and then click Copy. So from here we're just gonna zoom in and check the alignment of all the lines. Now what we're really looking for here is sort of identical equilateral triangles. A pattern of all the triangles throughout the whole page. So, just going to select both of the diagonal lines here. Zoom in all the way and then just sort of make sure that where when the lines cross is where it meets the vertical lines on the page here. So, just gonna do that here. Select both the diagonal lines and really carefully just move the diagonal line until it meets the very center of the vertical line there. And if done correctly, you should have a nice pattern of isometric triangles throughout the whole page. All right, what I'm going to do here now. As you can see here on the bottom left of the, and a little bit on the bottom right of the page. There's a bit of a lack of of patterns here and that's because I didn't. I didn't make enough vertical lines to begin with. So I'm just gonna increase the size of everything here. I'm making sure that all of the lines are selected. Just making sure that the whole page can be filled. Okay, so what we'll do now is select the rectangle tool. And just draw a rectangle within the area you wish the isometric guidelines to be. And now we're just going to go to Object > Clipping Mask > Make. And there we have it. We have our guidelines for our isometric environment ready to be used. So, in the next video we're going to go through how to use these guidelines to plan out and sketch our design. See you guys then.


