
 Lessons: 16Length: 2.5 hours
- Overview
- Transcript
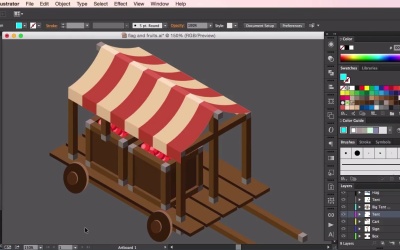
4.1 Setting Up and Arranging the Props
Now that we have finished our game props, we can now bring them into our final environment and start arranging them accordingly.
1.Introduction
1.1Introduction01:08
2.Planning
2.1Creating an Isometric Grid07:17
2.2Sketching the Design09:19
3.Props
3.1Isometric Box15:18
3.2Signpost05:50
3.3Cart Top Frame10:56
3.4Cart Bottom Frame10:18
3.5Cart Roof12:44
3.6Outer Tent Frame15:41
3.7Tent Roof14:44
3.8Tent Roof Colour14:30
3.9Isometric Anvil10:04
3.10Flag and Fruit05:22
4.Final Environment
4.1Setting Up and Arranging the Props06:34
4.2Adding Final Touches06:40
5.Conclusion
5.1Conclusion01:14
4.1 Setting Up and Arranging the Props
Hey guys. And welcome back to the Isometric Environment for Games Course. In this video we'll be looking at how to set up and arrange all of our props that we've created in the previous videos into an isometric environment in Photoshop. So first, I'm going to introduce to the environments that we've got here we've got an isometric grid on the layer at the top. Then we've got some layers here that represent the painting of our isometric environment. We're just gonna change the color adjustment so I'm adding a new layer here. I'm just gonna add some blue to our environment, going to a tab here and then clicking color, and changing the opacity to about 30%. Then I'm clicking on overlay to see if that changes anything. And you can see here that the color is now changed slightly. Just so it fits with the rest of our environment props. Now just moving back into Illustrator we're going to select our central tent piece. Copy, and then pasting it in. Now all the props here, you can see the top will be adjusted to about 30%. Okay, so just moving it around and just seeing where, where I can place this that will best suit the composition of the piece. And then you just do exactly the same with all the other props as well, just copying from illustrator and pasting them into Photoshop. And then just sort of arranging them into a composition which you feel suits the piece the best. Before we do that let's just head back in Illustrator so that we can move some of these boxes for the apples into the market carts. So I'm just gonna move these boxes and a range them inside the car like so. And then just using the arranged the arrangement tools that we have in illustrated just making sure that all of the construction poles and the tent, the roof is arranged in front of the boxes. So just taking them away there and making sure that these are arranged to the front, and moving these boxes back in. And you should see now, hopefully they look like they're inside the market cart. Half in this one leg here which we can adjust accordingly. So that won't be seen really so we can just and group that bit here. And ungroup that bit here, and we can either just move that leg to the back or we can just delete it entirely. So I'm just gonna move it to the back here so we at least have some sense of whether in Illustrator at least. And then what we need to do now is just select the whole cart, copy, and then paste it into our environment. Remembering again that when we paste our props into the environment that we want to change the size to 30% at the top there. Okay, so I'm just going to leave one cart here on the right-hand side and then duplicate this layer, flip it, and then create a cart on the left-hand side as well. Moving on to the boxes. Now, all of these boxes are open at the moment. So, I'm just going to create boxes which are closed at the top. So this is created by going into Illustrator. And just using the pen tool to create a top, here, like so. And then just moving it down a little bit to to see to keep that sort of sense of depth that we have. And then again just using the arrangement tools to ensure that the construction beams are at the top. And then again just adding it into our environment. So I'm just gonna fast forward the video here slightly as I arrange the props into our Photoshop environment. This is the fun part here. So you're just dragging and dropping all of these elements into Photoshop and just seeing how everything works, seeing where everything goes, and just creating our piece. Now you'll see here that I'm also going to develop and make a sort of wooden flooring environment in Illustrator here as well which is just a matter of taking those wooden planks that we had for our market cart. And just making more of them. And then just putting them back into Photoshop. Again just making it so that it's 30%. And then just placing it to the relevant area. So once you're happy with the arrangements and once you've placed everything in the correct order in the layers in the bottom right there, we'll move onto the next video where we'll be looking at adding some finishing touches to our environment design by adding some simple lighting and shadow. See you guys there.


