
 Lessons: 16Length: 2.5 hours
- Overview
- Transcript
3.3 Cart Top Frame
In this lesson you will learn how to create an isometric wooden frame which will make up the top section of your market cart.
1.Introduction
1.1Introduction01:08
2.Planning
2.1Creating an Isometric Grid07:17
2.2Sketching the Design09:19
3.Props
3.1Isometric Box15:18
3.2Signpost05:50
3.3Cart Top Frame10:56
3.4Cart Bottom Frame10:18
3.5Cart Roof12:44
3.6Outer Tent Frame15:41
3.7Tent Roof14:44
3.8Tent Roof Colour14:30
3.9Isometric Anvil10:04
3.10Flag and Fruit05:22
4.Final Environment
4.1Setting Up and Arranging the Props06:34
4.2Adding Final Touches06:40
5.Conclusion
5.1Conclusion01:14
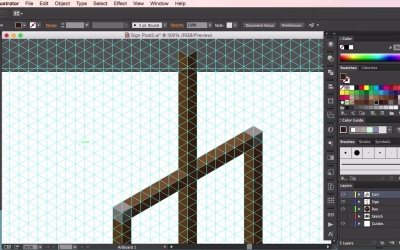
3.3 Cart Top Frame
Hey guys, and welcome back to the Isometric Environment for Games course. And this video we're going to go through how to create some more complicated structures, starting with the isometric cards. So we'll start by using the construction beams from the previous two props which were the box and the sign post. And using those beams to create a frame which we can use before fleshing everything out and using the roof tents and things like that. So pasting in one of those wooden frames, or vertical beams, zooming right into the artboard. So that we can see the guidelines as before. Just gonna start by putting together a frame for our cart. So, always starting with the first call beam, making sure that everything is in line. Just deleting the gray shape behind. Just that I can try and extend this vertical beam. So we can make a much larger beam. So just gonna grab these two. These two brown shapes. Copying and pasting, and then holding Shift and dragging them up so that they're into the same vertical plane. I'm just going to count how many segments these, this first beam is always making sure that I got one, two, three, four, five, six, seven, eight, nine, ten, 11. So 11 segments long so far. Just gonna move up one segment. So now it should be 12 segments long, making sure that it's in line with the guidelines. By just highlighting it all and uniting it. No, that's not what I want to do. So making sure that this side is united, and that side is united. So it all becomes one solid shape. Copying and pasting the gray shapes now. Moving up one more segment. So that it becomes 13 segments long. So now that we've got our wooden beam, just going to select it all and then duplicate it. So copy and paste, making sure it's one, two, three, four, five, six segments apart. Just making sure it's lined up with our guideline. And I'm just going to select it again. Copy and paste. And then making sure our third beam again, is six segments apart. So we're zooming right in there to make sure it fits in exactly into our isometric guide line. So there we have three exactly the same wooden beams. Each six segments apart from one another. So using the pentel, I'm going to join those beams together with another wooden beam. Same technique as before, just drawing it in there using the pentel. Selecting the right color. So that it's the same as our previous shapes and printing it in there, drawing it in, and increasing our horizontal beam. All right, so now we've got three vertical beams, each six segments apart, joined together by the top beam which is one, two, three, four, five, six, twelve, thirteen segments long. Not including the grey bits. So now I'm just copying and pasting this vertical beam here just so that it increases the height of our center beam. So just pressing command and colon to the remove the guidelines here, just to give us a better look at our shape, at our wooden structure. And here we have our center beam. I'm just going to use up the white selection tool to bring the height of this center beam down a little bit. So by selecting the the node, tracking it all the way down. You can also hold shift whilst you track the nodes down, which helps keep that vertical line, that vertical shape. So now we've got a center beam which is three segments higher than the other two beams. I'm just going to duplicate this shape. And now I wanted to drag this shape and fit it in to the same the same alignment with our previous one. Now before we do that. I just wanted to create the next, horizontal beam,which goes along the top of our center structure. Just counting the segments as I go along, so I know how long this center beam is going to be. Here we have the top of our center beam. Just gonna move this one out of the way for second. Zoom back in again. Yeah, I think I've made a mistake here. No, it's made the top of our center beam. So making sure you follow the guidelines. Joining the dots. So I'm making it so that there is one segment protruding out from our center beam here. So this bit's gonna be gray. Let's choose the top color. And this bits going to be the lighter grey. I'm now choosing the darker grey color, fitting in the cube here. And I'm just fixing these. Using the white selection tool, sometimes you'll have these elements which you might have to drag back down again. Okay. And dragging these elements down. Clicking and dragging. And there we have our vertical beam. Just going to make sure that we have the gray elements on the other side of the beam as well. So again using the pen tool, making sure you selected the right color. Just going over the wooden beam here, making sure that everything is exactly the same on either side. All right, so now we have our central beam which should connect both of the previous elements together. All you need to do now is select the the other beam. Copy and paste it. And now what we're going to do is just, using the guidelines connect it together. Just zooming in all the way, making sure that it fits with the guidelines. Now you'll see here I've made the mistake. I've connected it with the metallic, the grey bits. So, I'm just gonna move it down one segment. So that the metallic bit is protruding out just like the other structure. And now we have our top frame. So, there you have it. The top frame for our market cart. In the next video we'll continue to build our car prop by adding the bottom frame before finishing off in the video after that with the roof. See you guys there.


