
 Lessons: 16Length: 2.5 hours
- Overview
- Transcript
3.10 Flag and Fruit
In this lesson you will learn how to create the finishing touches to your isometric market level by adding some fruit and a flag to the central market tent.
1.Introduction
1.1Introduction01:08
2.Planning
2.1Creating an Isometric Grid07:17
2.2Sketching the Design09:19
3.Props
3.1Isometric Box15:18
3.2Signpost05:50
3.3Cart Top Frame10:56
3.4Cart Bottom Frame10:18
3.5Cart Roof12:44
3.6Outer Tent Frame15:41
3.7Tent Roof14:44
3.8Tent Roof Colour14:30
3.9Isometric Anvil10:04
3.10Flag and Fruit05:22
4.Final Environment
4.1Setting Up and Arranging the Props06:34
4.2Adding Final Touches06:40
5.Conclusion
5.1Conclusion01:14
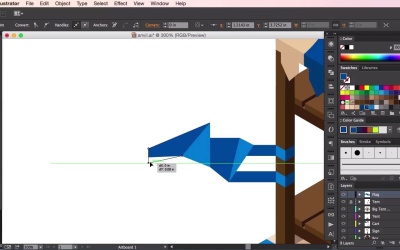
3.10 Flag and Fruit
Hey guys and welcome back to the isometric environment course for games. In this video we'll just be looking at adding some finishing touches to some of our prop designs before we import them into our environment. So the first of these ideas that we can use is just to add a small little flag sort of waving in the wind for our tent prop here. So the way we can do this is by using the pen tool. And also using our guidelines as before. Just sort of selecting the same colors that we used for our tent roof, which was the blue. And then making sure that we follow the same sort of lighting structure as before, so the blue in the darker shade of the structure here will be a dark blue. And the blue in the lighter shade of the structure will be a lighter blue. So once you've created that, just simply select both of the elements, and just slide it down the construction pole, like so. So the next thing I'm going to do here is we are going to create the actual flag itself. Now creating the flag is just a simple design where we're still trying to keep in with the flat design techniques that we've used for our previous props. So just continue to use the different shades of the blue like so, just to represent the different folds of the flag just waving in the wind. And then once you've done that, we'll move on to our next prop. So the secret to designing a flag waving in the wind is just to continue to switch between the dark shades of the blue and the light shade of the blue. Just two colors are all that you need to to create a flag. And also, just keeping in mind that the flag, well this flag design anyway, is a triangular one. So it's going from a wide width to a narrow width as it goes towards the end of the flag. So just make sure the shapes keep getting smaller and smaller as you go towards the end. Moving onto the next prop now, we're just going to add some fruits or apples into our boxes. This is a simple technique, we're just going to create a circle here, a red circle. And just create another circle on top Just again using the same techniques as before to add some highlights. So you'll see I put the circle on top of each other. And then all you have to do now is get the Pathfinder tool and find the right button to select, and all I'm going to do here is, I'm just going to change the color of the highlighted bit of the apple so that it adds a little bit more depth. Next thing I'm going to do is I'm going to create some smaller circles and make them white. And then using the transparency tool, just bring the opacity down. And then duplicating this circle and making it a little bit smaller, And then dragging these elements here, just to sort of, using the black Selection tool to drag it onto our red apple. And it adds a little bit of shiny effect to our apple. From there, all it is is a matter of grouping the shapes together by clicking Command or Control G, and then just copying and pasting it. Arranging the apple around on top of the box until you're happy with this sort of arrangement that you've got there. And then using the box again just to make sure that all the apples fit inside the box by using, selecting the frame of the box and moving it, and wrenching it to the front. So that's it for this video. In the next video, we'll be looking at how we can import our isometric props into an isometric environment. See you guys there.


