
 Lessons: 14Length: 1.5 hours
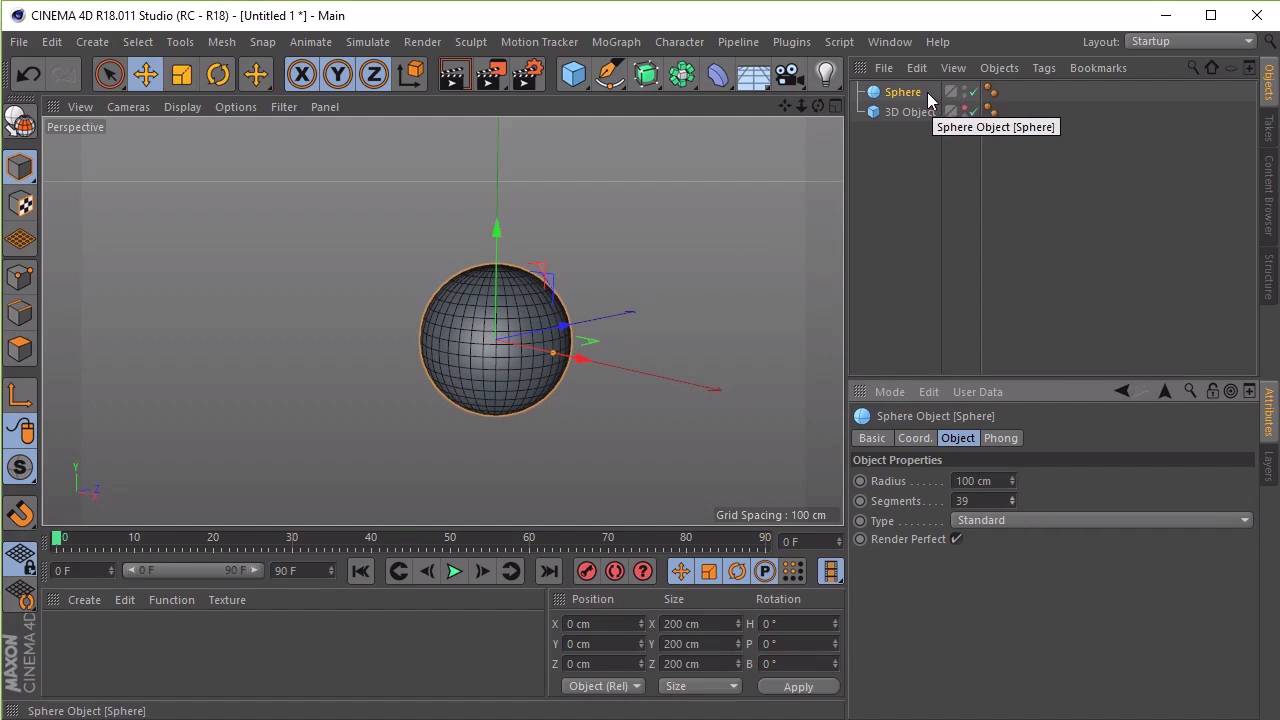
- Overview
- Transcript
2.2 Introduction to Basic Shapes
In this lesson we will go through different ways to create and manipulate basic shapes. This will act as the foundation of our modelling techniques.
1.Introduction
1.1Welcome to the Course00:41
2.Cinema 4D Overview
2.1Cinema 4D Setup04:30
2.2Introduction to Basic Shapes10:05
2.3Introduction to Deformers11:08
3.Modelling Fundamentals
3.1How to Edit Basic Shapes11:03
3.2How to Use the Extrude Tool07:53
3.3How to Use the Bevel Tool04:59
3.4How to Use the Boolean Tool06:04
3.5How to Duplicate Objects03:51
3.6How to Use the Bend Deformer05:53
3.7How to Use the Spline Tool07:39
4.Lighting and Rendering
4.1How to Create Materials13:26
4.2How to Render Your Final Model03:45
5.Conclusion
5.1Thanks for Watching!00:52
2.2 Introduction to Basic Shapes
Hi everyone, and welcome back to up and running with Cinema 4D. In this lesson we'll be going through the different ways of how we can create basic shapes, and how we can manipulate them. So this will act as the foundation of our modeling techniques. So let's begin this lesson by looking at the basic shapes. And just a quick note that any button that has these little sort of black arrows on the bottom right corner means that you can click and hold on them to bring up more options. So let's see an example of this. If we click and hold the key button here, you can see that we have a good selection of shapes that we can choose from. Ranging from simple basic shapes like the cube, the cone and the cylinder, to shapes like this donut ring here, capsules and figures. So clicking on any one of these will automatically spawn them into a scene, so let's click the key begin for an example, Just gonna zoom out here with the mouse wheel button. So after clicking on the cube, a few things will happen. So firstly, you'll notice that the cube has appeared in our view port. Secondly, you'll find that the cube object has appeared in our list view on the right. So this is extremely useful when it comes to selecting objects from our scene, as sometimes it can be difficult to do this when the viewport here is filled with lots and lots of 3D objects. So you can also rename the object by double-clicking on this cube here, or the object in our list view. So let's go ahead and do that. So we can double-click here. And let's just rename this 3D object, and then hit Enter to apply that. Cool. So another thing that can be quite handy are all these sorts of, these two little small dots that we have next to the name here. So like you saw in the previous lesson, if you click on the top dot until it's red, it will make the object disappear from the viewport, so it'll be invisible. However, if we were to click the render button, it will still render. So clicking on the bottom dot until it's red will mean that the object in the viewport will no longer render when we click on the render button. Cool, let's bring this back now. All right, now with the cube still selected, let's draw our attention to the section on the screen here, which is the adjustments window. So this is where we can adjust the initial settings of the cube. The main settings that we'll be interested in are in the objects tab here. And here we can adjust the values of the sizes so that we can easily make our cube bigger or smaller, like so. So you can adjust the size going along the x-axis, or you can adjust the size going along the y-axis. And we can also adjust the size going along the z-axis here, cool. So if you wanted to make it bigger uniformly, let's go ahead and make it 300 by 300. Excellent, so we can also increase these segments, which is how many polygons you want the object to be made out of. So in order to see this, let's go ahead and go to display and shading Lines. So let's go ahead and adjust the segments here. So let's say if we wanted it to increase by four, and hopefully you can see the polygons appearing here. So let's select the cube again. So this is useful if you know what you're going to do to the cube and how you're going to adjust the cube using the sort of tools here, so using the point, the edge, or the polygon tools here. Or if you simply want more resolution to your object. So this more apparent on a round object. So let's go ahead and hide the cube again and select a sort of round object here, so let's select the sphere. So now if we were to decrease these segments, you can see that it becomes low poly, and we can start seeing the edges of our sphere. So if we were to increase the segments, it becomes smoother and smoother. So that sort of increases the resolution of our sphere. Cool, so let's go ahead and delete this sphere now and bring our cube back in. Excellent. So to edit your 3D object even further, we'll need to make it editable. Now make sure that the object you want to edit is selected, so if I click on it, we've selected it, and you can also make it editable by clicking on the top left button here, you can see it says make editable, or by clicking the C button on your keyboard, which is the short cut. Cool, so once you to do this, however, some of the adjustment settings that we had access to will no longer be available, such as increasing or decreasing segments. So you can see here now on the bottom right, that's no longer an option. So just make sure that before we click on the make editable button, that we've definitely made the final adjustments to our object before we do that. Excellent. So now that it's editable, we can make adjustments using the adjustments tool on the left menu bar. So let's go ahead and see how we use those. So by clicking on the points tool, you can see automatically that sort of changes the look of our cube here, which indicates that we can start moving the points. But as we scroll over each of these points on the cube, you can see they sort of highlight, indicating that we can move them. So you can see, by selecting the Move tool I can move the points of our cube like so. And we can also do the same thing with the edge tool. So you can see now with the edge selected, instead of highlighting the points it highlights the edges. So you can do the same with the edges. And we can also use the rotate tool if we wanted to rotate the edges as well. Just clicking Ctrl + Z to undo. And we can also do the same with the polygons as well. So now you can see as I scroll over the cube, the polygons highlight instead. So let's go ahead and use the move tool to move the polygons around. And again, you can also use the rotate tool, and also the scale tool as well. Excellent, so you can use the scale tool by itself as well, so if I just press Ctrl + Z on the keyboard to bring the queue back to normal. If I just select this button right here, so that means the whole model is selected. If I use the scale tool here, I can scale it up in the different axis, like so, just by clicking these axis sorts of lines here. They will highlight just to indicate that you can adjust them. And if you want to adjust the cube uniformly, simply click having the scale tool selected. Just click anywhere on the viewport and click and drag your mouse like so. So I can make it smaller or I can make it bigger. And the same goes for the rotate tool. So if I click on the rotate tool here, just making sure that the whole model is selected, you can rotate the model by clicking on these lines here, on the rotator. Or you can simply click anywhere on the viewport to rotate it like so. And the same goes for the move tool. So just move the object in the axis like so, by clicking on the arrow buttons. And you can also move the object by selecting both axes here. So you can see that we've also got these other arrows. So in between this green arrow and red arrow here, we've got this one, which means we can move it along both axes, or this one. And finally, the bottom one. So if I select the bottom one here, can move along the exes as well. Excellent. So that's it for this lesson. In the next lesson we'll go into detail on how to use the deformance, which will give us further options on how we can manipulate shapes into what we want for modelling. See you all there.


