
 Lessons: 14Length: 1.5 hours
- Overview
- Transcript
3.7 How to Use the Spline Tool
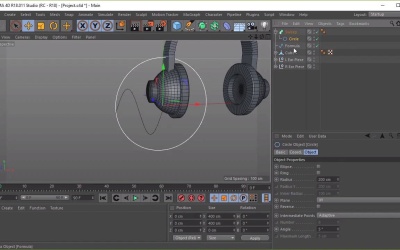
In this lesson you will learn how to use the “spline” tool. We will use what we learn to create the cable and plug for our headphones.
1.Introduction
1.1Welcome to the Course00:41
2.Cinema 4D Overview
2.1Cinema 4D Setup04:30
2.2Introduction to Basic Shapes10:05
2.3Introduction to Deformers11:08
3.Modelling Fundamentals
3.1How to Edit Basic Shapes11:03
3.2How to Use the Extrude Tool07:53
3.3How to Use the Bevel Tool04:59
3.4How to Use the Boolean Tool06:04
3.5How to Duplicate Objects03:51
3.6How to Use the Bend Deformer05:53
3.7How to Use the Spline Tool07:39
4.Lighting and Rendering
4.1How to Create Materials13:26
4.2How to Render Your Final Model03:45
5.Conclusion
5.1Thanks for Watching!00:52
3.7 How to Use the Spline Tool
Hi everyone, and welcome back to Up and Running with Cinema 4D. In this lesson, you'll learn how to use the spline tool, we'll then create the cable and plug for our headphones. So let's start by picking a spline, and to do this, we'll need to click and hold on the pencil button here. Then from here we can choose from a variety of splines to work with, or even use the pencil to draw our own shapes. But for now we'll just select a formula spline, so let's select that. And that will then spawn it into our viewport, like so. Let's go ahead and move it using our Move tool to see what it looks like. And from there what we'll want to is we'll want to place it in the correct position. And I'll want to make this end meets our headphones here. So in order to do that, we need to use the rotator tool, making sure that formula is selected, and let's rotate this by 180 degrees. Now, in order to do this properly, let's go ahead and input the value here, and then select apply. Cool, and now I'm going to select the move tool and move this into position, so it looks like the wire, or the cable, is coming out from our earpiece here. So we can move that a little bit further in, like so, and a little bit further down, excellent. Now we'll want to create the shape that we wanted to use to fill in this spine. In this case, we are going to be creating a cable, so let's go ahead with a circle. So again, going over to the Pen tool button, click and hold, and select the Circle. Now, it doesn't matter where we place this shape as we are only going to reference to it, excellent. Now, before we move any further, I'm just going to hide the circle here for now, and let's go back to formula. Now, you can see, as usual, we've got a few adjustment tools here that we can work from. And you can experiment with these to create your own sort of spline shapes. For example, just increasing the number here, we can increase the amount of sort of waves that we've got for our spline, or for our cable. And you can see, as we increase these, it sort of becomes more jaggedy, or a sharper line. And in order to make this smoother, all we need to do is increase the amount of samples here. So the less samples we have, the more jaggedy the line becomes, and the more samples we have, the smoother the spline becomes. Cool, so just go ahead and experiment with the adjustment here. For now, we'll just stick with what's the default option for our formula of spline is. And let's go ahead and bring back our circular spline, excellent. So now that we have our spline's ready, we'll need to create the actual cable itself, so we'll need to create some geometry. Now, in order to do this, we need to go to this button here, which is Subdivision Surface, click and hold, and then let's select Sweep, cool. Now, we'll want to add our splines to Sweep, so let's go ahead and select both Circle, drag it in there, and Formula, drag it into the Sweep. And we'll want to make sure that the Circle spline is above the Formula, otherwise it'll look like this. So let's go ahead and change the order of things. And then we can adjust our splines to our liking to create the look of the cable. So we want the circle to be a little bit more thinner, so let's make the radius smaller, like so. Now, you can see we've got a smaller radius for our spline. And then we'll want to make the spline smoother so our cable's smooth, so let's give it a few more samples to work with, excellent. Then we can also move our whole thing up a bit so it looks like it's coming out from the earpiece, excellent, cool. All right, so that's looking good for now. Excellent, now, to create the actual plug itself, we're going to spawn a cylinder, and use the tools that we've learned from the previous lesson. So once you're happy with that, let's go ahead and create a cylinder. Click and hold on the Cube button, select Cylinder, let's bring it into view like so. And then we're just going to make the radius smaller, bring the height down a little bit. And then let's go ahead and move it close to our cable so that we can compare the way it looks. And then next we're going to bring a cap in, so let's have one cap. So that if I zoom in here, you can see that we've got a cap at the top and at the bottom now, that we can work with. And once you're happy with the general shape of this cylinder, let's go ahead and make it editable. And then just as before, we're going to use select the Polygons tool and we're going to select the Live Selection, and we're just going to go ahead and extrude this bit here. So let's select that, go ahead and right click, Extrude. And just zoom out a bit here so we know we can see what we're doing. And extrude some of the geometry out a little bit here, like so. So this is going to act as our sort of plug, Excellent. And then from here, what we can do now is we can select the points, go to Selection again, and we're just going to select this middle point here and move it out like so. Cool, and that will be the point for our cable, or the plug, excellent. Now once we're happy with that, go ahead and select model again. And then we can go ahead and move it into position so that it matches the bottom of our cable. And then use the Rotate tool. Let's see if we can go to our front view to make things easier. And then just sort of rotate it so that it looks like it's part of our cable. Excellent, all right, so that's it for this lesson. In the next lesson, we'll go over how to create some materials so that we can color in our headphones. See you all there.


