
 Lessons: 14Length: 1.5 hours
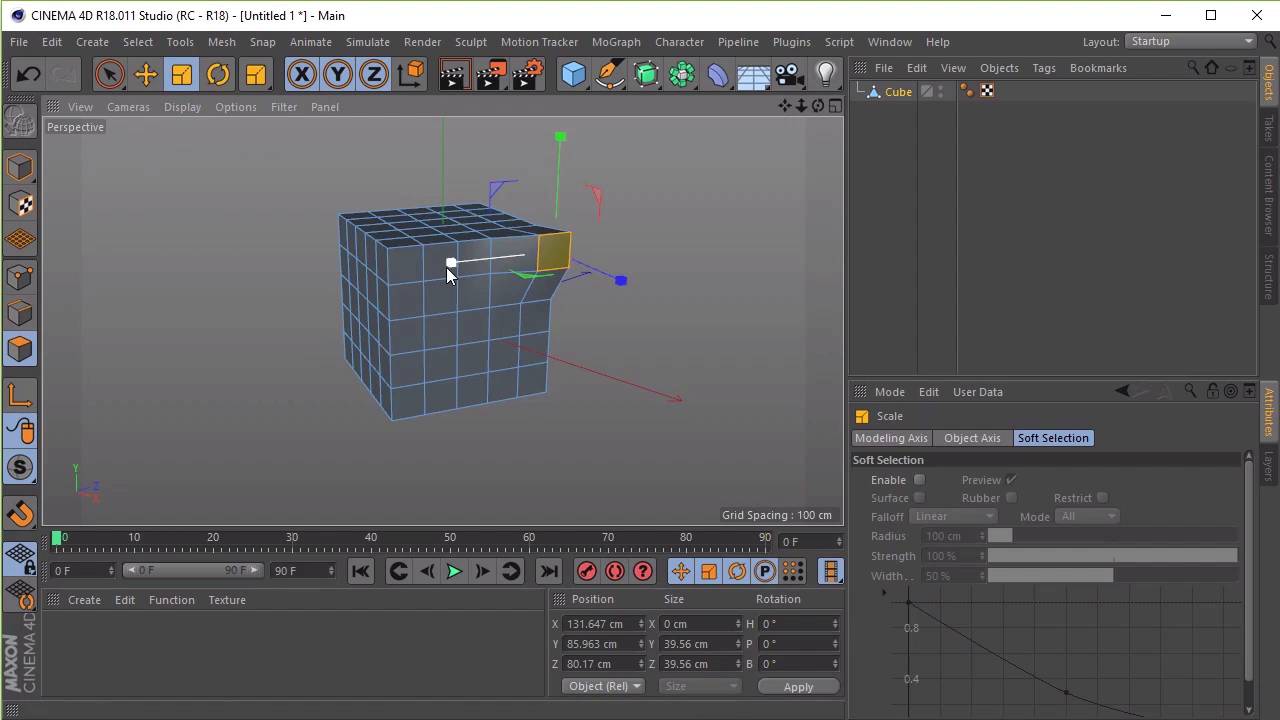
- Overview
- Transcript
3.1 How to Edit Basic Shapes
In this lesson you will learn how to make basic shapes editable. We will go through the options that become available to you and discuss how this can affect your modelling. We will then use the half sphere object to create part of the headphones model.
1.Introduction
1.1Welcome to the Course00:41
2.Cinema 4D Overview
2.1Cinema 4D Setup04:30
2.2Introduction to Basic Shapes10:05
2.3Introduction to Deformers11:08
3.Modelling Fundamentals
3.1How to Edit Basic Shapes11:03
3.2How to Use the Extrude Tool07:53
3.3How to Use the Bevel Tool04:59
3.4How to Use the Boolean Tool06:04
3.5How to Duplicate Objects03:51
3.6How to Use the Bend Deformer05:53
3.7How to Use the Spline Tool07:39
4.Lighting and Rendering
4.1How to Create Materials13:26
4.2How to Render Your Final Model03:45
5.Conclusion
5.1Thanks for Watching!00:52
3.1 How to Edit Basic Shapes
Hi everyone, and welcome back to up and running with Cinema 4D. In this lesson we'll learn how to make basic shapes editable and what happens when we do this. We'll go through the options that become available to you and how this can affect your modeling. We'll then use half a sphere object to create the headphones model, or parts of your headphones model. So, just a quick explanation on what this button does. It basically converts an object into something which can be edited manually using the tools on the left side here. So, mainly the points tool, the edges tool, and the polygons tool. So for example, if we were to create simple cube object here just by clicking the cube button. We can also give it a few segments here, so let's give it 10 segments by 10 by 10. And let's go ahead and display them here like so. In fact, let's make it a little bit clearer by giving it 5 segments. Now, at this stage we can only change the parameters in this window here. We can't use these tools yet. So if we try to use these tools here by clicking on these buttons, you can see even though I try to click on the cube, the only thing that I can do is use the buttons here. So the move tool or the scale tool or the rotate tool. I can't actually manipulate using these buttons here. So, I can't use the points tool, I can't use the edges tool and I can't select the polygons either. But, once we make the 3D object editable by clicking on the button here. This make editable button or by pressing C on the keyboard, suddenly you can see. Now if I was you, click on the points button, you can see now that the cube, or the 3D object is now suddenly sort of changed color. Or at least the edges here, have turned blue. And this indicates that we can now edit the 3D object using these tools here. Cool, so let's begin by taking a look at what we can do with the points tool. So making sure that the 3D object has been selected. Once we click on the button here, we can see that as we scroll over the points, they sort of become highlighted. And you can, and that sort of indicates that we can manipulate them. So with the move tool, I selected as well, you can go ahead and select a point and actually move it along the axis, like so. So we can just sort of move it around and manipulate it, however we choose, cool. You can also select multiple points as well. So if we want to select two points, all you have to do is press and hold the Shift key on the keyboard, and select as many points as you want. And then sort of move them with the Move tool at the same time. Excellent, so moving a point is simple. And once we've done that, we'll now take a look at the edge tool. Now, the edge tool works in a similar way to the point's tool, so let's go ahead and click on the edges button here. Now, with the edge tool selected, in fact let's go ahead and press Control Z a few times so we can get our cube back. Now, with the edge tool selected when we mouse over the edges. Now, instead of the points being highlighted white. You can see now that the edges are selected, or are highlighted as we mouse over them, which indicates that we can adjust them. Again, if we just sort of select an edge with the move tool selected, we can move it in any direction that we choose. And the same thing again if we wanted to select multiple edges we can do so, by pressing and holding on the shift key button on your keyboard and selecting multiple edges like so, cool. So finally we'll have a look at the polygon tool. So let's go ahead and press control Z to undo those. And let's select the polygon tool. Now you'll see now as we hover over the polygons, you'll see that the whole polygon. Is now highlighted white, which as you guessed it. It indicates that we can manipulate them. So let's go ahead and select a polygon, and you'll see once it's selected it's actually highlighted yellow. And we can go ahead and move it a long the axis, like so. Now one thing that's, is worth mentioning is we can also select one of these tools here. So we've been using the move tool for manipulating the points and the edges, but we can also use the scale tool. So if I was to select the scale tool, you'll see that these axis change from the arrows to the squares to indicate that we can now use the Scale tool. And you can sort of scale the polygon up, or down. Cool, and you can also use the Rotate tool as well. So we can rotate the polygon, if we wanted to as well. Excellent, and again, if we wanted to select multiple polygons, press and hold shift on the keyboard. And you can highlight multiple polygons. And let's use the move tool to move them, or the scale tool to scale them or the rotates tool to rotate them. Excellent, now for the last part of this video. I'm going to finish up by showing you how it can start to create and model a pair of headphones and also how we can practice using these tools that we've just learned. So let's go ahead and delete the cube, here. So just select the cube in your list view, or just select the model, and then select it in your viewport. And then press delete and we'll go ahead and spawn a sphere. So press and hold on the key button and select a sphere. Excellent, now for our headphones, we want to create a hemisphere. So let's go ahead and go over to this window here. And you can see the type here is set to standard. Now we want see, change it to a hemisphere here, which is half of the sphere. You can also change the types of spheres here as well and as you. You can see they, sort of changes the topology of each shape to whatever you want. So you can experiment with these but for finalist, go ahead with a hemisphere. And we want to rotate this by 90 degrees. So let's go ahead, and go to our front view, to make this a little bit easier. And rotate using the rotate tool here, we want to rotate it carefully until we get 90 degrees. Now if you find this difficult, we can actually press or click, enter the value here as well. So let's go ahead and enter 90 degrees, and then press Apply. And you'll see now that's exactly 90 degrees, cool. So now we're got half of our hemisphere here, before we want to make it editable. We want to increase the segments here, and that because, as we look at it from the side, you can see it's not quite smooth. We haven't got enough polygons here, to give it a smooth look. So let's go ahead and increase the segment, so at the moment it's at 24. So if we were to increase it to 50, hopefully that will make it a little bit smoother and you can see here that it has. Cool, so now that we've done that, the next thing that we want to do is we want to make sure that we're actually happy with the way that it looks, before we click on the Make Editable button. Because once we click on this button here, we won't be able to change the segments anymore, or indeed change the type of sphere it is. So I'm happy with this. So I'm going to go ahead and click on this button. And you can see here that the window has now changed. So I can't change the segments anymore. However, I can use these buttons here now, so that's cool. Next thing that I want to do with this model here is i want to sort of start closing up this gap here. So in order to do that, I want to select the edges. Or one of the ways that I can do this. Is I want to go ahead and select all the edges here and to do that, you want to select the outermost edge. And just double click on it, and you can see. The whole ring is now highlighted in yellow, which means that it's now been selected, or all the edges have been selected. I'm going to use the Scale tool, and I'm just going to go ahead and scale all of these in, just to bring it in a little bit. So that's one way we can start to cover the hole. A another way that we can cover this hole and this is something that we can explore. These are tools that we can explore later on in the course as well. Is if we press, or if we click on the right mouse button, you'll see that we've got more tools to explore here. Now, I'm just going to go ahead and find the Close Polygon Hole button. And you can see as I mouse over the hole, it sort of highlights white, which means that I can click on the mouse button, it will close the hole, excellent. So that's it for this lesson, in the next lesson we'll go over how to use the Extrude Tool and the next steps in creating our headphones. See you all there.


