
 Lessons: 14Length: 1.5 hours
- Overview
- Transcript
4.1 How to Create Materials
In this lesson you will learn how to create basic materials and how to use them and apply them to our model.
1.Introduction
1.1Welcome to the Course00:41
2.Cinema 4D Overview
2.1Cinema 4D Setup04:30
2.2Introduction to Basic Shapes10:05
2.3Introduction to Deformers11:08
3.Modelling Fundamentals
3.1How to Edit Basic Shapes11:03
3.2How to Use the Extrude Tool07:53
3.3How to Use the Bevel Tool04:59
3.4How to Use the Boolean Tool06:04
3.5How to Duplicate Objects03:51
3.6How to Use the Bend Deformer05:53
3.7How to Use the Spline Tool07:39
4.Lighting and Rendering
4.1How to Create Materials13:26
4.2How to Render Your Final Model03:45
5.Conclusion
5.1Thanks for Watching!00:52
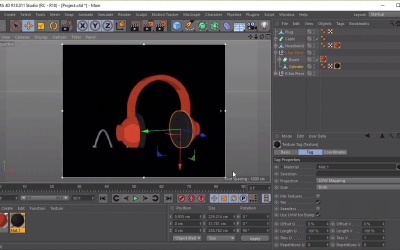
4.1 How to Create Materials
Hi everyone, and welcome back to up and running with Cinema 4D. In this lesson, you'll learn how to create basic materials and then how to use them and apply them to our headphones model. Now before we get started, it's always good practice to rename our objects here. So we've got our left earpiece, our right earpiece, our cube, which is our headband, so double-click that and rename that Headband. The sweep here is the cable, so double-click that and rename that cable. And we can see the cylinder here is our plug. So let's rename that Plug. Excellent, now, to create a new material, we want to go to the bottom of the screen here, click on the Create button, and then select New Material. And you'll see straight away that a material sphere appears here in the bottom of the screen. Now, we'll want to use these materials to color in various objects and parts of our headphone. So each material will represent a color. So let's go ahead and create a color by double clicking on the sphere here and you'll see that the material editor window will appear. Now, this is where we can adjust various properties of the material such as color transparency, reflectance and so on. We're just interested in the color at the moment. So in order to do that and also in order to create this sort of cell shaded style and flat color we'll want to untick reflectance, untick color, and select luminance. So you can tell that luminance is selected once it's highlighted yellow, and the tick box is ticked here. Once we've selected luminance we'll then want to go over to the settings here. Go to Texture. Scroll down to Sketch and Toon and select Cell. Now you'll see that a new Cell button will appear, so let's go ahead and select that. And from here in this menu, we'll want to adjust these settings here. So once you untick Camera, select Lights. Take shadow, and make sure that multiply is selected under shadows. And then next we will want to change the base colors here a little bit. So let's go ahead and change this to a gray color. So let's go ahead and select a sort of dark gray color here. Like so, and then we'll want a medium grey hair, so just a little bit lighter, like so. And then the last one we'll want a sort of light grey color, like so. Cool, now once we've done that we're wanting to change the base color, so let's go back to the luminance menu Menu and click on the color here. And double click and then we can choose a color using these options. So I'm just going to click on this and the first color I want to choose is, let's go ahead and create a sort of nice red, orange, color for our headphones here. So, select once you're happy with the color here, you can select that. Go back to luminance, scroll down. And then you want to change the mix mode here to multiply and you'll see that the color is now applied to our material sphere here, excellent. Now, from there all you need to do, now, is exit that window. And we can just drag and drop this material onto the objects that we want to color in. So we drag and drop it into here. And we can drag and drop it into these objects here, and we can also use the list view here to color our objects in, so let's do that and do that as well. So you can see, once I drag that material here, it's actually because there's two objects in here, it would've colored in the earpiece and the earpad. So, in order to change this, let's go ahead and drag that material Into the actual ball here, so it doesn't affect the cylinder, which is our earpads. Cool, now let's duplicate this material by holding Ctrl on the keyboard, click and dragging it out like so. And now we've got two of these materials and we can just sort of create a new material and choose a new color. So let's go ahead and double click on this material here. And simply go to luminance, double click on the color here. And let's go ahead and select sort of dark gray color for our ear pads. And just drag it like so. Excellent, and we can sort of repeat these steps until we've colored in the whole headphones. Now, to get a better idea of how the shading will look when we actually render this image, we can actually use the instructive render region. Now to do this, we'll need to click and hold on this render button here. And, let's go ahead and select render region and we can go and click and drag the region that we want to render in. You can see straight away that it gives you a sort of preview of how the headphones will look, cool. Now let's go ahead and find Interactive Render Region down here. And now you can sort of adjust the window, like so. And we can also continue working on it and it will constantly sort of, every time you stop it will render out our image. Now let's go ahead and use this sort of increase the resolution by using this little, tiny arrow here. So you can move it up to increase the resolution, like so. Or you can move it down again to decrease the resolution. You can see it's all pixellated now. But it'll also increase the performance if you find that the performance is slowing down because of this. Excellent, so let's go ahead and increase the resolution. And I'm going to right-click on this corner here and go to alpha mode, so that we've got our background again, and it's not just on a black background. And now we can also change the light source. So you can see that it's got all of our shading information here, we might want to change the light source. So in order to do this we'll want to go to options, go to default light, and you can see that we've got this sort of default light window here, represented by a sphere. And by clicking on this sphere, it actually changes the direction of where the light is coming from, Like so. So the next thing that we want to do is color in individual parts of our model. So for example, here, if you wanted to color in the points of our plug. If you see if we can try to color in the plug here, automatically it will color in the whole plug. But, in order to just color in the point here or the connector, let's go ahead and remove interactive render region. We want to try and select this part of the plug here. So let's select the plug, make sure that polygons is all selected and that we've got our live selection tool here. We'll want to go ahead and select the plug by going to select loop selection, holding shift on the keyboard and selecting both parts here so that it's highlighted yellow. And then use a new material to click and drag onto the highlighted part. And now you'll see once we've taken away the highlights, the highlighted part has been colored in with grey. And the base part of the model is the dark grey here. We can also do the same with other parts of our model so if we go to the cylinder. So if you wanted to color inside here. Let's go ahead and do the same thing, so Go to polygons, make sure that the live selection tool is selected. We can select all of the polygons in here. Click and drag a material onto our selection. And you'll see straightaway, it's colored in. So let's do the same with the other side. So select the cylinder, select all of the polygons that we want to color in, click and drag it into the selection, and it's being colored in, great. So the next thing I want to do is, I want to add a sort of cushion to our headband here. Now, if we try to select our headband, and if we want to try and add some geometry to it It becomes quite difficult because straight away by going to our polygon's tool. It sort of reverts back to its original shape. Now, in order to stop it from doing that we'll have to select headbands, go to mesh conversion and select current state object. And this will duplicates our headbands. So, let's go ahead and hide the original headband. And now, select the duplicates headband object, once we've selected it, you can see now that once we select polygons. It retains its bent shape. So from here what I want to do is to select some of the polygons underneath here. So let's go ahead and make sure that I'm selecting the right ones, so let's go ahead and hold shift, and let's count these out, 1, 2, 3, 4, 5, 6, 7, 8, 9, 1011, 12, 13, 14, 15. And the same on this side. So just moving along here, 1, 2, 3, 4, 5, 6, 7, 8, 9, 10, 11, 12, 13, 14, 15, just to make sure that we've got an equal amount of polygons selected on each side. Cool, from there I'm going to right click, I'm going to extrude Inner just slightly, so that we've got that little bit. So it's smaller than the original headband shape. And then I'm going to right-click that selection and click Extrude, so that it comes out slightly. And then from there I'm going to use the Scale tool and scale it in a little bit, excellent. Now, keeping this selection here, I'm going to use the live selection tool, and I'm going to select all of the polygons that I want to color in. So, all of the faces here. Like so. And then just going to rotate the other side and select all the polygons behind the headphones as well. Then once that's selected, I'm just going to select a new material and drag it onto the selection to color it in, excellent. And now from here, we can use our interactive render region to see what that looks like, excellent. And then we've also missed the cable here so let's go ahead and color that into. Cool, so that's it for this lesson. In the next lesson, we'll go through how to render your final model and how to use a basic camera. See you all there.


