
 Lessons: 14Length: 1.5 hours
- Overview
- Transcript
3.3 How to Use the Bevel Tool
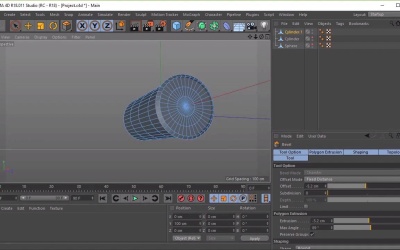
In this lesson you will learn how to use the bevel tool on a simple cylinder object. Again, we will combine what we create with what we’ve previously done.
1.Introduction
1.1Welcome to the Course00:41
2.Cinema 4D Overview
2.1Cinema 4D Setup04:30
2.2Introduction to Basic Shapes10:05
2.3Introduction to Deformers11:08
3.Modelling Fundamentals
3.1How to Edit Basic Shapes11:03
3.2How to Use the Extrude Tool07:53
3.3How to Use the Bevel Tool04:59
3.4How to Use the Boolean Tool06:04
3.5How to Duplicate Objects03:51
3.6How to Use the Bend Deformer05:53
3.7How to Use the Spline Tool07:39
4.Lighting and Rendering
4.1How to Create Materials13:26
4.2How to Render Your Final Model03:45
5.Conclusion
5.1Thanks for Watching!00:52
3.3 How to Use the Bevel Tool
Hi, everyone, and welcome back to Up and Running with Cinema 4D. In this lesson, you'll learn how to use the Bevel Tool. And we'll be demonstrating this on a simple cylinder object. So in the last lesson, we took a look at the extrude tool. And the way we accessed that was by right-clicking on our mouse with the polygon tool selected here. We right-clicked and then we selected Extrude. And we extruded out this section of the headphones here. And we extruded inwards this section of our headphones here as well. Cool, so now that we're familiar with the extrude tool, let's take a quick look at some of the other tools we have available in this menu. All right, so let's go ahead and hide these objects for now. So I'm going to click on this button here until it's red to hide these buttons. And let's spawn a new cylinder object. Cool, now I'm just going to want it to rotate this by 90 degrees. Excellent, and let's make some quick adjustments here. Just gonna give it a few segments. And let's give it a few more segments here and a couple of caps. And then once we're happy with that, let's go ahead and make it editable. Excellent, now let's use the live selection tool. And we're going to select the top of the cylinder. So let's go ahead and use the polygons. And let's go ahead and select all the polygons here in our cylinder, as this is the section that we'll want to manipulate. And now let's go ahead and right-click on the mouse. And we looked at Extrude, now we're gonna look at Bevel. So let's go ahead and click on the bevel tool here. And you'll see that the mouse has changed to indicate that we've got the bevel tool selected. Cool, now by clicking and dragging the mouse onto the viewport, you'll see how this affects our model. So you can see that it affects the model this way and this way. So usually, we want to bevel something. So if we want to bevel the edge here, that's how we do it. It's quite interesting that we can do it this way as well. We can have quite interesting forms here as well. So that's how we use the bevel tool. And now from there, we can also combine this and use the extrude tool. So we can also go ahead and use the extrude tool and extrude this outwards. And now you can start to see how we can use each of these tools to create the shapes that we want for our model. So that's just a quick example of how to use bevel tool. Remember, just right-click and then click on Bevel. And then just simply drag the mouse like so. Unfortunately, I deselected some polygons here. We've got something there that's gone wrong. So let's go ahead and select all the polygons that we want, Extrude this out again, and then use the Bevel tool. And now you should see that that works correctly. Cool, so let's see how we can apply the bevel tool to our headphones model. So I'm just going to delete this object here and bring back our headphones. And you can see, if we go ahead and select the cylinder, I'm just going to go ahead and highlight all of the polygons here. So the way that we can do this is by going to Select, Loop Selection, and then select all the polygons there like so. And now I'm going to right-click, using the mouse button, and click on Bevel. And now we can use the bevel tool here to actually bevel out our headphones model like so. Excellent, so that's it for this lesson. In the next lesson, we'll learn how to use the boolean tool. See you all there.


