
 Lessons: 14Length: 1.5 hours
- Overview
- Transcript
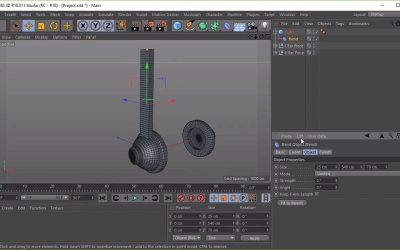
3.6 How to Use the Bend Deformer
In this lesson you will learn how to use the “bend deformer” on basic shapes. We will then use the bent shape as the headband of the headphones model and combine it with the previous objects we created.
1.Introduction
1.1Welcome to the Course00:41
2.Cinema 4D Overview
2.1Cinema 4D Setup04:30
2.2Introduction to Basic Shapes10:05
2.3Introduction to Deformers11:08
3.Modelling Fundamentals
3.1How to Edit Basic Shapes11:03
3.2How to Use the Extrude Tool07:53
3.3How to Use the Bevel Tool04:59
3.4How to Use the Boolean Tool06:04
3.5How to Duplicate Objects03:51
3.6How to Use the Bend Deformer05:53
3.7How to Use the Spline Tool07:39
4.Lighting and Rendering
4.1How to Create Materials13:26
4.2How to Render Your Final Model03:45
5.Conclusion
5.1Thanks for Watching!00:52
3.6 How to Use the Bend Deformer
Hi everyone, and welcome back to Up and Running with Cinema 4D. In this lesson, you'll learn how to use the Bend Deformer to create the headband part of the headphone model, and combine it with these earpieces that we've created. So let's start by creating a simple cube by clicking on the cube object here, and we'll want to use the adjustments window to create the right shape and size for the headband. So we'll want to make it thinner and taller, so let's go ahead and adjust the sizes here. So just adjusting it to about, let's say, 35 on the X axis. And I want to make it taller, so let's make it approximately 540 for now. And I'll also want to make it thinner this way as well. So let's go ahead and adjust it to about, let's say, 70 looks about right, so let's keep it at 70. Cool, and now we'll want to place it in the right position by using the Move tool. So I'm just gonna bring it up a little bit, zoom out with my mouse wheel. And just looking around the object to see if it looks correct, and I think I want to make it a little bit thinner. So let's go ahead and make it even thinner, again. In fact, that's the wrong one. So in the X, I'm gonna make it about, let's say 25. Cool, I'll just move it slightly more that way. Excellent, and now let's go ahead and give it some segments to work with. Because remember, when we used the bend deformer previously without segments, it doesn't bend correctly. So let's give it about 30 segments. In fact, that's the one, give it 30 segments in the Y, or if you wanna give it a little more to make it smoother, let's say, let's give it 50. Cool, now, once we have the shape that we want, we can start bending it. So let's go ahead and click on the Bend Deformer here. And we want to add the bend deformer to the cube objects that we've created. And then remember, we want to increase the cage so that it fills up the whole object that we've got here. So in order to do that, we can click Fit to Parent and it automatically goes to fit the whole object here, instead of having to mess about with the sizes here. Cool, so let's bend this at about 180 degrees strength. So go ahead and bend it there, like so. So 180, to make it symmetrical. And then let's bring the queue up, Excellent. And this will now give us the shape of our headband. From here, if we wanted, we can also add some more geometry to the cube. So if we wanted to make it smoother, we can do that by adding more geometry. And we can also click to make it editable here, so let's go ahead and do that, so we're gonna make it editable. And from there, what I'll want to do Is I want to add or stretch out these bottom parts of the headphones here. So let's go ahead and select the polygon tool here, and we'll just stretch these out a bit. So go ahead and stretch these out like so. That's the bottom, and we'll do the same at the top. Let's go ahead and stretch that out a little bit. And you can see when I've clicked on the cube here, it automatically goes back to its previous shape. But you can still see the bend deformer cage here, so you'll see how it's affected, like so. So let's go ahead and go back to object mode. And as soon as you've clicked back to object mode, you can see that it's applied the bend deformer back to our object. So I'm just gonna stretch this part out a little bit more. So let's go back to the polygon tool. Stretch that out a little bit more. Go back to object, excellent. And now all we need to do from here Is just adjust the earpieces so that they align with our headphones. It might be easier to do this in the frontview here, let's go ahead and do that, so move the right earpiece like so. And then I'm just going to select both of them by pressing the Control button on the keyboard, and then moving them up like that, excellent. Now click the middle mouse button, select the perspective view again, and just move around the object to see if If you're happy. Great, so now that we've learned how to create our headband by using the bend deformer, in the next lesson, we'll learn to how to use the spline to create our headphones cable. See you all there.


