
 Lessons: 14Length: 1.5 hours
- Overview
- Transcript
4.2 How to Render Your Final Model
In this final lesson, you will learn which render settings to use to create the desired look for the final image.
1.Introduction
1.1Welcome to the Course00:41
2.Cinema 4D Overview
2.1Cinema 4D Setup04:30
2.2Introduction to Basic Shapes10:05
2.3Introduction to Deformers11:08
3.Modelling Fundamentals
3.1How to Edit Basic Shapes11:03
3.2How to Use the Extrude Tool07:53
3.3How to Use the Bevel Tool04:59
3.4How to Use the Boolean Tool06:04
3.5How to Duplicate Objects03:51
3.6How to Use the Bend Deformer05:53
3.7How to Use the Spline Tool07:39
4.Lighting and Rendering
4.1How to Create Materials13:26
4.2How to Render Your Final Model03:45
5.Conclusion
5.1Thanks for Watching!00:52
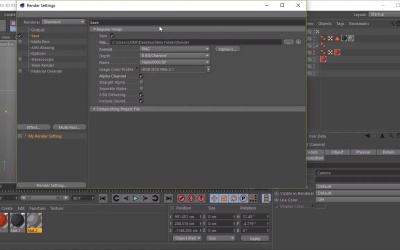
4.2 How to Render Your Final Model
Hi everyone, and welcome back to up and running with Cinema 4D. In this lesson, you'll learn what render settings to use to create the desired look for your final image and also some camera basics. So first of all, we'll navigate a round of view port to find an angle that we like for our model here. So something like this. And then once you've found an angle, click on the camera button here and you'll see that the camera will appear in our list of objects. Cool, so once we've got our camera here, it will use the same view as what we're seeing in the view port. And we can go into our camera by clicking on this square icon here. Once it's white, it means that we're inside the camera. We can freely move around using the Alt key on the keyboard and the mouse buttons, sort of change where we're looking through our camera. Then to go out of our camera, simply click on the square icon again. And then we can use the mouse button to zoom out. And then we can sort of move about and navigate freely around the free view port again. And you can also see that the camera is here as well. Cool. Now to move back into our camera view, just simply click on this square icon until it's white. So basically if it's white, it means you're inside the camera, and if it's gray, that means you're outside the camera. Excellent. So let's hop back into the camera again, making sure that we've got the correct angle. And then once you're happy, we'll move into the render settings. So let's go ahead and click on the render settings button here. So the first thing we need to do is familiarize ourselves with all these options. So let's go ahead and look at the save options we have. So over here, we've got our file destination, which we can change by clicking on this button here. You'll want to change the format to png and make sure that the alpha channel is selected. This is so that we can keep the background transparent or see-through. So if we take it into programs like Photoshop. It will retain the alpha channel, cool. The next thing we want to do is look at the Output. And in the Output Settings, we can choose the resolution here. So we can choose the width and height in pixels. And from there, we can also go over to Anti-Aliasing, which is here. And this is to ensure that the final render is nice and sharp. So to do this, let's go ahead and go to Filter. And we want to make sure that we've selected Cubic (Still Image). Cool. To create the final image, all we need to do now is close this window, and then click on the Render to Picture Viewer button, which is at the top here. Excellent, so just click on that and you'll see that we have rendered out our image. You'll be able to find this image in the save destination that you selected in render settings. Excellent. So that's it for this lesson in the next lesson we'll go through the conclusion of the course. See you all there.


